


3
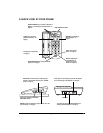
slots with the wall plate studs and slide
the phone downward to secure it.
4. Press and lift up the handset holder,
rotate it 180°, then snap it back so it holds
the handset.
To mount the phone directly on a wall, in addi-
tion to the preceding steps, you need two
screws (not supplied) with heads that fit into
the keyhole slots on the bottom of the base.
Drill two holes 3
15
/
16
inches (100 mm) apart.
Then thread a screw into each hole, letting the
heads extend about
5
/
16
inches (8mm) from
the wall.
Substitute the long modular cord for the short
cord mentioned in step 2.
Connecting the Handset
Plug one end of the coiled cord into the modu-
lar jack on the handset. Then connect it to the
jack on the left side of the telephone base.
Note:
Your local RadioShack store sells a va-
riety of longer coiled handset cords, which are
especially useful when you mount the phone
on a wall.
Connecting an AC Adapter
Your telephone operates from telephone line
power. In some areas, however, the tele-
phone might not provide enough power to op-
erate all of your telephone’s features. If the
volume of the speaker is too low, even with
the volume control set to its highest level, or if
the speaker does not work, you need to con-
nect the supplied AC adapter.
Cautions:
You must use a Class 2 power
source that supplies 9V DC and
delivers at least 200 mA. Its
center tip must be set to positive and its
plug must fit the telephone's
DC 9V
jack.
The supplied adapter meets these speci-
fications. Using an adapter that does not
meet these specifications could damage
the telephone or the adapter.
• Always connect the AC adapter to the
telephone before you connect it to AC
power. When you finish, disconnect the
adapter from AC power before you dis-
connect it from the telephone.
Plug the barrel plug of the supplied adapter
into the
DC 9V
jack at the back of the tele-
phone. Plug the other end into a nearby AC
outlet.
Setting the Ringer
If you do not want to hear the phone ring, set
RINGER
to
OFF
. You can still make calls with
the ringer off, and you can answer calls if you
hear another phone on the same phone line
ring. The bar-shaped ring indicator flashes
when the phone rings, even when the ringer is
off. If you want to hear the phone ring, set
RINGER
to
HI
or
LO
.
Setting the Dialing Mode
Set
T/P
(TONE/PULSE) for the type of service
you have. If you are not sure which type you
have, do this simple test.
1. Set
T/P
to
T.
Lift the handset and listen for
a dial tone.
2. Press any number except
0
. If your phone
requires that you dial an access code (9,
for example) before you dial an outside
number, do not press the access code
number either.
If the dial tone stops
, you have touch-
tone service. Leave the setting to
T
.
If the dial tone continues
, you have pulse
service. Set
T/P
to
P
.
!