


Page 9For technical questions, please call 1-800-444-3353.Item 68851
Note: The Battery Pack’s capacity will increase
somewhat during the first few charging cycles.
A fully discharged Battery Pack will take about 1 hour
to fully charge. Recharging the Battery Pack for
more than 1 hour can damage the battery cells.
7. While charging, the Battery Pack, Charger, and
Power Supply may become warm to the touch.
This is normal, and does not indicate a problem.
8. The red LED will light continuously when the
Battery Pack is charged. Unplug the Charger and
disconnect it from the Battery Pack when finished.
9. Allow the Battery Pack to cool
completely before using it.
10. Press the Battery Button to release
Battery Pack from the Charger.
Work Piece and Work Area Set Up
1. Designate a work area that is clean and well-lit.
The work area must not allow access by children
or pets to prevent distraction and injury.
2. Secure loose work pieces using a vise or clamps
(not included) to prevent movement while working.
3. There must not be objects, such as utility lines,
nearby that will present a hazard while working.
General Operating Instructions
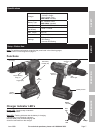
1. Insert the fully charged Battery Pack (11) into the
base of the Tool, making sure that it clicks into place
securely. Be sure the Battery Pack is securely seated
into the Drill Handle so it does not fall off during use.
2. Slide the Direction Switch (which should initially
be centered in the “lock” position) to the right for
forward drilling/fastening, or to the left for reversing
the operation. Use the “reverse” setting only to
remove screws or to release jammed drill bit.
NOTICE: Do not change direction of rotation
while Chuck is rotating. Wait until Chuck has come
to a complete stop before changing direction.
3. If using the Drill to insert or remove screws,
position the tip in the item to insert or remove.
4. If drilling a hole, hold the Drill above the area to drill.
5. For precision depth drilling, loosen (turn
counterclockwise) the Driver Clamp (21)
on the Secondary Handle (23) and move
the Depth Gauge (23) to the desired
position. Retighten the Driver Clamp.
6. Press the Trigger to start the drill. The Work
Light will also activate once the Switch is
pressed and turn off once Switch is released.
7. When inserting or removing a screw or bolt, use
slight pressure at first to keep the bit in the head
of the screw or bolt and cause the screw or bolt
to thread into or unthread from the material.
8. When drilling a hole, let the Drill do the work,
using only enough pressure to follow the
drill as it cuts the hole in the material.
9. When drilling a hard, smooth surface, use
a center punch (not included) to mark the
desired hole. This will prevent the drill bit
from slipping as the hole is started.
Wood Drilling
a. For best performance, use high speed
drill bits for wood drilling and turn the
torque setting to the drill icon.
b. Start wood drilling at very low speed
to keep the bit from slipping. Increase
speed as drill bit bites into wood.
c. When drilling through holes, place a block
or wood behind the workpiece to prevent
ragged edges on the back side of the hole.
Metal Drilling
a. For best performance, use high speed
drill bits for metal or steel drilling and turn
the torque setting to the drill icon.
b. Start metal drilling at very low speed to keep the bit
from slipping. Maintain the speed and pressure,
allowing for cutting without overheating the bit.
c. When drilling large holes in metal surfaces, use a
small drill bit at first. Then finish with a larger drill
bit. Be sure to lubricate the bit with oil to improve
the drilling action and help increase bit life.
Masonry Drilling
a. Use carbide or specialty bits for
masonry/concrete drilling.
b. Rock and masonry are generally drilled
in the hammer drilling mode.
c. When drilling in walls, start with regular drilling and,
once tile is pierced, continue with hammer mode.
NOTE: In deep bore holes, occasionally pull
the drill bit out to remove dust and chips.
10. When finished using the Drill, release the
Trigger and center the Direction Switch to lock
the trigger mechanism as a safety measure.
11. Remove the Battery Pack.
12. Clean then store the Drill indoors
and out of children’s reach.
SAFETYOPERATIONMAINTENANCE SETUP