


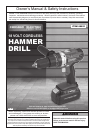


Page 8 For technical questions, please call 1-800-444-3353. Item 68851
Operating Instructions
Read the ENTIRE IMPORTANT SAFETY INFORMATION section at the beginning of this
manual including all text under subheadings therein before set up or use of this product.
Tool Set Up
TO PREVENT SERIOUS INJURY FROM ACCIDENTAL OPERATION: Release the
Trigger and remove the Battery Pack before adjusting tool or installing bits.
• Do not install the Battery Pack until
AFTER you complete the following
steps to set up the Saw for use.
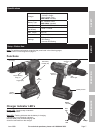
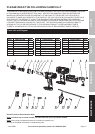
1. The Tool is designed to accept up to 1/2 IN. drill
bits. Do not use larger drill bits in this Drill as
damage to the gears and/or motor may result.
Always use a drill bit that is designed for the
specific drilling job. Keep selected drill bits
tucked in the Tool’s Bit Groove during use.
2. To “lock” the trigger mechanism, press down the
Direction Switch so that it is in the “center” position.
This will prevent the drill turning on accidentally.
3. While holding the ring behind the collar of the
Chuck (2) with one hand, rotate the collar of the
counterclockwise, if needed, and place the desired
drill bit into the drill between the Chuck’s jaws.
4. Hand tighten the Chuck until the bit is held securely
in place, centered between the Chuck Jaws.
5. Attach the Secondary Handle (20) to the Tool by
sliding the metal loop over the front of the Drill
and securing it behind the Torque Setting Ring.
Turn the Secondary Handle counterclockwise
until it holds firmly. The Secondary Handle
allows for greater control of tool during use.
6. Slide the Speed Selector (16) at the top of the Tool
forward and back to adjust from the lower speed
(0-400 RPM) to the higher speed (0-1200 RPM).
7. Set the desired torque setting by rotating the
Torque Setting Ring (4) to the desired setting.
a. The numbered torque settings from 1 to 23
are for driving screws, bolts and nuts.
b. Use the drill setting (marked by
the drill icon) for drilling.
• It is recommended that a very low torque
setting be used when first driving small screws
into soft materials. Then adjust the setting
as the proper force required is determined.
• The torque setting required depends on the
item being driven. In the case of screws,
consider the size, length, and type of material.
• If a pilot hole has been drilled into the material,
a lower torque setting will be required.
c. In addition to single or double-ended screwdriver
bits, adapters with hexagonal shafts with
matching socket heads can also be used.
• Fix the torque setting low enough
to allow a safety margin.
d. To switch Tool to Hammer Setting, turn
Torque Setting Ring to the Hammer icon.
e. Only use this setting to bore or drill into an object.
The Hammer setting works well when drilling/
chipping into materials. It is generally used to bore
holes with the purpose of breaking up materials.
f. The tip of Tool MUST be firmly depressed
for the hammer action to engage.
Note: Only use a masonry bit when
drilling into masonry materials.
Charging
1. Place the Battery Pack on a dry fireproof surface in
a room where the temperature is from 50–104° F.
Note: If recharging a newly spent Battery Pack,
allow it to cool completely before charging.
2. Examine the Battery Pack. It must be
undamaged, and a NiCd type Battery Pack.
Do not charge a cracked, open, or
leaking Battery Pack, or charge a
non-recommended type of Battery Pack.
3. The Battery Pack’s terminals are designed to fit
this Charger specifically. If the Battery Pack does
to not fit the Charger properly, do not try to insert it.
Do not force a Battery Pack into the Charger.
4. Plug the Power Supply into a grounded,
120V~, 60Hz receptacle.
5. Connect the Power Supply to the Charger.
The green power LED will light, showing
that power is supplied to the Charger.
6. Slide the Battery Pack into the charger until the
button on the Battery Pack clicks into place.
The Red LED will flash to show the Battery is
charging and the Green LED will continue to stay lit.
SAFETY OPERATION MAINTENANCESETUP