


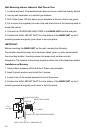

Wall Mounting without a Modular Wall Phone Plate
1. Locate a wall stud. lf the selected area does not have a wall stud directly behind
it, use dry wall expanders or a similar type fastener.
2. Drill 2 6mm holes 100 mm apart, as per template at the end of this user guide.
3. Fix a screw (not supplied) into each hole and leave 5mm of the head exposed to
mount the phone.
4. Connect the TELEPHONE LINE CORD to the BASE UNIT and the wall jack.
5. Position the WALL MOUNT SLOTS on the bottom of the BASE UNIT on the 2
mounting screws and gently push down to lock into place.
IMPORTANT:
Before mounting the BASE UNIT on the wall, consider the following:
The location should be away from electrical cables, pipes, or other items behind
the mounting location. Inserting screws into areas such as these can be
dangerous. The location of the phone should be within 2m of the telephone socket.
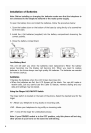
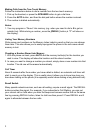
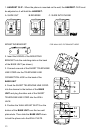
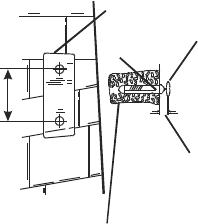
Installation on Masonry
1. Using a 6mm masonry drill bit drill the 2 holes using template.
2. lnsert 2 plastic anchors and install the 2 screws.
3. Leave 5 mm of the screws exposed to mount the phone.
4. Position the WALL MOUNT SLOTS on the bottom of the BASE UNIT on the 2
mounting screws and gently push down to lock into place.
MOUNTING AREA
ANCHOR
MOUNTING SCREW
LEAVE / " (5 MM) SCREW EXPOSED
3
16
DRILL HOLE WITH / " MASONRY BIT
1
4
3 / "
(100 MM)
15
16
3
16
/ " (5 MM)
16
16