


5 of 10
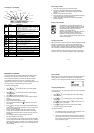
LCD Display on the Handset
Icon Name Description
Battery
• Animated when charging.
•
When the battery indicator displays 4 blocks, the
battery is fully charged.
• When the battery indicator displays no block, the
battery is almost empty, and requires charging.
Signal Indicator Steadily – signal linkage between handset and base is
established.
Blinking – no signal linkage with any base.
Off Hook Display during off hook.
Calling External User is calling outside.
Calling Internal User is making an intercom call
Conference User is talking with one external and another internal
user.
External Call Blinking – there is a call from outside.
Steady – Line is engaged.
Intercom Blinking – there is an intercom call.
– when being paged.
Steady – Line is engaged.
New CID New callers number Caller ID (CID) received.
Right Scroll
The number displayed contains more than 16 digits and
the first 16 digits are displayed.
Left Scroll The number displayed contains more than 16 digits and
the rightmost digits are displayed.
Mute Handset microphone is muted during off hook.
Ringer Off The handset ringer is turned off.
Answer Machine The answering machine is on.
Left Scroll
Battery
Phone On
Digits Display
Right Scroll
Si
g
nal Indicator
Mute
New CID
External /
Internal /
Conference
Rin
g
er Off
Answering
Machine On
6 of 10
Basic Steps to Install
1. Plugs the mains adapter to the wall mains supply.
2. Insert the 2 rechargeable Ni-MH AAA batteries (included),
observing their polarity, into the battery compartment on the
handset.
3. Slide the battery door firmly into place.
4. Place the handset on the charger and let the batteries charge for
a full 24 hours before using for the first time.
5. Register the handset to the base unit (Refer to Registration
Section for details).
Battery Level Indication
The Battery icon is always displayed when the
handset is on. When charging, the battery icon will
be scrolling to indicate that the batteries are being
charged. When fully charged, four bars are
displayed. The scrolling will stop.
When an empty battery icon is displayed, place the
handset on the base cradle to recharge the
batteries. If low battery level happens during off-
hook, a series of short beeps will be heard from the
speaker of the handset.
Charging the Handset
When the handset is placed on the base cradle to charge the handset
batteries, a charging tone, if set to ON, will be emitted from the
handset’s speaker. (Refer to Alert Tone Section). During charging,
the charge LED on the base unit will be steadily lit. The battery icon
will be scrolling to indicate that the batteries are being charged.
Get into the habit of putting the handset on the base unit to charge
when it is not in use to ensure the handset is always fully charged
7 of 10
Registration of handset
This handset is designed to operate with the Oricom M120 and the
M140 base units. You can then answer calls from any handset,
Intercom between handsets and transfer calls between handsets.
Each additional handset you want to use on the base must be
registered with the base unit in order to operate. Additional base units
can be purchased to extend the coverage of your system.
To register handset to base:
•
Press
. Use to scroll through the menu until the display
reads SYSTEM.
• Press
. Use to scroll through the menu until the display
reads REGISTER.
• Press
. The display will read BS 1 2 3 4.
•
Enter the number of the base unit you wish to register using the
keypad.
•
The handset will read PIN?
• Enter the PIN number (default is 0000).
•
Press and hold the PAGE button
on the base unit until you
hear 2 beeps.
• Press
on the handset. The handset will read SEARCH BS X
while it searches for the base unit (where ‘X’ is the number of the
base you are registering to).
•
Once a connection has been made, the handset name and
number (the next available number if the number of handsets
already registered with the base is less than 5) will be shown on
the display.
•
If the handset registration failed, the display will show
NOT REG. Repeat process above.
As the Oricom M145 is GAP (Generic Access profile) compatible
you can register with another manufacturer’s base unit. To do this,
follow that manufacturer’s instructions. If the handset is registered
with another manufacturer’s base unit, some of the features may
not be available.
8 of 10
During Standby
When the phone is not in standby mode the LCD displays the phone
Handset name, the handset no, the battery icon and the Signal
indicator. You can change the handset name if you wish, see below.
Changing Handset Name
If you choose to you may change the handset name that is displayed
in standby mode.
•
Press
. Use to scroll through the menu until the display
reads DISPLAY.
• Press
. Use to scroll through the menu until the display
reads LABEL.
•
Press
. Use the numeric keys and to enter the name for
the handset (max 10 characters).
• Press
to confirm the name entered and exit to LABEL.
• Press and hold
will exit to standby.
Important information
• For detailed operation of the handset after registration, refer
to your M120 or M140 instruction manual.
• Some of the symbols on this handset refer to the answering
system feature on the M140. If you will use this handset on
the M120 base these symbols can be ignored. As the M120
has no answering system.