4 5
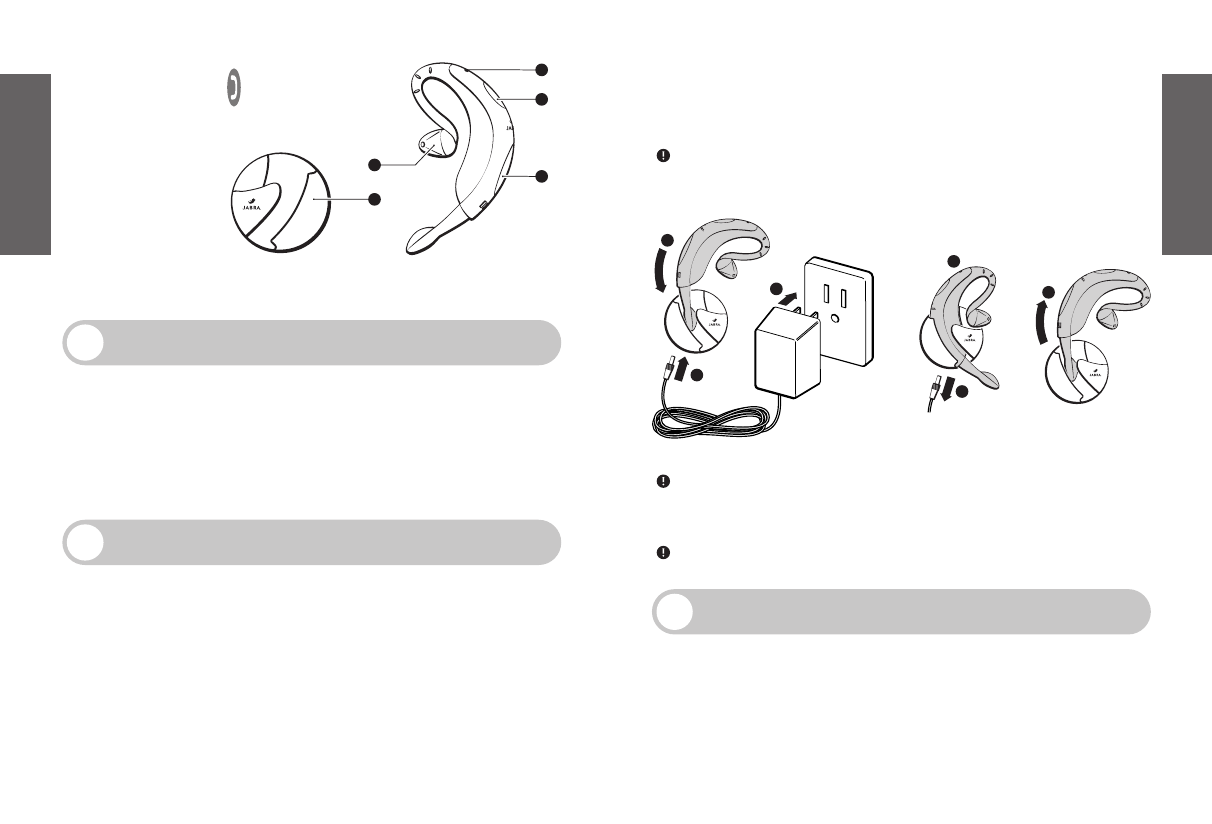
1 Blue Indicator Light
2 Multi-Function Button
3 Volume Control Button
4 Charging Cradle
5 MiniGel
™
4
5
3
2
1
4
5. Unplug the AC adapter from the charging cradle.
6. Remove the headset from the charging cradle.You are now ready to “pair”JABRA
FreeSpeak 250 to your mobile phone.If the headset has already been paired to your
phone,then you can begin using it.
WARNING: Do not attempt to charge JABRA FreeSpeak 250 with anything other
than the AC adapter provided.Using another AC adapter may damage or destroy
the headset.
IMPORTANT:The blue indicator light will be on while charging and will turn off when
charging is complete. Removing the headset from the charging cradle while it’s
charging will put the headset into standby mode and stop the charging sequence.
IMPORTANT:JABRA FreeSpeak 250 cannot be used while charging.
Check phone compatibility
1
STOP: BEFORE USING YOUR HEADSET
The JABRA FreeSpeak 250 is compatible with most Bluetooth
1
(see Glossary)phones that
are compliant with Bluetooth version 1.1 or higher specification and support the headset
and/or hands-free profile(s)
2
. Ensure that your phone has Bluetooth capability by either
visiting your phone manufacturer’s web site or JABRA’s web site at www.jabra.com
JABRA also provides FreeSpeak versions for most non-Bluetooth phones.
Charge JABRA FreeSpeak 250
2
JABRA FreeSpeak 250 uses a rechargeable battery that must be charged fully before
you use the headset for the first time.
1. Fully insert the headset into the charging cradle.
2. Plug the JABRA FreeSpeak 250 AC adapter into the headset’s charging cradle.
3. Plug the AC adapter into the electrical outlet.
4. Charge your headset until the blue light on JABRA FreeSpeak 250 turns off.The unit
will be fully charged in approximately 2 hours.
Read the glossary
3
Read the glossary at the end of this document to familiarize yourself with important
terms used in this User Manual.
Once JABRA FreeSpeak 250 is fully charged,continue with these instructions.
1
2
3
4
5
6
Fig. 1
English
English


