


8
CAUTION: To reduce the risk of fire or personal injury, use only the ATLINKS,
Inc. Nickel-Cadmium battery model 5-2548 that is compatible with this unit.
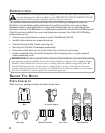
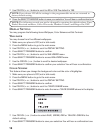
2. Locate the battery compartment on the back of the handset.
3. Plug the battery pack cord into the jack inside the compartment.
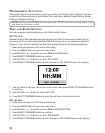
NOTE: It is important to maintain the polarity (black and red wires) to the jack inside
the compartment. To ensure proper battery installation, the connector is keyed and can
be inserted only one way.
RED WIRE
BLACK WIRE
BATTERY
PRESS DOWN
FIRMLY
4. Insert the battery pack.
5. Close the battery compartment by pushing the door up until it snaps into place.
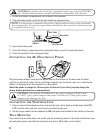
6. Place the handset in the charging cradle.
CONNECTING THE AC (ELECTRICAL) POWER
Plug the power adaptor cord into the power jack on the bottom of the base and the other
end into an electrical outlet. The in use/charge indicator (on the base) turns on to indicate the
battery is charging when the handset is on the cradle.
Allow the phone to charge for 16 hours prior to first use. If you don’t properly charge the
phone, battery performance is compromised.
CAUTION: Use only the ATLINKS USA, Inc. power adaptor 5-2616 (black)
or 5-2617 (gray) power adaptor that came with this unit. Using other power
adaptors may damage the unit.
CONNECTING THE TELEPHONE LINE
1. Plug one end of the telephone line cord into the jack on the bottom of the base called TEL
LINE and the other end into your home’s modular phone jack.
2. Set the ringer switch (on the handset) to ON, and place the handset in the cradle on the base.
WALL MOUNTING
If you want to mount the phone on a wall, slip the mounting holes (on the back of the base) over
the wall plate posts, and slide the unit down into place. (Wall plate not included.)