


17
Receiving and Storing CID Records
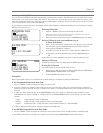
This unit receives and displays information transmitted by your local phone company. This information can include the phone number,
date and time; or the name, phone number, date and time. The unit can store up to 99 calls for later review. When the memory is full,
a new call automatically replaces the oldest call in memory.
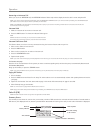
NEW appears in the display for calls received that have not been reviewed.
The line number for the call received is also displayed.
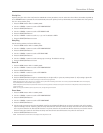
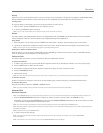
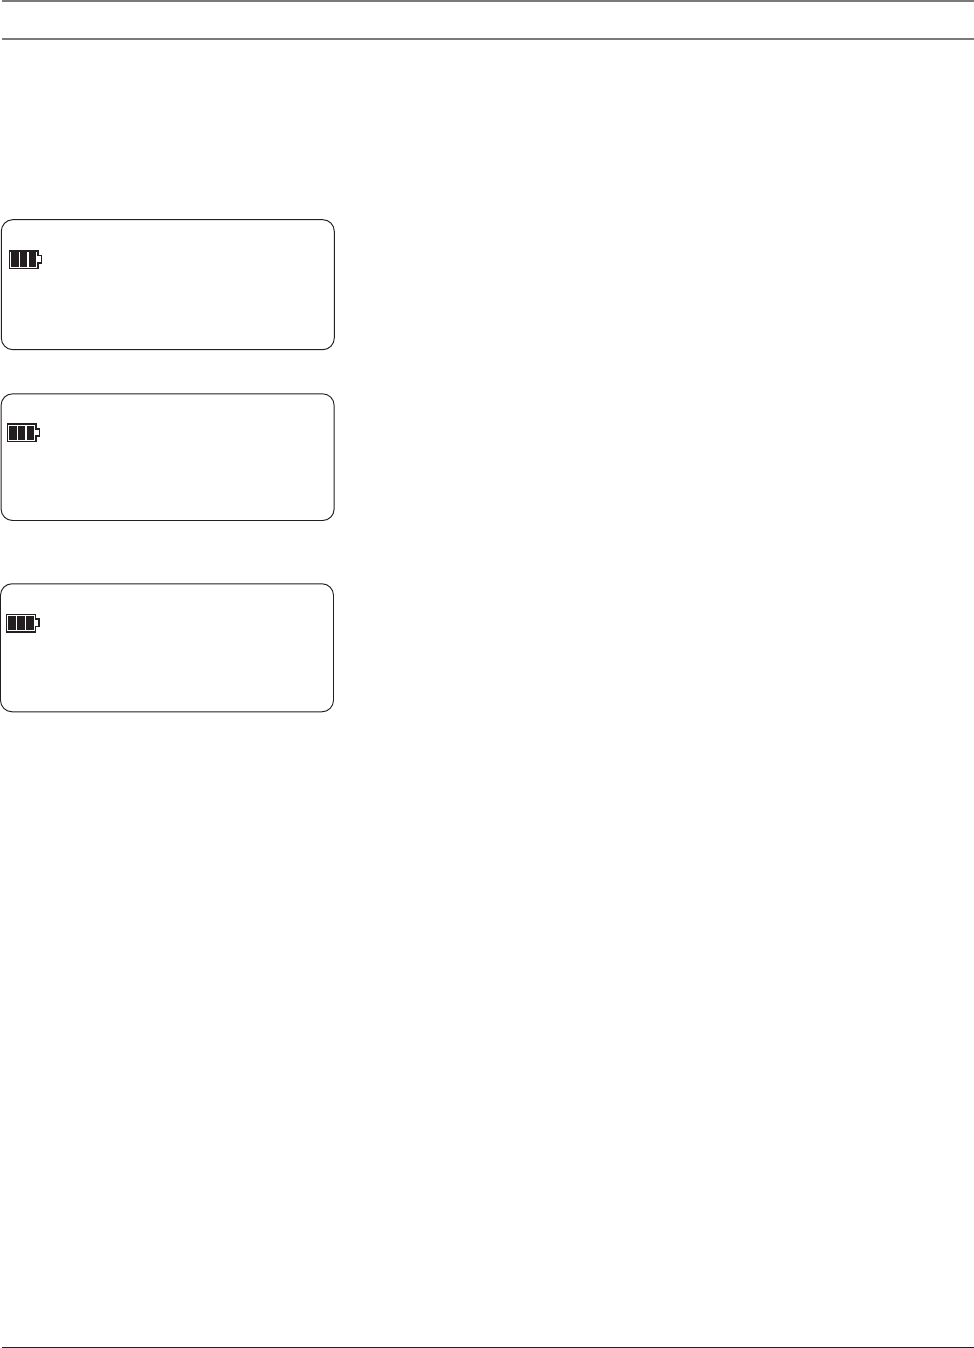
In case multiple incoming calls come in at the same time, the CID information is displayed according to the unit’s priority line setting.
Example: the priority line is 3.
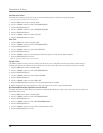
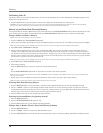
Reviewing CID Records
• Press the < REVIEW > button to scroll through the call records.
NOTE: If you press the > button, the oldest record shows in the display. If you press the <
button, the most recent record shows in the display.
• When you scroll to the start/end of the list, START/END appears in the display.
Saving a CID Record to the Intercom/Memory Log or
to Phone Book Memory
1. While a name and telephone number shows in the display, if you need to edit
the information, press the SELECT/SAVE button and follow the steps for
Storing a Name and Number in Memory.
2. If you do not need to edit the name or number, press the STORE button.
3. To store data in the Phone Book Directory, press the DIRECTORY button,
OR
To store data in the Intercom/Memory Log, press a memory log button (1-16).
Deleting a CID Record
To delete the record shown in the display, press the DELETE button once.
Deleting All Call Records
This feature allows you to clear all CID records at once.
1. While viewing a CID record, press and hold the DELETE button.
PRESS DELETE
AGAIN CLEAR ALL CALLER ID shows in the display.
2. Press the DELETE button again to confirm.
Dialing Back
When reviewing CID records, you can dial back the numbers showing on the display by pressing the DIAL button.
If You Programmed Your Local Area Code
1. Use the < REVIEW > button to display the number you want to dial.
2. If you see a number with 7 digits (i.e.555-1234), then the call was received from within your area code. However, this does not
guarantee the call is a local call. If you see a number with 11 digits (i.e.1-234-555-1234), then the call received was not from your
area code.
3. To adjust the phone number format, use the REDIAL/FORMAT button. For instance, a 7-digit local number sometimes cannot
be dialed because it requires a 10-digit or 11-digit format. Use the REDIAL/FORMAT button to scroll through 7, 10 and 11-digit
numbers.
7-digits: 7-digit telephone number (i.e.555-5555)
10-digits: 3-digit area code +7-digit telephone number (i.e.425-555-5555)
11-digits: long distance code 1 +3-digit area code +7-digit telephone number (i.e. 1-425-555-5555)
4. To dial the displayed number, pick up the phone handset or press DIAL again.
If You Did Not Program Your Local Area Code
1. Use the < REVIEW > button to display the number you want to dial. You will only see 10-digit numbers (i.e.234-555-1234).
2. Press DIAL to dial back. You may adjust the number format by pressing the REDIAL/FORMAT button before dialing.
Caller ID
L2
12:34 PM 12/25
1-317-123-4567
JOHN SMITH
INCOMING CALL
L4:
L2: 1-317-123-4567
L1:
L3: 555-1234
L1
12:34 PM 12/25
1-317-123-4567
JOHN SMITH
CID REVIEW NEW
L1