


27
G
26
G
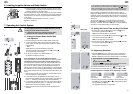
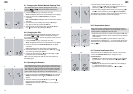
Setting the watering days:
(a) every 2
nd
or 3
rd
day (from current day)
(b) select any day (daily watering possible)
7. (a) Every 2nd or 3rd day:
Set the arrow L to 2
nd
or 3
rd
using the ▲-▼ keys (e.g. 2
nd
L
= every 2nd day) and confirm by pressing the OK key.
The watering days (e.g.
2
nd
■
) and preview for the week
(e.g.
Sa■,Mo■,We■,Fr■)
are displayed.
The days in the preview for the week depend on the current
day of the week (e.g. Sa).
– or –
(b) Any day of the week:
Set the arrow L to the correct day (e.g.Mo L) using the
▲-▼ keys and activate (e.g. Mo■L) or deactivate the day
using the OK key.
Once you have activated all the days you require (e.g. Mo■,
Tu ■,We■), press the ▼ key repeatedly until the arrow L
next to Su disappears and appears in front of channel V 1.
The preview for the week (e.g.
Mo■,Tu■,We■
) for the water-
ing days is displayed.
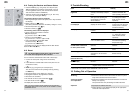
Assigning the Programme to the Channels:
The programme only controls only the assigned channels.
8. Set the arrow V to the channel you require using the ▲-▼ keys
(e.g. V 3 = channel 3) and activate (e.g. V■ 3) or deactivate
the channel by pressing the OK key.
Once you have activated all the channels you require (e.g. ■ 3
and ■ 8), Press the Menu + key.
The display then changes to point 2 and the current programme
data are displayed.
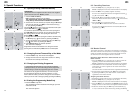
The receivers must be registered and the levers of the Irrigation
Valves must be set to the “AUTO” position in order to run the
set programmes.
4. Repeat steps 2 and 3 until all receivers are registered.
5. Press the Menu– key.
The main level is displayed.
6. Test the radio range (refer to section 7.4
Testing the Radio
Range
).
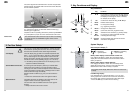
7.4 Testing the Radio Range
1. Install the radio receivers/radio switches as required
(do not bury the valve boxes yet).
2. Test the Central Radio Control Unit in that room in which
you plan to install the bracket for the control unit.
3. Open and close the channels manually to check they work
correctly (refer to 8.1
Opening and Closing Channels Manually
).
4. Once you have established radio contact, bury the valve boxes
and permanently install the holder for the Central Radio Control
Unit.
7.5 Setting the Control Programme
Prerequisite: You must have set the current time and current
day. The receivers must not be registered. All programmes are
saved when receivers are cancelled.
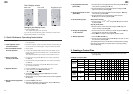
Selecting the Programme Memory Location (PROG):
The Control Unit can store 32 programmes.
1. If the main level is displayed, press the Menu+ key twice.
Programme Memory Location
11
flashes.
2. Select the programme memory location using the ▲-▼ keys
(for example, memory location
1188
) and confirm by pressing
the OK key.
START-TIME
and the hours flash on the display.
Setting the Programme Start Time (START- TIME):
3. Set the hours for the programme start time using the
▲-▼ keys (e.g.
1166
hours) and confirm by pressing the OK key.
START- TIME
and the minutes flash on the display.
4. Set the minutes for the programme start time using the
▲-▼ keys (e.g.
2200
minutes) and confirm by pressing the
OK key.
RUN-TIME
and the hours flash on the display.
Setting the Programme Run Time (RUN-TIME):
5. Set the hours for the programme run time using the ▲-▼ keys
(e.g.
22
hours) and confirm by pressing the OK key.
RUN-TIME
and the minutes flash on the display.
6. Set the minutes for the programme start time using the
▲-▼ keys (e.g.
4455
minutes) and confirm by pressing the
OK key.
CHANNEL a
nd the arrow
L
flash in the top left-hand corner
of the display next to
3
rd
.
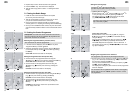
1. 2.
3. 4.
5. 6.
7.(a)
7. (b)
8.