


Wall Mounting Instructions
The following steps enable installation on a new or existing telephone wall-
mounting plate or directly onto a wall. (Your Cobra
Intenna
is designed to be used
with any AT&T, GTE, local phone company or other wall-mounting plates that
can be purchased from most local electronics stores.)
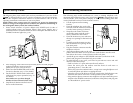
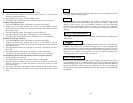
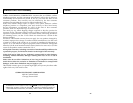
¥ Use the separate wall mounting
bracket.
¥ Place the telephone line cord so the
last inch (near the modular connector)
is in the center opening (as shown).
¥ Wrap the cord counter clockwise
around the center until the cord is
totally contained in the bracket.
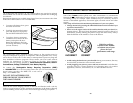
¥ Place the bracketÕs top two tabs into
the top two openings in the base back
panel.
¥ Carefully snap the bottom two tabs
into the bottom two openings in the
base back panel.
¥ Plug the modular connector into the
telephone wall jack.
¥ Align the mounting studs on the wall
plate to the holes in the cord wrap bracket. Push the base onto the studs
and slide it down into a locked position on the wall plate.
¥ Attach the power adapter to the POWER connection (on the base of the
phone) and plug into a household AC power outlet.
¥ To install directly on any wall, youÕll need to provide two screws and wall
anchors; follow these steps:
ÑDrill two holes 3
1
Ú4Ó apart and insert the wall anchors.
ÑDrive the screws into the anchors until the head of each screw is
protruding about
1
Ú8Ó from the wall.
ÑFollow the procedure outlined above, except leave enough telphone cord
to reach the phone jack before wrapping the cord.
ÑAlign the screws to the holes in the cord warp bracket. Push the base onto
the studs and slide it down into a locked position on the wall plate.
ÑPlug modular phone connector into telephone wall jack; attach the power
adapter to the POWER connection (on the base of the phone) and plug into
to a household AC power outlet.
8
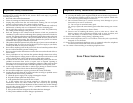
Quick Set-Up Guide
The following basic steps enable quick and easy installation of your new Cobra
Intenna
®
Cordless Phone for use on a desk or countertop. You are encouraged to
review this complete instruction manual to become familiar with all of the
operating instructions and features of your new phone.
NOTE: Before using, connect your new system to AC power (see instructions
below) to charge it overnight (at least 12 hours) for optimum conditioning of
the rechargeable battery inside the cordless handset.
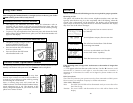
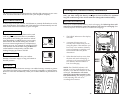
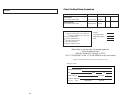
1. Insert round connector of power adapter into POWER jack (at side of
cordless phoneÕs base; see diagram below). Plug power adapter into a
standard 120 VAC household electrical outlet. Then place handset in base so
CHARGE indicator lights (see p. 18).
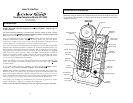
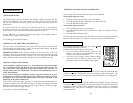
2. After charging, remove the twist-tie from the phone cord and plug the
modular telephone connector into the
phone jack on your wall (see above).
3. Make sure that the RINGER switch is ON
(located on handset; see p. 17 for details).
4. Set the PULSE/TONE switch (at the side
of the base) for proper operation (see p. 17
for details).
Note: Make sure you have charged
handset in base 12 hours before using.
5. Snap the desk bracket into the base as
shown in the illustration
7