


5
Nothing comes close to a Cobra
®
Installation and Connection
4
English
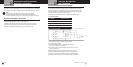
Included in this Package
Your Mobile Radio Your Mobile Radio
Included in this Package
•
You should find all of the following items in the package with your radio.
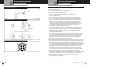
Installation and Connection
•
Refer to the illustration on page A3 for connection points on the back of the
unit while installing your radio.
--
Location
Plan the location of the transceiver and microphone brackets before starting the installation.
Select a location that is convenient for operation and does not interfere with the driver or
passengers in the vehicle. In automobiles, the transceiver is usually mounted below the
dash panel, with the microphone bracket beside it.
--
Mounting
Your mobile radio is supplied with a universal mounting bracket. When mounting the bracket
and radio to your car, make sure it is mechanically strong. Also provide a good electrical
connection to the chassis of the vehicle. Proceed as follows to mount the transceiver:
--
Mount the Transceiver
1. After you have determined the most convenient location in your vehicle, hold the mobile
radio with the mounting bracket in the exact location desired. If nothing will interfere
with mounting it in the desired position, remove the thumbscrews and use the
mounting bracket as a template to mark the holes for the mounting screws. Before
drilling the holes, make sure nothing behind the surface will be damaged or interfere
with the installation.
2. Connect the antenna cable plug to the standard receptacle (ANT) on the rear panel.
Most antennas are terminated with a type PL-259 plug and mate with the receptacle.
3. Connect the red DC power input wire (with the fuse) to +13.8 V DC. This wire extends
from the rear panel. Connect directly to positive terminal (red) of vehicle's battery.
4. Connect the black lead to -13.8 V DC. This is usually the chassis of the car. Any
convenient location with good electrical contact (remove paint) may be used.
5. Mount the microphone bracket on either side of the transceiver, using the two screws
supplied. When mounting in an automobile, place the bracket under the dash so the
microphone is readily accessible.
6. Attach the microphone cable to the connector on the face of the transceiver.
NOTE
If power cables need to be shorter, we recommend attaching a 10 amp
fuse to positive cable (red) at least six inches from vehicle’s battery.
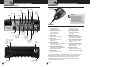
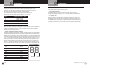
Transceiver Universal Mounting Bracket
Operating Instructions
Microphone
Microphone Bracket
A2
English
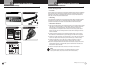
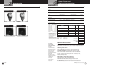
Controls and Indicators
Introduction
Controls and Indicators
•
Frequency
Selector
Dim
(center knob)
SWR CAL
(outer ring)
Analog
Meter
Antenna
Warning
Indicator
Band
A / B / C / D
PA / AM / FM
RF Power
Hi / Low
S/RF / SWR / CAL
RX / TX
Indicator
+10 kHz
/ Off
NB/ANL
/ ANL /
Off
Dual 7
Segment
Frequency
Display
Antenna
Connector
External
Speaker
Connector
Public Address (PA)
Speaker Connector
Microphone
Connector
Microphone Gain
(center knob)
RF Gain
(outer ring)
Power Cord
Connector
Frequency
Counter Connector
Off / On / Volume
(center knob)
Squelch
(outer ring)
Echo
(center knob)
Talk Back
(outer ring)