


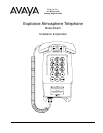


Avaya Inc.
Installation and Operation
Model EA401
Page 6
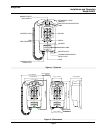
Installing the EA401
• Declassify the hazardous location before proceeding with any
installation or electrical wiring.
Caution: Installation or
electrical wiring in a
hazardous location
could result in serious
injury to personnel or
damage to property.
• Follow all appropriate electrical codes and use only approved electrical
fittings for the installation.
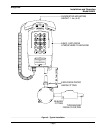
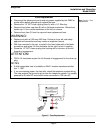
• Choose a wall location that is free of obstructions and permits space for ½”
NPT conduit runs
See: Figure 3 - Typical
Installation.
• Ensure mounting can support 16.5lbs. (7.5kg), plus the weight of any
peripheral equipment.
• Ensure that none of the electrical connection circuits are live.
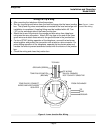
• Use the template provided to locate and drill holes for mounting screws.
Use ¼” bolts or screws to mount the unit.
See: Figure 2 -
Dimensions.
• Secure the unit to the wall:
Tip: Use ¼” bolts or
screws to secure the unit
to the wall.
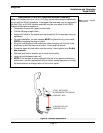
• Attach lower conduit nipples to the telephone and ensure a minimum five
thread engagement.
• Mount an approved explosion proof junction box within 45.7 cm (18") of the
telephone’s lower sealing cavity and bring telephone wires into this box.
Tip: Fittings compatible
with 1/2 inch NPT
nipples, conduit, or 1/2
inch explosion-proof
flexible couplings not
exceeding 45.7 mm (18
inches) may be fitted
directly.