


3
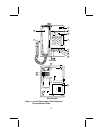
The TOP VIEW includes the following:
1) LINE jack (on top/rear side of telephone)
This jack, located on the rear of the set, is used to connect the
telephone and the modular wall jack. Use the 7-foot cord that comes
with the set.
2) DATA jack (on top/rear of telephone)
This jack, located on the rear of the set, is used for connecting a
device such as a modem to your telephone.
3) Ringer indicator/Message light
This indicator flashes when the telephone rings with an incoming call.
The light also flashes when you have a message.
4) ON HOOK DIAL button
While the handset is on-hook, you can use this button to hear the
progress of a call as it is being dialed. However, in order to speak to
the other person, you must speak through the handset.
5) FLASH button
This button is used with PBX systems to activate special PBX facilities
such as Hold or Transfer which may be available in your PBX.
6) Dial pad
The standard dial pad can be used for normal dialing. You can also
store and then dial a telephone number or extension programmed on
any of the ten numeric dial pad keys (0 and 1 through 9; you cannot
store numbers on the * or # keys).
7) REDIAL button
With this feature, you can redial the last number dialed from the dial
pad. Merely, lift the handset, and when you hear dial tone, press the
REDIAL button. The last number that you dialed is redialed
automatically. This number can be up to 32 digits.
8) PAUSE button
With this feature, you can insert a 3.6-second pause into the dialing
sequence. A pause in a dialing sequence may be needed if your
telephone is connected to certain types of PBX or to any network
where a pause is required. For example, you may need a pause
between an outside line access number (usually, “9”) and the
telephone number.