


128-7032A
10 of 28
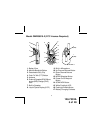
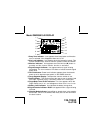
Controls:
LED Flashlight Button (16)
Press this button on the right side of the Transceiver to light the white LED
(15) on top of the unit, thereby activating the built-in flashlight function.
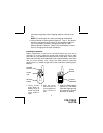
Power On/Off/Keylock (13) Button
To turn unit on, press the power on/off button ( ) momentarily (less
than 1 second). A confirming melody will play to indicate the unit has
turned on. A momentary pressof the ON/OFF button again will turn the
unit off. When the unit is on and the button is pressed for more than 1
second, the keylock icon ( ) will appear to confirm the functions
MODE, SCAN and channel up/down buttons have been disabled.
Adjusting the Volume (10, 11)
With the unit powered on, press the Up Channel/Volume button (
) to
increase volume and the Down Channel/Volume button (
) to decrease
volume. The display will indicate the current volume level between 1 and 7
by the small number in the icon ( U
L
5
).
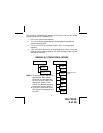
Monitor/Display Backlight Button (2)
This button is used to check activity on the current frequency before
transmitting. Check activity by pressing the Monitor (M) Button longer
than 2 seconds; the
icon will apppear on the display and you will
hear static if frequency is clear.
Do not transmit if you hear conversation.
Hold down the Monitor Button again longer than 2 seconds and the
icon will disapppear from the display.
The monitor function will temporarily bypass the squelch setting and play
all signals on a given channel. This feature is useful when communicating
with other parties at extreme range.
By pressing the monitor button momentarily, the LCD backlight is turned
on accompanied by a beep tone (if enabled); the LCD backlight will turn off
automatically in about 5 seconds, or when the monitor button is pressed
momentarily once again.
10