


BATTERIES
About the Handset Batteries
You will know the batteries need
charging when:
• The phone beeps two times when
you press to answer or
make a call.
• The MUTE/LOW BATT indicator
on the handset flashes.
• The phone does not respond when
you press and the PHONE
indicator does not go on.
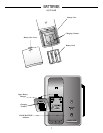
Charging the Handset Batteries
Place the handset in the base so the
IN USE/CHARGE indicator goes on.
The batteries will be fully charged in
6 hours. Once the batteries are fully
charged, you need only put the
handset in the base when the
MUTE/LOW BATT indicator flashes.
If it is more convenient for you to do
so, you can leave the handset in the
base all the time. It is impossible to
overcharge the batteries.
If the batteries don’t charge
properly:
If you get a low-battery signal even
after 6 hours of charging, the
battery should be replaced.
CAUTION: To reduce the
risk of fire or injury to
persons or damage to the telephone,
read and follow these instructions
carefully.
• Use only Replacement Battery
3470.
• Do not dispose of the battery
in a fire. The cell might explode.
Check with local codes for special
disposal instructions.
• Do not open or mutilate the
battery. Released electrolyte is
corrosive and may cause damage
to the eyes or skin. It may be toxic
if swallowed.
• Exercise care in handling batteries
in order not to short the battery
with conducting materials such
as rings, bracelets, and keys. The
battery or conductor may overheat
and cause harm.
• Charge the battery provided with
or identified for use with this
product only in accordance with
the instructions and limitations
specified in this manual.
• Observe proper polarity orientation
between the battery and battery
charger.
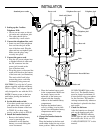
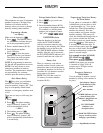
Replacing the Battery Pack
1 Remove the battery compartment
cover on the handset by pressing
on the indentation and sliding the
cover downward.
2 Lift out the old battery pack.
3 Place the new battery pack in the
compartment. Make sure the
metal contacts on the underside
of the battery are aligned with the
charging contacts in the battery
compartment.
4 Replace the cover by sliding it
on its track up over the battery
compartment until it snaps firmly
in place.
5 The new batteries must be charged
before using your telephone. Place
the handset in the base unit and
allow it to charge for 6 hours. The
telephone may operate before that
but, for best performance, let the
batteries charge fully.
Power Reserve
The Cordless Telephone 9110 has the
ability to provide back-up power to
the telephone base in the event of a
power failure. For this feature to
work, it is necessary to have a fully
charged spare battery (PURCHASED
SEPARATELY) installed in the base
unit Spare Battery Charger (located
under the directory card on the tele-
phone base unit). If a power failure
or interruption occurs, the Cordless
Telephone 9110 will automatically
switch into the Power Reserve mode.
When operating in the Power
Reserve mode, the phone’s features
and functions should operate normal-
ly until the spare battery charge has
been depleted. When power is
restored to the telephone base unit,
the phone will automatically switch
back to its normal operating mode.
IMPORTANT: The amount of time
the Cordless Telephone 9110 will
operate during a power failure will
vary depending on use and spare
battery charge level.
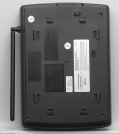
Spare Battery Charger
The Cordless Telephone 9110 is
equipped with a spare battery charger
built into the base unit. The spare
battery charger allows you to always
have a charged battery available,
should your handset battery
discharge during normal use.
To install the Spare Battery Pack
(PURCHASED SEPARATELY):
1 Open the base unit battery
compartment.
2 Place the spare battery pack in
the battery compartment. Make
sure the metal contacts on the
underside of the battery are
aligned with charging contacts
in the battery compartment.
3 Replace the battery compartment
cover.
4 When the battery is installed
properly, the SPARE BATTERY
indicator on the base unit will be
illuminated.
5 The spare battery will be fully
charged after 16 hours. Please
note that the SPARE BATTERY
indicator will always be illuminat-
ed when a spare battery is installed.
6