


EPSON Stylus Photo 825
6 - EPSON Stylus Photo 825 11/02
Printing Your Photos
You can select one or more photos for printing:
❏ If you select one photo, you can print one or more copies of
it on a page, depending on your selected layout. With the
copies option, you can print multiple pages of your selected
layout.
❏ If you select a set of photos, you can print them as a group
using a variety of layouts. If you’ve selected more photos
than can fit on a page, the printer automatically prints
additional pages as needed, using the selected layout.
Make sure the type of paper you want to use is loaded in the
printer, then follow these steps:
1. Select your Print Mode (
All, One, or Set), depending on
which photos you want to print.
2. Select the appropriate Paper Type and Paper Size settings.
See page 3 to choose the correct Paper Type setting.
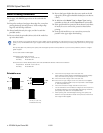
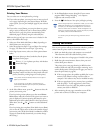
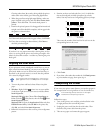
3. In the Page Layout menu, select one of the options shown
below.
Prints one photo per sheet, borderless; fits the photo
lengthwise on the paper.
Prints 1, 2, 3, or 4 photos per sheet, with borders
around the edges.
Prints 20 photos per sheet. If you select a set of photos,
the photo number and date are also printed with each
photo. (Good for printing larger-size index prints.)
Your photos are automatically sized to fit the type of
paper you’ve loaded.
If you’re printing on roll paper, the page layout is
automatically selected (you can print only borderless
photos on roll paper).
4. At the Select Photo menu, press the button to select the
picture you want to print.
If you’re printing various photos, press the round
Select
Photo
button when the number of the picture you want to
print is displayed. Continue pressing this button to print
additional copies of this photo (shown in the Copies menu).
When done, use the and buttons to select additional
photos.
If you’re printing just one photo (Print Mode is set to
One),
you can use the Copies menu to select the number of pages
you want to print. (If the Print Mode is on
Set, the number
of pages is automatically determined; you cannot change
this setting.)
5. In the PhotoEnhance menu, select
On (if your camera
supports PRINT Image Matching
™
or to improve
brightness and contrast) or
Off.
6. Press the
Print button. Your print job begins printing.
When using the printer in stand-alone mode, you can make
additional changes to your images before printing. For
example, you can adjust the brightness or use various
filters to make color corrections. These changes do not
affect your original photo files, just the way they’re printed.
For details, see the Printer Basics book.
To cancel a print job while printing, press the Cancel
button.
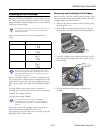
Testing the Printer
You can run a printer self-test to determine whether a problem
comes from the printer itself or some other source.
1. Make sure both the printer and computer are turned off.
Then disconnect the USB cable from the printer.
2. Make sure letter-size or larger paper is loaded in the printer.
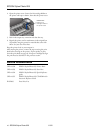
3. Hold down the b maintenance button, then press and
release the
Ppower button.
The printer prints a test page showing its ROM version
number, black and color ink percentages remaining, and a
nozzle check pattern. (If the pattern has gaps, you need to
clean the print head; see page 8.)
❏ If the test page prints, the problem probably lies in your
memory card, software settings, interface cable, or
computer. Your software may not be installed correctly.
❏ If the test page doesn’t print, you may have a problem
with the printer. Try the suggestions in the Printer
Basics book. If you can’t solve the problem yourself,
contact your dealer or EPSON.
4. After examining the test page, remember to turn off the
printer and reconnect its cable to your computer.