


SETTING HANDSET VOLUME
Set the Handset volume switch to High, Mid
or Low , depending on your preference.
The Volume switch is located on the left-hand
edge of the handset (with the keypad facing
towards you, and the antenna pointing up).
CHANGING CHANNELS
If you notice interference when using your
handset, press CHAN key to switch to a clear
channel. This function is only available when
you are on a call.
TEMPORARY TONE
If you have a rotary (dial-pulse) telephone
service, and your telephone is set to PULSE
11
BASIC OPERATIONS
MULTIPLE REDIALING
VT9112
contains a history of 4 previous
telephone numbers dialed from the phone.
To redial one of these telephone numbers:
1. Before pressing PHONE, press REDIAL/
PAUSE key, the last telephone number
dialed is retrieved.
2. Press REDIAL/PAUSE more times, the
second, third, and fourth redial telephone
numbers can be retrieved.
3. If REDIAL/PAUSE is pressed for 5 times,
the first redial number will be shown again.
4. Check if one of these numbers is
appropriate. Press PHONE to dial out this
telephone number. Or press OFF to quit
this function.
MEMORY (SPEED) DIAL
Up to 10 frequently dialed phone numbers
can be programmed into your
VT9112
Speed
Dial Memory. Each phone number can
contain a maximum of 20 digits.
Programming a Speed Dial Number
To program a phone number into memory,
the Handset must be OFF.
* Press PROG. The LCD will show
MEM_
to
prompt you to enter the number of memory
location.
* Press the number of the memory location
you wish to store the number (0 – 9).
* Dial the number you want to store. The
number may be up to 20 digits long. The
number can be entered manually or by
using REDIAL.
* Press MEM to save the phone number or
press OFF to discard the change and exit
the program.
Replacing a Speed Dial Number
If you want to replace a speed dial number,
simply follow the above steps. Your new
speed dial number will replace the previous
one in that memory location.
Clearing a Speed Dial Number
If you want to clear a speed dial number,
simply follow the above steps, but press
MEM without entering any number.
Storing A Pause In A Speed Dial Number
To insert a pause in a phone number, just
press REDIAL/PAUSE key between any two
digits you want to insert the pause. The LCD
will display the telephone number with digit
‘P’ between the digits. This indicates an
additional 2-second pause being added
between the digits when the line is connected
and the phone number is dialed.
For example:
If your phone is connected to a PBX, you can
store the PBX access number and PAUSE
before the phone number. For example, to
store
9-PAUSE-555-1234
in
memory location
8
, do the following:
1. Press PROG
2. Press 8 (memory location)
3. Press 9
4. Press REDIAL/PAUSE key
5. Enter 555-1234 (LCD now shows
“9P5551234”)
6. Press MEM
12
ADVANCED OPERATIONS
Your
VT9112
cordless telephone is equipped
with a 2.5mm Headset Jack for use with an
optional
accessory Headset for hands-free
operation.
If you choose to use the Headset option, you
must do the following:
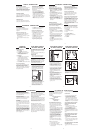
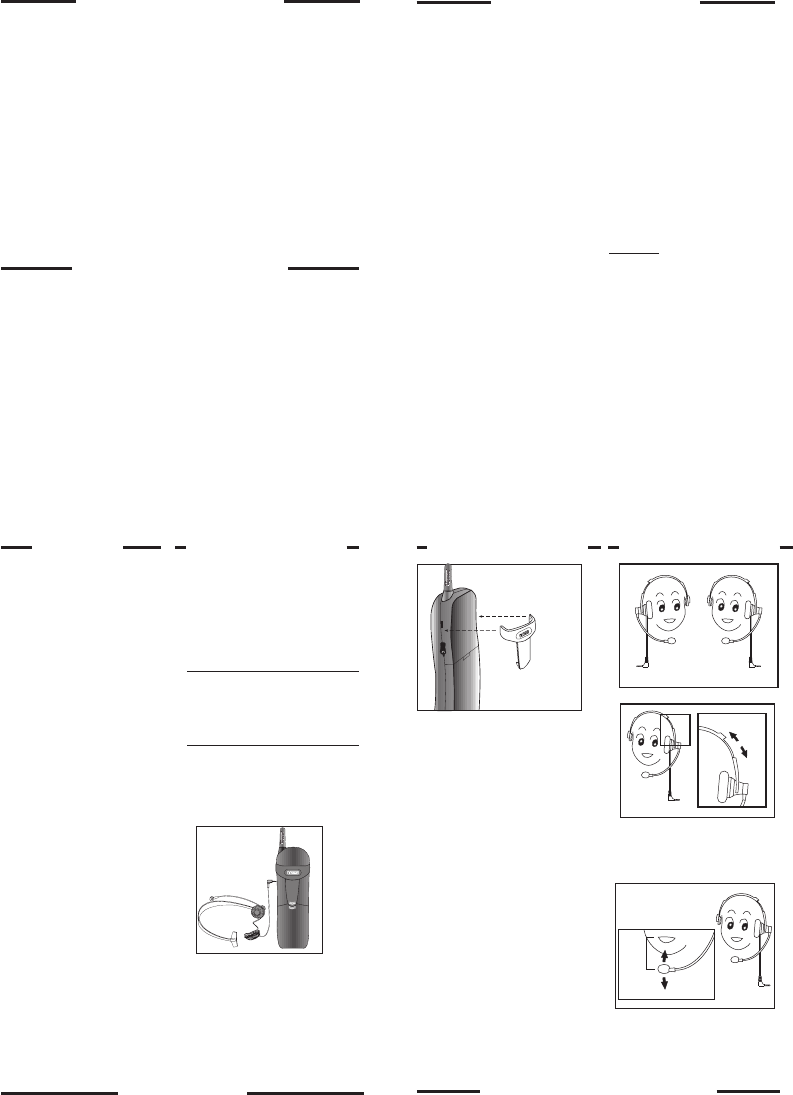
INSTALLATION
* Obtain an optional accessory Headset,
which is compatible
with the
VT9112.
Please contact VTECH Communications
Customer Service, in the U.S. toll-free at
1-800-595-9511,in the Canada call 1-800-
267-7377 for dealer information in your local
area. You can also purchase a compatible
Headset directly from VTECH
Communications Customer Service.
* Once you have a compatible 2.5mm
Headset, locate the Headset Jack on the
Handset of your
VT9112
. Connect the
plug on the Headset to the jack on the
cordless Handset. The plug should fit
securely. Do not force the connection.
See illustration.
* The
VT9112
is also equipped with a
detachable belt clip. Align the pins on the
inside edge of the belt clip with the
notches on the side of the
VT9112
handset. The belt clip should snap
securely into place. Do not force the
connection. See Illustration
OPERATION
* NOTE: Whenever a compatible
Headset is connected to the cordless
Handset, the microphone on the
Handset will be MUTED. This is done
to limit the effect of background noise.
* The following operational characteristics
apply to VTECH Headsets. the same
may also apply to other (non-VTECH)
compatible headsets, but VTECH
assumes no responsibility for their
performance.
* The VTECH brand compatible Headset
has a monaural design which is
reversible, so you can wear your
Headset on either the left or right ear,
leaving one ear free for room
conversation.
* The headband can be adjusted to fit the
contour of your head. Using both
hands, slide the headband up or down
so that it rests comfortably on your
head with the speaker cushion centered
against your ear.
14
15
* For maximum sound quality, the flexible
microphone should be positioned at the
corner of your mouth, about one inch from
your mouth.
Speed Number Dialing
*
For Live Dialing
1. Press PHONE to get a dial tone.
2. Press MEM and the memory location
number key (0-9) to dial the
corresponding speed dial number.
*
For Predialing
1. Press MEM and the memory location
number key (0-9) to retrieve the
corresponding speed dial number.
2. Check its correctness and append any
digit to it if necessary.
3. Press PHONE to dial the phone number.
ADVANCED
OPERATIONS
One-Touch Speed Dialing
If you are sure a memory location number
(0-9) contains the telephone number you
want to dial, just press and hold this
number key for 2 seconds. Your phone will
automatically connect the line and dial out
this telephone number.
13
MAINTENANCE
TAKING CARE OF YOUR TELEPHONE
.
Your
VTECH 9112
cordless telephone
contains sophisticated electronic parts so it
must be treated with care.
Avoid rough treatment
Place the handset down gently. Save the
original packing materials to protect your
telephone if you ever need to ship it.
Avoid Water
Your telephone can be damaged if it gets
wet. Do not use the handset outdoors in the
rain, or handle it with wet hands. Do not
install your base unit near a sink, bathtub or
shower.
Remember that electrical appliances can
cause serious injury if used when you are
wet or standing in water. If your base unit
should fall into water,
DO NOT RETRIEVE
IT UNTIL YOU UNPLUG THE POWER
CORD AND TELEPHONE LINE CORDS
FROM THE WALL
. Then pull the unit out
by the unplugged cords.
Electrical Storms
Electrical storms can sometimes cause power
surges harmful to electronic equipment.
For your own safety, use caution when using
electric appliances during storms.
Cleaning your telephone
Your telephone has a durable plastic casing that
should retain its luster for many years. Clean
it only with a soft cloth slightly dampened with
water or a mild soap. Do not use excess water
or cleaning solvents of any kind.
AUTOMATIC SECURITY CODING
Your
VT9112
phone is factory set with one of
1,048,576 possible security codes. This unique
security code allows your handset and base to
recognize each other, and minimizes the
possibility of another cordless phone using your
telephone line. The security code will be kept
even in case of power failure or handset battery
being disconnected.
OPTIONAL HEADSET INSTALLATION
AND OPERATING INSTRUCTIONS
OPTIONAL HEADSET INSTALLATION
AND OPERATING INSTRUCTIONS
OPTIONAL HEADSET INSTALLATION
AND OPERATING INSTRUCTIONS
16
IN CASE OF DIFFICULTY
If you have difficulty operating your phone, the
suggestions below should solve the problem.
If you still have difficulty after trying these
suggestions,
In the US call:
VTECH Communications at
1-800-595-9511.
In the Canada call:
VTECH Electronics at
1-800-267-7377.
THE PHONE DOESN’T WORK AT ALL.
* Make sure the power cord is plugged in.
* Make sure the telephone line cord is
plugged firmly into the base unit and the
telephone wall jack.
* Make sure the handset battery is installed.
If the base CHARGING LED flashes when
handset is put onto the base, then handset
battery may not be inserted well.
* Make sure the batteries are properly
charged. If the handset make two beeps,
or the BATTERY LEVEL INDICATOR
shows LOW BATTERY LEVEL, the
battery needs charging. If IN USE
indicator at base or PHONE indicator at
handset do not light when you press
PHONE button, you must charge the
batteries.
* If you recently installed a new battery
pack, make sure it is installed correctly.
Follow the procedure below:
1. Remove battery from handset.
2. Replace battery in handset.
3. Place the handset in the charge cradle.
Wait 60 seconds.
Pick up the handset and press PHONE.
NO DIAL TONE.
* First check all the suggestions above.
* If you still don’t hear a dial tone,
disconnect the base unit from the
telephone jack and connect a different
phone. If there is no dial tone on that
phone either, the problem is in your wiring
or local service. Call your local telephone
company.
YOU GET NOISE, STATIC, OR A WEAK
SIGNAL WHEN YOU’RE NEAR THE
BASE UNIT.
* Place the handset in the base
momentarily to reset the security code.
Then press PHONE to get a line.
Household appliances plugged into the
same circuit as the base unit can
sometimes cause interference. Try moving
the apppliance or the base unit to another
outlet.
YOU GET NOISE, STATIC, OR A WEAK
SIGNAL WHEN YOU’RE AWAY FROM
THE BASE UNIT.
* You may be out of range. Either move
close to the base, or relocate the base
unit.
* The layout of your home may be limiting
the range. Try moving the base unit to
the second or third floor.
THE HANDSET DOES NOT RING WHEN
YOU RECEIVE A CALL.
* Make sure your handset ringer is turned
on.
PUSH THE BELT CLIP
ONTO THE HANDSET
ONE
INCH
ON RIGHT EAR
ON LEFT EAR
mode, this feature allows you to enter
special codes and tones to operate
answering machines, use electronic
banking services, calling cards, or other
special services.
* First, dial the call normally.
* Then, activate the Temporary Tone
feature by pressing TONE (the * key).
You can then press the numbers or
symbols you need, and your phone will
send the signals by tone dialling.
* To end the call, press OFF or place the
handset back on the base. The phone
will automatically go back to PULSE
mode.
ADVANCED OPERATIONS
RINGER PROGRAMMING
You can select from 4 different Handset
ringer types. You can also program the
ringer OFF.
Programming The Ringer Type
(To program, the Handset must be OFF)
* Press PROG TWICE, the LCD will
indicate the current ringer type, e.g.
BELL
1
(for ringer type 1).
* Press a key 1,2,3 or 4 to select a ringer
type.
* Press MEM to save the new setting, or
press OFF to discard changes.
Turning Off The Handset Ringer
(To program, the Handset must be OFF)
* Press PROG TWICE, the LCD will
indicate the current ringer type.
* Press 0 to turn off the ringer
* Press MEM to save the new setting, or
press OFF to discard changes.
* To turn the ringer on again, see
Programming The Ringer Type
HANDSET JACK LOCATION
AND CONNECTION WITH PLUG.