


QUICK
REFERENCE
GUIDE
Read the Owner’s Manual for details.
CALLER ID CORDLESS TELEPHONE
SG-1801
UCZZ69738BZ RC009817 Printed in China
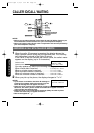
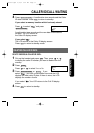
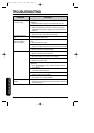
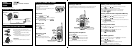
SETTING UP THE BASE UNIT
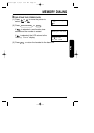
CHARGING THE BATTERY PACK
Black
Red
IN USE/
CHARGE
LED
Charging contacts
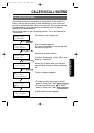
SETTING / USING THE PHONE
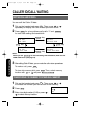
1
Press
FUNCTION
, then press
3
.
2
Press
SELECT/CHANNEL
and enter your 3-digit area
code.
3
Press
SELECT/CHANNEL
, then press
FUNCTION
.
1
Remove the battery cover by sliding it down.
2
Plug the battery pack cord into its socket, observing
the correct polarity.
3
Place the battery pack, then close the battery
compartment cover.
4
Place the handset on the base unit. You can place
the handset with the dialpad facing up or down.
IMPORTANT
Charge the battery pack for at least 12 to 16 hours.
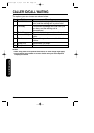
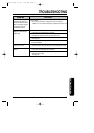
CALLER ID SERVICE
1
Press
CID
, then press or to display the number you want to dial.
2
Press
TALK
, then the displayed number will be dialed.
Deleting Caller ID Data
Storing Caller ID Data to Speed-Dial Memory
Call Waiting Options
1
Press
CID
, then press or to display the number you want to store into
Speed-dial memory.
2
Press
MEM
, then press , or enter a memory location number.
3
Press
SELECT/CHANNEL
. A confirmation beep sounds and the Caller ID data is
stored.
Press
CID
to return to standby mode.
1
Press
CID
, then press or to display the Caller ID number you want to
delete from the memory.
2
Press
DELETE
, then press or to select Yes or No.
3
Press
SELECT/CHANNEL
or
DELETE
.
4
Press
CID
to return to standby mode.
For more detailed instructions and examples, please refer to the owner’s manual.
Fasten the AC
adaptor cord.
Raise the antenna to
vertical position.
Telephone Line Cord
AC Adaptor
Single-Line
Telephone Jack
(RJ11C)
Power Outlet
(AC 120V, 60Hz)
1
When you receive a call waiting call, press
FUNCTION
for a list of options.
2
Press or to select an option.
3
Press
SELECT/CHANNEL
to confirm.
4
Press
TALK
or return the handset to the base to end the call.
See page 33 in the owner’s manual for more information.
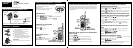
Note: For long distance calls, you need a prefix “1” and the area code.
Press
L.D./1
and
LOCAL/3
to add or cancel “1” and the area code
before you press
TALK
.
NOTE: Plug the AC adaptor firmly into the base unit and the AC 120V outlet.
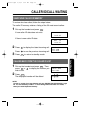
1
Dial the phone number.
2
Press
TALK
.
3
Press
TALK
to hang up.
Press
TALK
and speak.
NOTE: To indicate Caller ID data, let the
phone ring twice before you answer the call.
Set the TONE/PULSE switch to TONE.
Place a call.
If the call does not connect with the TONE setting, set the
TONE/PULSE switch to PULSE
Setting Up Caller ID Making a Call with Caller ID Data
To use Caller ID/Caller ID on Call Waiting features, you must subscribe to both Caller
ID/Caller ID on Call Waiting services provided by your local telephone company.
Setting The Tone/Pulse Switch
Area Code
Answering a Call
Making a Call
Selecting Caller ID Options
1
Press
FUNCTION
.
2
Press , , or
2
to move the pointer to CIDCW.
3
Press
SELECT/CHANNEL
to change the option setting.
4
Press
FUNCTION
and return the handset to the base.
See page 15 in the owner’s manual for more information.
DELETE
FUNCTION
SELECT
RDL/P
TONE
LOCAL
L.D.
CID
3
TALK
FUNCTION
TONE/
FLASH
SELECT/CHANNEL
TONE/PULSE switch
DELETE
FUNCTION
SELECT
RDL/P
TONE
LOCAL
L.D.
CID
SELECT/CHANNEL
,
CID
3
1
DELETE
FUNCTION
FLASH
TALK
MEM