


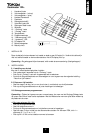
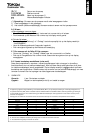


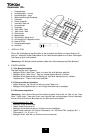
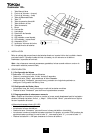
1. Handsfree key
2. Volume control – (low)
3. Volume control + (high)
4. Redial/Pause key
5. Flash key
6. Direct Memory Key M1
7. Voice Mail Key VM
8. Memory Recall key
9. Erase key
10. Up key
11. Down key
12. Call back key
13. Set key
14. “New call” LED indicator
15. “Speakerphone” LED indicator
16. Adaptor DC 9V
17. Ring volume switch
18. Battery compartment
1. INSTALLATION
Open the battery compartment underneath the unit and insert a 9V battery. Connect the line cord
to the telephone unit and to the telephone line wall socket. The LCD display lights up.
Remark : The memories remain saved, even without electricity supply (flash memory)!
2. SETTINGS
2.1 Language setting
The Deskmaster 122+ has 9 different display languages.
• Press and hold the Up key for 6 seconds.
• Press the Down key to select the desired language.
• Press the Set key to confirm and to proceed to the next setting : Date and Time settings.
2.2 Date and Time settings
• Enter the month, day, hour and minutes by means of the numerical keys.
• Press the Set key to confirm the correct settings.
2.3 Programming memory numbers
Note : While entering the number/name, the cursor can be moved to the left or to the right by
means of the Up/Down key. Use the Erase key to erase a digit/letter at the location of the cursor.
a) One touch memory (M1,VM)
• Press the Set key.
• Enter the telephone number.
• Press the Set key to confirm the telephone number.
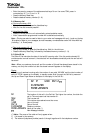
• Enter the name by means of the alphanumerical keys. For ex. the name TOM, press 1 x
numerical key ‘8’, 3 x ‘6’ and 1 x ‘6’.
• Press M1 or VM to store the telephone number.
b) Two touch memory (0…9)
• Press the Set key.
• Enter the telephone number.
• Press the Set key to confirm the telephone number.
9
Deskmaster 122+
15
9
10
11
12
13
18
4
3
2
1
14
8
7
6
5
16 17