


6
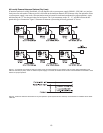
Installation
Unpacking
Each SS-1002 / SS-2002 / SS-2002RM is supplied with the following items. Contact the shipper or your Audiocom dealer
immediately if anything is damaged or missing. Be sure to fill out and return the product registration card to Telex to properly
register your intercom station.
For SS-1002 / SS-2002 units:
ytitnauQytitnauQ
ytitnauQ
ytitnauQytitnauQnoitpircseDnoitpircseD
noitpircseD
noitpircseDnoitpircseD
1noitatSmocretnI2002SSro2001SS
1dracnoitartsigerdnaytnarraW
1snoitcurtsnIresU
For SS-2002RM units:
ytitnauQytitnauQ
ytitnauQ
ytitnauQytitnauQnoitpircseDnoitpircseD
noitpircseD
noitpircseDnoitpircseD
1noitatSmocretnIMR2002SS
1dracnoitartsigerdnaytnarraW
1snoitcurtsnIresU
4)esupotksedrofMR2002SSfomottobotylppa(teefrebbuR
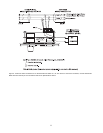
Configuration Pre-check
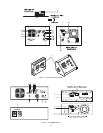
Before making connections, read the configuration notes that follow, and make sure that all internal controls are properly set
for your intended usage. If you need to access the internal controls, remove the four screws on the front that secure the
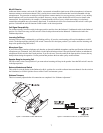
intercom station faceplate to the mounting box, then lift out the faceplate for all versions except the RM version. To access the
internal controls for the RM version, remove the 10 screws securing the cover on the box and then lift the cover.
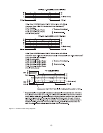
DIP Switches
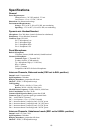
Table 1 lists the DIP switch descriptions and factory default settings.
hctiwShctiwS
hctiwS
hctiwShctiwS
rebmuN
noitpircseDnoitpircseD
noitpircseD
noitpircseDnoitpircseD
sgnitteSsgnitteS
sgnitteS
sgnitteSsgnitteS
nO=desolC,ffO=nepO
tluafeDtluafeD
tluafeD
tluafeDtluafeD
gnitteS
1eviecerllikciM
llikcimon-delbasiD:desolC
evitcallikcim-delbanE:nepO
nepO
2
langisllaC
dohtem
)LABNUottes1WS(CD:desolC
)LABottes1WS(mocoiduA:nepO
nepO
3
llacgnimocnI
peeb
delbasiD:desolC
delbanE:nepO
nepO
4
enohporciM
epyt
decnalabnU:desolC
decnalaB:nepO
nepO
5
peebrekaepS
llacgnimocnirof
tsum3hctiwsPID(delbanE:desolC
)nepOotteseb
delbasiD:nepO
nepO
6desutoNeract'noDnepO
7desutoNeract'noDnepO
8desutoNeract'noDnepO