


PROGRAMMING THE AUTO DIAL KEYS
Models L2S-10E, L2-10E, L2S-5E, and L2-5E include programmable auto dial keys.
The L2S-10E and L2-10E models each have ten (10) programmable auto dial keys, and
the L2S-5E and L2-5E models each have five (5) programmable auto dial keys. These keys
can be programmed to automatically dial telephone numbers or activate telephone system
features.
To program the auto dial keys, the telephone must be connected to a telephone line.
1) Lift the handset or press the
SPEAKERPHONE key (models L2S-5E and L2S-10E.)
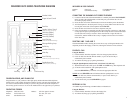
2) Press the recessed
STORE key and release (Please see phone diagram for key location).
3) Enter the telephone number, including pause (see below) as required. The sequence
can be up to 15 digits in length.
4) Press the auto dial key where the number is to be stored.
5) Hang up the handset or press the
SPEAKERPHONE (models L2S-5E, L2S-10E only)
key to disconnect.
PAUSE KEY
The PAUSE key can be used to provide a timed pause between dialed digits within an auto
dial key. The timing of the pause is programmable, with the factory default set to zero (0)
seconds. To change the pause timing:
1) Lift the handset or press the
SPEAKERPHONE key (models L2S-5E and L2S-10E.)
2) Press the
STORE key (see diagram on inside front cover for key location.)
3) Press the PAUSE key (see diagram for key location.)
4) Press 0 - 5 on the DTMF pad. The number selected will be the pause timing in seconds
(ie: pressing the ‘3’ key will insert a 3-second pause, etc.)
5) Press the
STORE key. The selected pause is now inserted into the dialing string.
FLASH KEY
The FLASH key, when programmed behind an auto dial key, provides a timed line
interrupt typically used for accessing PBX/CO features such as transfer or conference. The
timing of the hookflash is programmable, with the factory default set to 600 milliseconds.
Some PBXs may require you to change the hookflash timing from this default. To change
the hookflash timing:
1) Lift the handset or press the
SPEAKERPHONE key (models L2S-5E and L2S-10E.)
2) Press the
STORE key (see diagram on inside front cover for key location.)
3) Press the FLASH key (see diagram for key location.)
4) Select 1 - 9 on the DTMF pad. The number selected will be the new flash timing in
hundreds of milliseconds (ie: pressing the ‘3’ key will reset the flash to 300 ms, etc.)
5) Press the
STORE key. The selected flash timing is now programmed.
CONVERTING FROM DESK TO WALL MOUNT
The Diamond Elite telephone can be converted for wall mounting applications. This
conversion process is easiest when the handset and line cords are not connected.
1) Located on the front of the telephone, above the speaker grill, is the wall/desk mounting
clip. Remove this clip by firmly pushing upward (towards the hook switch.)
2) Rotate the clip one half turn (180 degrees) so that the side with the protruding edge is
towards the top of the telephone and reinsert. This edge will hold the handset.
3) Turn the telephone over so the back side is up, facing you. Ensure that the telephone is
resting on a non-abrasive surface, to prevent scratching.
4) Locate and remove the mounting bracket, by firmly pushing back and pulling up to
disengage two of the four retaining tabs, and remove the bracket.
5) Rotate the mounting bracket one half turn (180 degrees) so that the mounting eyelet is
facing in the same direction as the other mounting eyelet located on the lower part of
the telephone.
6) Insert the top two retaining tabs of the mounting bracket into the slots located near the
middle of the telephone. Then firmly push down to insert the retaining tabs on the
opposite side of the mounting bracket.
7) Connect a short modular line cord into the jack on the back of the phone labeled
TO
TEL. Route the line cord throughout the line cord channel. Connect the other end of
line cord to the phone jack on the wall mounting plate.
8) Turn the telephone over, and slide it down onto the mounting posts. Both eyelets should
line up with the mounting posts.
9) Complete the process by installing the handset and handset cord.
4 5