


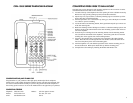

INCLUDED IN YOUR PACKAGE
Handset Line Cord
Base Unit Clear Plastic Overlay
Coiled Handset Cord User Guide
CONNECTING THE OPAL SERIES
1) Located on the left side of the Opal Series (as the phone is facing you) is a modular
jack. Insert one end of the coiled handset cord into this jack (you should hear the coil
cord click when properly inserted).
2) Insert the other end of the coiled handset cord into the modular jack on the handset.
3) Turn the telephone so the back panel is facing you. Insert either end of the line cord
into the jack on the back of the telephone labeled LINE.
4) Insert the other end of the line cord into a telephone wall outlet jack.
5) Once your telephone is connected, remove the plastic overlay and place the paper face
plate over the keys. Replace the plastic overlay by hooking the tabs on the overlay into
the recessed slots located on both sides. The overlay is easiest to insert when; the left
or right side tabs are inserted first, and the middle of the overlay is slightly bowed to
allow for insertion of tabs
SELECTING LINE 1 AND LINE 2
The Opal’s MPC
TM
technology makes selecting the correct line as easy as lifting the hand-
set. MPC technology prioritizes the ringing or idle line and reduces the confusion of line
selection.
PLACING A CALL USING THE HANDSET
1) Lift the handset. The Opal will select the appropriate “idle” line.
2) Listen for dial tone. Dial the desired number, or press an AUTO DIAL key to
automatically dial a number.
3) To end the call, hang up by placing the handset back in the cradle.
PLACING A CALL USING THE SPEAKERPHONE
(SPEAKERPHONE MODELS ONLY)
1) With the handset in the cradle, press the LINE 1 or LINE 2 keys. The Opal will go off
hook on the selected line with speakerphone active.
OR
Press the SPEAKER key. The Opal will select the appropriate “idle” line.
2. Listen for dial tone, dial the desired number, or press an AUTO DIAL key to automati-
cally dial a number.
3. To end call the call press the SPEAKER key again.
RECEIVING A CALL
An audible ring and flickering red LED indicate an inbound call.
U
SING THE HANDSET
1. Lift the handset. The Opal will select the ringing line.
2. To end the call hang up the handset.
1
PROGRAMMING THE AUTO DIAL KEYS
The Opal 2000 series has up to eleven (11) programmable AUTO DIAL keys. Follow the
steps below to program the keys to automatically dial telephone numbers, or to activate tele-
phone system features. To program the auto dial keys, the telephone must
be connected to
an active telephone line.
1) Lift the handset from the cradle or press the SPEAKERPHONE key.
2) Press the recessed STORE key and release it.
3) Enter the telephone number to be programmed.
4) Press the AUTO DIAL key where the number is to be stored.
5) Repeat procedure as necessary for additional auto dial keys.
6) Place the handset back in the cradle, or press the SPEAKERPHONE key to disconnect.
PAUSE KEY
The PAUSE key can be used to provide a timed pause between dialed digits within an auto
dial key. The timing of the pause is programmable, with the factory default set to one (1)
second. To change the pause timing:
1) Lift the handset or press the SPEAKERPHONE key (speakerphone-equipped models.)
2) Press the STORE key (see diagram on inside front cover for key location.)
3) Press the PAUSE key (see diagram for key location.)
4) Press 0 - 5 on the DTMF pad. The number selected will be the pause timing in seconds
(ie: pressing the ‘3’ key will insert a 3-second pause, etc.)
5) Press the STORE key. The selected pause is now inserted into the dialing string.
FLASH KEY
The FLASH key, when programmed behind an auto dial key, provides a timed line
interrupt typically used for accessing PBX/CO features such as transfer or conference. The
timing of the hookflash is programmable, with the factory default set to 600 milliseconds.
Some PBXs may require you to change the hookflash timing from this default. To change
the hookflash timing:
1) Lift the handset or press the SPEAKERPHONE key (speakerphone-equipped models.)
2) Press the STORE key (see diagram on inside front cover for key location.)
3) Press the FLASH key (see diagram for key location.)
4) Select 1 - 9 on the DTMF pad. The number selected will be the new flash timing in
hundreds of milliseconds (ie: pressing the ‘3’ key will reset the flash to 300 ms, etc.)
5) Press the STORE key. The selected flash timing is now programmed.
4