INCLUDED IN YOUR PACKAGE
Handset
Base Unit
Coiled Handset Cord
Line Cord
Clear Plastic Overlay
User Guide
CONNECTING THE OPAL TELEPHONE
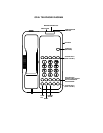
1. Located on the left side of the Opal (as the phone is facing you) is a modular jack. Insert one end of the coiled
handset cord into this jack (you should hear the coil cord click when properly inserted).
2. Insert the other end of the coiled handset cord into the modular jack on the handset.
3. Turn the telephone so the back panel is facing you. Insert either end of the line cord into the jack on the back of
the telephone labeled LINE.
4. Insert the other end of the line cord into a telephone wall outlet jack.
5. Once your telephone is connected, remove the plastic overlay and place the paper faceplate over the keys.
Replace the plastic overlay by hooking the tabs on the overlay into the recessed slots located on both sides. The
overlay is easiest to insert when; the left or right side tabs are inserted first, and the middle of the overlay is
slightly bowed to allow for insertion of the other tabs.
PLACING A CALL
1. Lift the handset.
2. Listen for dial tone. Dial the desired number, or press an AUTO DIAL key to automatically dial a number.
3. To end the call, hang up by placing the handset back in the cradle.
RECEIVING A CALL
An audible ring and flickering red message waiting light will indicate an inbound call.
1. Lift the handset. The Opal will engage the ringing line.
2. To end the call hang up the handset.
ADJUSTING THE RING VOLUME
Locate the adjustment control on the back of the telephone labeled RINGER LOW/HI. Slide the switch to the
desired LOW or HI ring volume.
REDIAL
TO REDIAL THE LAST TELEPHONE NUMBER DIALED:
1. Lift the handset from the cradle.
2. Press the REDIAL key.
ADJUSTING THE HANDSET VOLUME
The HANDSET VOLUME key has three levels. When the handset is first lifted, the handset volume is NORMAL.


