


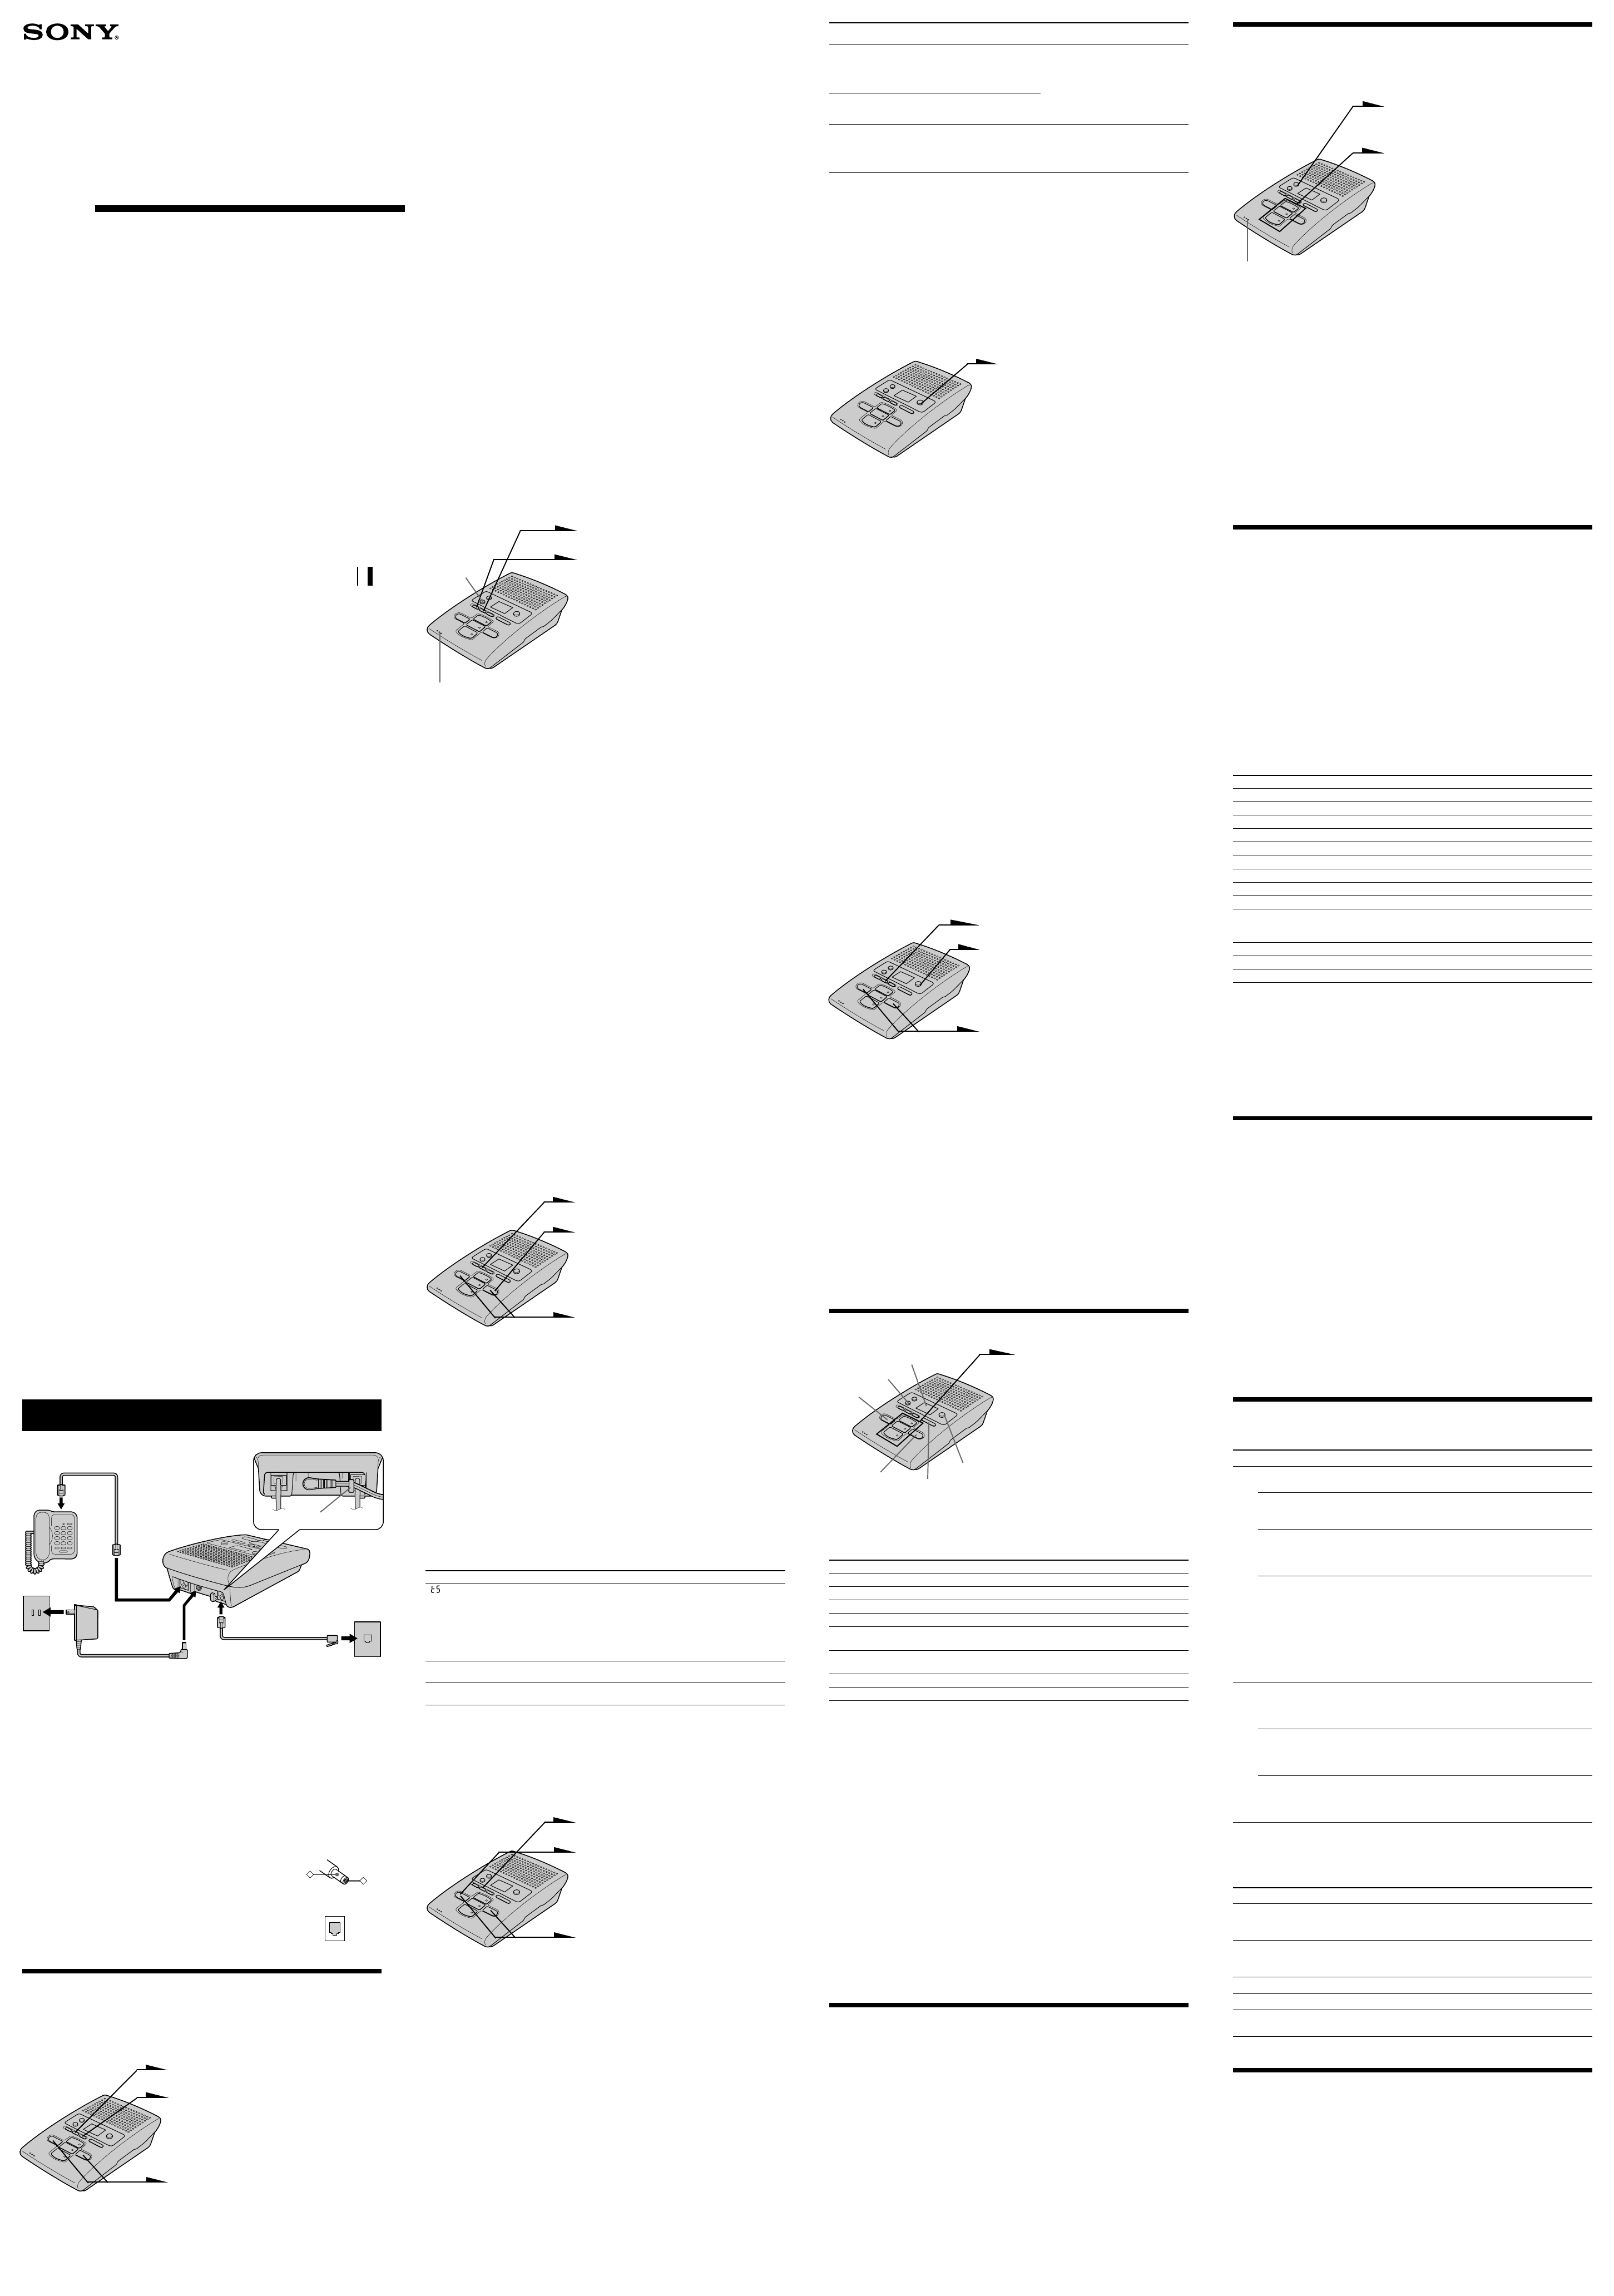
Setting up the answering machine
Connect the answering machine
1 Unplug the telephone line cord from your telephone and connect the
telephone line cord (supplied) to the TEL jack of the answering
machine and to the telephone.
2 Connect the telephone line cord to the LINE jack of the answering
machine.
3 Connect the AC power adaptor to the DC IN 12V jack of the
answering machine and to an AC outlet.
“P” flashes in the display window.
Notes
• Use only the supplied AC-T70 AC power adaptor. Do not use
any other AC power adaptor.
• Connect the AC power adaptor to a continuous power supply.
• Place the answering machine close to the AC outlet so that you
can unplug the AC power adaptor easily.
Tip
If your telephone outlet is not modular, contact your telephone
service company for assistance.
Preparing the answering machine
Setting the day and time
Set the day and time so that you can stamp day and time for the incoming
messages. You’ll hear the recorded day and time when you play back messages.
1 Press (SET/REC).
2 Press (TIME).
You hear a voice guide: “Please set
the day. To select, press the SKIP or
REPEAT button. To enter, press the
SET button”.
3 Press (SKIP/QUICK) or
(REPEAT/SLOW) repeatedly until the
correct day of the week is announced.
Press (SKIP/QUICK) to advance, or
(REPEAT/SLOW) to go back.
IMPORTANT SAFETY
INSTRUCTIONS
When using your telephone equipment, basic safety precautions should always
be followed to reduce the risk of fire, electric shock and injury to persons,
including the following:
1. Do not use this product near water, for example, near a bath tub, wash bowl,
kitchen sink, or laundry tub, in a wet basement, or near a swimming pool.
2. Avoid using a telephone (other than a cordless type) during an electrical
storm. There may be a remote risk of electric shock from lightning.
3. Do not use the telephone to report a gas leak in the vicinity of the leak.
4. Use only the power cord and batteries indicated in this manual. Do not
dispose of batteries in a fire. They may explode. Check with local codes for
possible special disposal instructions.
SAVE THESE INSTRUCTIONS
INDUSTRY CANADA NOTICE
NOTICE: The Industry Canada label identifies certified equipment. This
certification means that the equipment meets certain telecommunications
network protective, operational and safety requirements as prescribed in the
appropriate Terminal Equipment Technical Requirements document(s). The
Department does not guarantee the equipment will operate to the user’s
satisfaction.
Before installing this equipment, users should ensure that it is permissible to be
connected to the facilities of the local telecommunications company. The
equipment must also be installed using an acceptable method of connection.
The customer should be aware that compliance with the above conditions may
not prevent degradation of service in some situations.
Repairs to certified equipment should be coordinated by a representative
designated by the supplier. Any repairs or alterations made by the user to this
equipment, or equipment malfunctions may give the telecommunications
company cause to request the user to disconnect the equipment.
Users should ensure for their own protection that the electrical ground
connections of the power utility, telephone lines and internal meatallic water
pipe system, if present, are connected together. This precaution may be
particularly important in rural areas.
Caution: Users should not attempt to make such connections themselves, but
should contact the appropriate electric inspection authority, or electrician, as
appropriate.
NOTICE: The Ringer Equivalence Number (REN) assigned to each terminal
device provides an indication of the maximum number of terminal allowed to be
connected to a telephone interface.
The termination on an interface may consist of any combination of devices
subject only to the requirement that the sum of the Ringer Equivalence Number
of all the devices does not exceed 5.
IMPORTANT INSTRUCTION TO USERS
Your model (TAM-100) has been approved by the Industry Canada.
The Ringer Equivalence Number (REN) of your model is indicated at the bottom
of the unit.
If you forgot to turn the answering function on
Call your phone and let it ring 10 times until it answers. Then the answering
function automatically turns on.
Note
If you enter a wrong remote security code three times, the line will be disconnected.
To use the toll-saver feature
Set RINGER SELECT to TS. See “Selecting the ring time”.
Maintenance
On handling
• Do not attempt to disassemble the casing. Refer servicing to qualified
personnel only.
• Do not put foreign objects into the unit. Should any liquid or solid object fall
into the unit, unplug the unit and have it checked by qualified personnel
before operating the unit any further.
• Do not put anything in the DC IN 9V (external power input) jack.
• Do not drop the unit as a malfunction may result.
On cleaning
Clean the cabinets with a soft cloth slightly moistened with water or a mild
detergent solution. Do not use any type of abrasive pad, scouring powder or
solvent such as alcohol or benzine as they may damage the finish of the cabinet.
If you have any questions or problems concerning your unit, please consult your
nearest Sony dealer.
Troubleshooting
Symptom
You cannot hear anything
from the speaker.
No time stamp is heard.
You cannot record the
greeting properly.
The answering machine
does not record messages
The answering machine
does not accept your
remote ID code (security
code).
You hear error beeps
when you enter your
remote ID code (security
code).
A long confirmation beep
does not sound when you
enter your remote ID code
(security code).
Display window
The display window on the answering machine shows the following
information.
When the display window shows
Number (0-99)
P
A
F
The high, middle and low
bars flash successively.
Specifications
Power source DC 12 V from AC power adaptor
Maximum recording About 15 minutes, using incorporated IC
time
Greeting message Up to 4 minutes
Incoming message Up to 4 minutes/message
Memo Up to 4 minutes/message
Dimensions Approx. 100 x 50 x 173 mm (w/h/d)
(approx. 4
x 2 x 6
7
/
8
inches)
Mass Approx. 290 g (approx. 10 oz)
Supplied accessories AC power adaptor AC-T70
Telephone line cord
Design and specifications are subject to change without notice.
Sony Corporation 2001 Printed in China
TAM-100
3-866-411-61(1)
Operating Instructions
Mode d’emploi (au verso)
Telephone
Answering Machine
Set AUDIBLE When you wish to Prerecorded greeting
INDICATOR to
“On” play a greeting to ask the caller
(normal mode) to leave a message and have
the answering machine beep to
alert you of recorded incoming
messages.
“OF” play a greeting to ask the caller
(normal mode) to leave a message but you do
not wish to sound a beep.
“A” make an announcement to the
(announcement caller without accepting
only mode) incoming messages when, for
example, you are away on a
long vacation.
When the memory is full
The recording area of this answering machine’s memory is about 15 minutes
(including the greeting, messages, and memo). If the remaining recording area
becomes less than one minute, “F” flashes on the display window, and the
answering machine automatically switches to announcement only mode, which
does not record messages, and the greeting will be switched to the prerecorded
greeting.
If you wish to record more messages, erase the existing messages. You can also
erase the messages from an outside phone, see “Operating from an outside
phone”.
Turning on the answering function
Press (ANSWER ON/OFF) so that it
lights up in red.
Note
When the memory is full, you hear five short error beeps and you cannot turn on the
answering function. Erase unnecessary messages.
Tips
• The answering machine will automatically answer a call after 10 rings even if the
answering function is off. The answering function will remain on for all subsequent
calls.
• You can also turn on or off the answering function from an outside phone, see
“Operating from an outside phone”.
Mailbox usage
This answering machine offers you three voice mailboxes, providing a convenient
way to share the mailbox feature with other members of your household or business.
When a caller calls
The caller can choose one of the two ways to leave a message:
• Select a mailbox by pressing (*)(1) (MAIL BOX 1), (*)(2) (MAIL BOX 2) or
(*)(3) (MAIL BOX 3) while the caller hears the greeting. The greeting stops
and a beep will sound, then the caller can start recording a message.
• Wait until the greeting finishes, then start recording a message. When the
caller does not select a mailbox, the messages goes into MAIL BOX 1.
Notes
• If four minutes have passed while recording the incoming message, the line is
automatically disconnected.
• If the message is shorter than two seconds, it will not be recorded.
Tip
Even if a power interruption occurs, the incoming messages are not erased.
To turn off the answering function
Press (ANSWER ON/OFF) so that the red light goes off.
Setting the remote ID code (security code)
If you want to operate the answering machine from an outside phone, you must
first set the remote ID code (security code). See “Operating from an outside
phone” for details on remote operations.
1 Press (SET/REC).
2 Press (ANSWER ON/OFF).
You hear a voice guide: “Please set
the security code. To select, press the
SKIP or REPEAT button. To enter,
press the SET button”.
3 Set a two-digit number between 00
and 99 by pressing (SKIP/QUICK) or
(REPEAT/SLOW).
Press (SKIP/QUICK) to increase a
number, or (REPEAT/SLOW) to
decrease.
Each time you press (SKIP/QUICK) or
(REPEAT/SLOW), the answering
machine announces a number.
4 Press (SET/REC).
The remote ID code (security code) is
set, and you hear a long confirmation
beep.
To change the remote ID code (security code)
Enter a new remote ID code (security code). The new code will replace the old
one.
Tip
Even if a power interruption occurs, the remote ID code is not erased.
Playing back messages
When you come home
If (ANSWER ON/OFF) flashes in
red, or the display window shows
the total number of new messages
and the MAIL BOX indicator
flashes, press the mailbox button
((MAIL BOX 1), (MAIL BOX 2) or
(MAIL BOX 3)).
If you press the mailbox button,
the display window shows the
total number of new messages
that are recorded to the mailbox.
The answering machine plays
back from the first new messages.
Additional tasks when playing back messages
To Do this
Adjust the speaker volume Press (VOLUME) (+) or (--).
Stop playback Press the mailbox button again.
Replay the messages Press the mailbox button again.
Skip to the next message Press (SKIP/QUICK) while the current message is playing.
Repeat the current message Press (REPEAT/SLOW) while the current message is
playing.
Go back to previous messages Press (REPEAT/SLOW) within the first three seconds of the
current message.
Play back slowly Keep (REPEAT/SLOW) pressed during playback.
Play back quickly Keep (SKIP/QUICK) pressed during playback.
Note
The old messages will not be played back unless all new messages are played back.
To erase messages
You can erase only the messages you have played back.
• To erase one message, press (ERASE) while the message is being played back.
• To erase all the messages in a mailbox, press (ERASE), and a mailbox button
((MAIL BOX 1),(MAIL BOX 2) or (MAIL BOX 3)). A long confirmation beep
sounds and all messages in the selected mailbox are erased.
Notes
Selecting the ring time
You can select the number of rings before the answering machine starts to play
back the greeting and records incoming messages. There are three options of ring
time. The ring time is preset to Toll Saver.
1 Press (SET/REC).
2 Press (SKIP/QUICK).
You hear a voice guide: “Please set
the number of rings. To select, press
the SKIP or REPEAT button. To
enter, press the SET button”.
3 Press (SKIP/QUICK) or
(REPEAT/SLOW).
The current setting is announced.
4 Press (SKIP/QUICK) or (REPEAT/SLOW) repeatedly to select a ring
duration.
5 Press (SET/REC).
The ring time setting is announced.
To check the ring time
1 Press (SET/REC).
2 Press (SKIP/QUICK).
3 Press (SKIP/QUICK).
The ring time setting is announced.
4 Press (SET/REC).
Set the number of ring to
Mode
“ ” (Toll Saver) If new messages have been recorded, the answering machine
answers at the second ring and records incoming messages; if
no new messages are recorded, it answers at the fifth ring.
When you call from an outside phone and hear more than two
rings, you know that there are no new messages. If you hang
up at this point before the answering machine answers, you
can save the toll for the call (see “Operating from an outside
phone”).
“5” The answering machine always answers at the fifth ring and
records incoming messages.
“2” The answering machine always answers at the second ring and
records incoming messages.
Selecting the answering mode
You can set the answering machine to record incoming messages (normal mode),
or just make an announcement without recording messages (announcement only
mode).
You can record your own greeting, or use the factory prerecorded greetings.
In the normal mode, you also have the option of having a beep to tell you if you
have received any new incoming messages.
The audible message alert is preset to
on.
1 Press (SET/REC).
2 Press (REPEAT/SLOW).
You hear a voice guide: “Please set
the message alert and announce only
function. To select, press the SKIP or
REPEAT button. To enter, press the
SET button”.
3 Press (SKIP/QUICK) or
(REPEAT/SLOW).
The current setting is announced.
4 Press (SKIP/QUICK) or (REPEAT/SLOW) repeatedly to select the
answering mode.
5 Press (SET/REC).
To check the answering mode
1 Press (SET/REC).
2 Press (REPEAT/SLOW).
3 Press (REPEAT/SLOW).
The answering mode setting is announced.
4 Press (SET/REC).
Screening incoming calls
You can screen calls by leaving the answering function on while you are at
home. When a call is answered, you can hear the message being recorded
through the answering machine but the caller cannot hear you. Then, you can
decide whether to answer the call or not.
To answer the call
Pick up the handset of the telephone.
Recording is cancelled and you can speak to the caller.
Notes
• If the volume is set to minimum, you cannot screen the calls.
• While the greeting is being played the caller cannot be heard however, you can answer
the call by picking up the handset of the telephone.
Tips
• You can disconnect the call by pressing (MAIL BOX 1), (MAIL BOX 2) or (MAIL BOX 3).
• The high, middle and low bars on the display window flash successively while
screening incoming call.
Recording a memo
You can record a “memo” (up to four minutes) as a personal reminder or as a
message for other people. You can play back the recorded memo like any
incoming messages.
1 Press (MEMO).
You hear a voice guide.
2 Select a mailbox by pressing
(MAIL BOX 1), (MAIL BOX 2) or
(MAIL BOX 3). You will hear a voice
guide, then a long confirmation beep.
The display window shows the total
number of new messages and memos
that includes the memo in recording
of the selected mailbox.
3 After the tone, start recording. Speak
about 12 inches (30 cm) away from
the microphone.
4 Press (MEMO) to stop recording.
The display window shows the total
number of new messages and memos
of the all mailboxes.
Notes
• If you press (MEMO) when the memory is full (“F” flashing on the display window), you
hear five short error beeps and you cannot record a memo.
• If a call comes in while recording a memo, recording stops automatically, and the
recorded memo is counted as a new message.
• If the remaining memory becomes full while recording, recording stops automatically
and “F” flashes on the display window.
Tips
• If four minutes have passed in step 3, recording stops automatically, and the recorded
memo is counted as a new message.
• Even if a power interruption occurs, the memos are not erased.
Operating from an outside phone
You can call from a touch-tone phone and pick up new messages recorded on the
answering machine. First, you just set the remote ID code (security code) and
turn on the answering function before going out. See “Setting the remote ID
code (security code)”.
Picking up new messages
1 Call your phone from a touch-tone phone.
2 While you hear the greeting play, press (#), and your remote ID
code (security code).
You hear a long confirmation beep and the greeting stops. Following
the voice guide informing you of the number of messages recorded,
the answering machine stands by for you to enter a control code.
3 To do other operations, enter the control code within 20 seconds (see
the table below). To quit, hang up the phone.
Control codes for remote operations
To Press
Play back messages in MAIL BOX 1 (#) (1)
Play back messages in MAIL BOX 2 (#) (2)
Play back messages in MAIL BOX 3 (#) (3)
Repeat the current message (#) (4) while the message is being played back
Skip the current message (#) (6) while the message is being played back
Erase the current message (#) (9) while the message is being played back
Erase all the messages in MAIL BOX 1 (#) (9) (#) (1)
Erase all the messages in MAIL BOX 2 (#) (9) (#) (2)
Erase all the messages in MAIL BOX 3 (#) (9) (#) (3)
Record a new greeting (*) (7). When you hear a long beep, start
(up to one minute) recording your greeting. Press (*) (*) to stop
recording.
Turn on the answering function (*) (0)
Turn off the answering function (#) (0)
Stop the current operation (*) (*)
4 Press (SET/REC).
You hear a voice guide: “Please set the hour. To select, press the
SKIP or REPEAT button. To enter, press the SET button”.
5 Press (SKIP/QUICK) or (REPEAT/SLOW) repeatedly until the correct
hour is announced.
6 Press (SET/REC).
You hear a voice guide: “Please set the minute. To select, press the
SKIP or REPEAT button. To enter, press the SET button”.
7 Press (SKIP/QUICK) or (REPEAT/SLOW) repeatedly until the correct
minute is announced.
8 Press (SET/REC).
You hear a long confirmation beep, followed by the day and time.
Then the answering machine starts counting time.
Notes
• Do not allow more than 20 seconds (or 60 seconds when setting the minute) to elapse
between each step of the procedure.
• If a power interruption occurs, the day and time will be erased.
• If the current day and time are not set, you will not hear a time stamp when you play
back recorded messages. If you try to check the current time, you will hear five short
error beeps.
To check the current time
Press (TIME). You hear the current day and time.
Recording the greeting
This answering machine has prerecorded greetings. However, you can record
your own greeting.
The greeting must be between two seconds and four minutes long.
You can record a greeting for each of the answering mode (“normal” and
“announcement only” modes. See “Selecting the answering mode”). To record a
greeting for the “announcement only” mode, select the mode first, then follow
the instructions below (see “Selecting the answering mode”). Otherwise, the
normal greeting will be recorded.
1 Press (SET/REC).
2 Press (GREETING).
You hear a voice guide and a long
confirmation beep.
3 After the tone, start recording. Speak
about 12 inches (30 cm) away from
the microphone.
4 Press (SET/REC) to stop recording.
The answering machine
automatically replays the recorded
greeting.
Notes
• If recording did not succeed, you hear five short error beeps. Start over the procedure.
• If a call comes in while recording a greeting, recording is cancelled. Start over the
procedure.
• If you hear five short error beeps while recording, the recording area may be full. In this
case, erase unnecessary messages.
Tips
• If four minutes have passed in step 3, recording stops automatically.
• To record the greeting from a touch-tone phone, see “Operating from an outside phone”.
• Even if a power interruption occurs, your own greeting is not erased.
• If your own greeting is recorded, the greeting has priority over the prerecorded greeting.
Prerecorded greeting
Normal mode : “Hello, I’m unable to answer your call right now.
Please leave your name, number and message after
the tone”.
Announcement only mode : “Hello, I’m unable to answer your call right now.
Please call again, thank you”.
To check the greeting
Press (GREETING) to play back the greeting.
To change the greeting
Record a new greeting. The new greeting replaces the old one.
To erase the greeting
Press (ERASE) while playing back the greeting.
The answering machine will answer a call with the prerecorded greetings.
To go back to the factory prerecorded greeting
Press (ERASE) while playing back the greeting.
This will bring back the original greeting, but your own greeting is erased.
• The display window shows the total number of “new” messages. Therefore, it is reset to
“0” when you play back all new messages, even they are not erased yet. Be sure to erase
unnecessary messages before the memory becomes full.
• When the number of new messages exceeds 99, “99” flashes on the display window.
• If a call comes in during playback, the playback stops.
• If a power interruption occurs or the AC power adaptor is disconnected while erasing a
message, all recorded message may be erased.
• If you try to erase all messages in a mailbox with any new messages remaining. You
hear five short error beeps and you cannot erase the messages.
Tip
You can also listen to the messages or erase the messages from a touch-tone phone, see
“Operating from an outside phone”.
MIC (Microphone)
(ERASE)
“Hello, I’m unable to answer your
call right now. Please leave your
name, number and message after
the tone.”
“Hello, I’m unable to answer your
call right now. Please call again,
thank you.”
Remedy
• Use the VOLUME control to increase the speaker
volume.
• Make sure the day and time are set.
• The day and time may have been cleared due to a
power interruption. Set them again.
• Keep your message between two seconds and four
minutes.
• Make sure you speak about 12 inches (30 cm) away
from the microphone when recording.
• Check the answering mode. The phone cannot record
messages in announcement only mode.
• Make sure that the memory is not full. When the
remaining recording area is less than one minute, the
answering machine switches to announcement only
mode automatically.
• The answering machine does not record a message that
is shorter than two seconds.
• Even if the message is longer than four minutes, the
answering machine only records up to four minutes.
• Make sure you call from a touch-tone phone.
• Make sure you entered your remote ID code (security
code) within two seconds after you have entered (#).
• Make sure the remote ID code (security code) is correct.
• Enter your remote ID code (security code) while the
greeting is being played back.
• Make sure you are calling from a touch-tone phone.
Display window
(VOLUME)
(SKIP/QUICK)
(ERASE)
(REPEAT/SLOW)
(ANSWER ON/OFF)
Answering machine
Operating from an outside
phone
It means
Number of messages not yet played back. The display
window shows up to 99 messages. After that, ”99“ flashes
to tell you that there are 100 or more messages.
Flashes when the day and time is cleared due to a power
interruption, or when you connect the answering machine
to the AC outlet for the first time.
The announcement only mode is selected.
The recording area is full. Erase unnecessary messages.
Flashes while screening incoming call.
MIC (Microphone)
Polarity of the plug
–
+
Modular
To telephone
outlet
To AC outlet
3
AC power adaptor
(supplied AC-T70)
To LINE
To DC
IN 12V
Hook the cord.
1
Telephone line cord
(supplied)
To TEL
2
Telephone line cord