


Remedy
• Make sure you have set up the base unit
correctly.
• Move the handset closer to the base unit.
• Make sure the telephone line cord is securely
connected to the telephone outlet.
• Make sure the battery is fully charged.
• Make sure the dialing mode is set correctly.
• Make sure the last dialed number is really the
one you want to dial.
• The number you last dialed exceeds 32 digits
(including the tone and pause digits if used).
• The number you last dialed is erased.
• Move the handset closer to the base unit and
perform the redial operations again.
• Make sure the ringer is turned on.
• The battery may be weak. Charge the battery for
more than 12 hours.
• Make sure you have set up the base unit
correctly.
• Move the handset closer to the base unit.
• Make sure the telephone line cord is securely
connected to the telephone outlet.
• Move the handset closer to the base unit.
• Place the base unit away from noise sources .
• This is the out-of-range alarm. Move the handset
closer to the base unit within one minute.
• The battery is weak. Charge the battery for more
than 12 hours.
• Make sure you follow the procedure for storing
the number correctly.
• Make sure the number (including the tone and
pause digits) does not exceed 16 digits.
• Store the correct number.
• Make sure you have subscribed to Caller ID
service.
• Caller ID service may not work when the phone
is connected to a Private Branch Exchange (PBX).
• You have answered the call while “** RINGING
**” was displayed. Be sure to answer after the
Caller ID data is displayed.
• Make sure you have subscribed to “Caller ID
with call waiting” service.
• Make sure nobody is talking with another phone
on the same telephone line.
• You may need to change the number of digits of
the phone number.
• This function may not work when the phone is
connected to a Private Branch Exchange (PBX).
• Make sure you have subscribed to voice mail
service.
• If you move or change your telephone company,
reset this phone.
• Wipe the charge terminals of the base unit and
the handset with a soft cloth for better contact of
the charge terminals.
• Make sure the handset is placed on the base unit
properly.
• The battery is empty. Charge the battery for more
than 12 hours.
• The battery pack was charged less than 12 hours
(due to power failure, etc.).
• The usage life of the battery has expired and
needs replacement.
Symptom
You hear five short error
beeps when you press
(TALK).
You hear no dial tone.
The phone does not connect at
all, even though the number
you dial is correct.
The phone does not redial
correctly.
You hear five short error
beeps when you try to redial.
You cannot perform the redial
operations (redialing,
checking and erasing the
phone number), and “NO
CONNECT” appears on the
display.
The handset does not ring.
“NO LINE” appears on the
display.
You hear interference during
conversation.
Your conversation is muted
and “NO CONNECT” appear
on the display.
You hear a beep every three
seconds and E and
“BATTERY LOW” appears on
the display.
You hear five short error
beeps and cannot store a
number in the Phone
Directory.
Phone Directory dialing is
incorrect.
The caller’s name and/or
phone number does not
appear on the display.
The caller’s name and/or
phone number does not
appear on the display during
call waiting.
You cannot dial the number
from the Caller ID list.
You cannot use voice mail
service.
The CHARGE lamp does not
light up when you place the
handset to charge.
The CHARGE lamp flashes.
The battery duration is short.
Caller ID
Power source/battery
Phone Directory
When you receive the 10 digits phone number
When you receive the 8 digits phone number
When you receive the 7 digits phone number
2 Continue the operation to call or store the phone number with the
correct number of digits (see “Call back a number from the Caller ID
list” and “Storing a number of the Caller ID list into the Phone
Directory”).
Notes
• The number of digits of the phone number does not change even if you press (#) when
you receive the phone number of 6 digits or less.
• You need to adjust the number of digits each time you call back from the Caller ID list as
the changes to the Caller ID data is not stored in memory.
• You may not be able to change the number of digits depending on the Caller ID data.
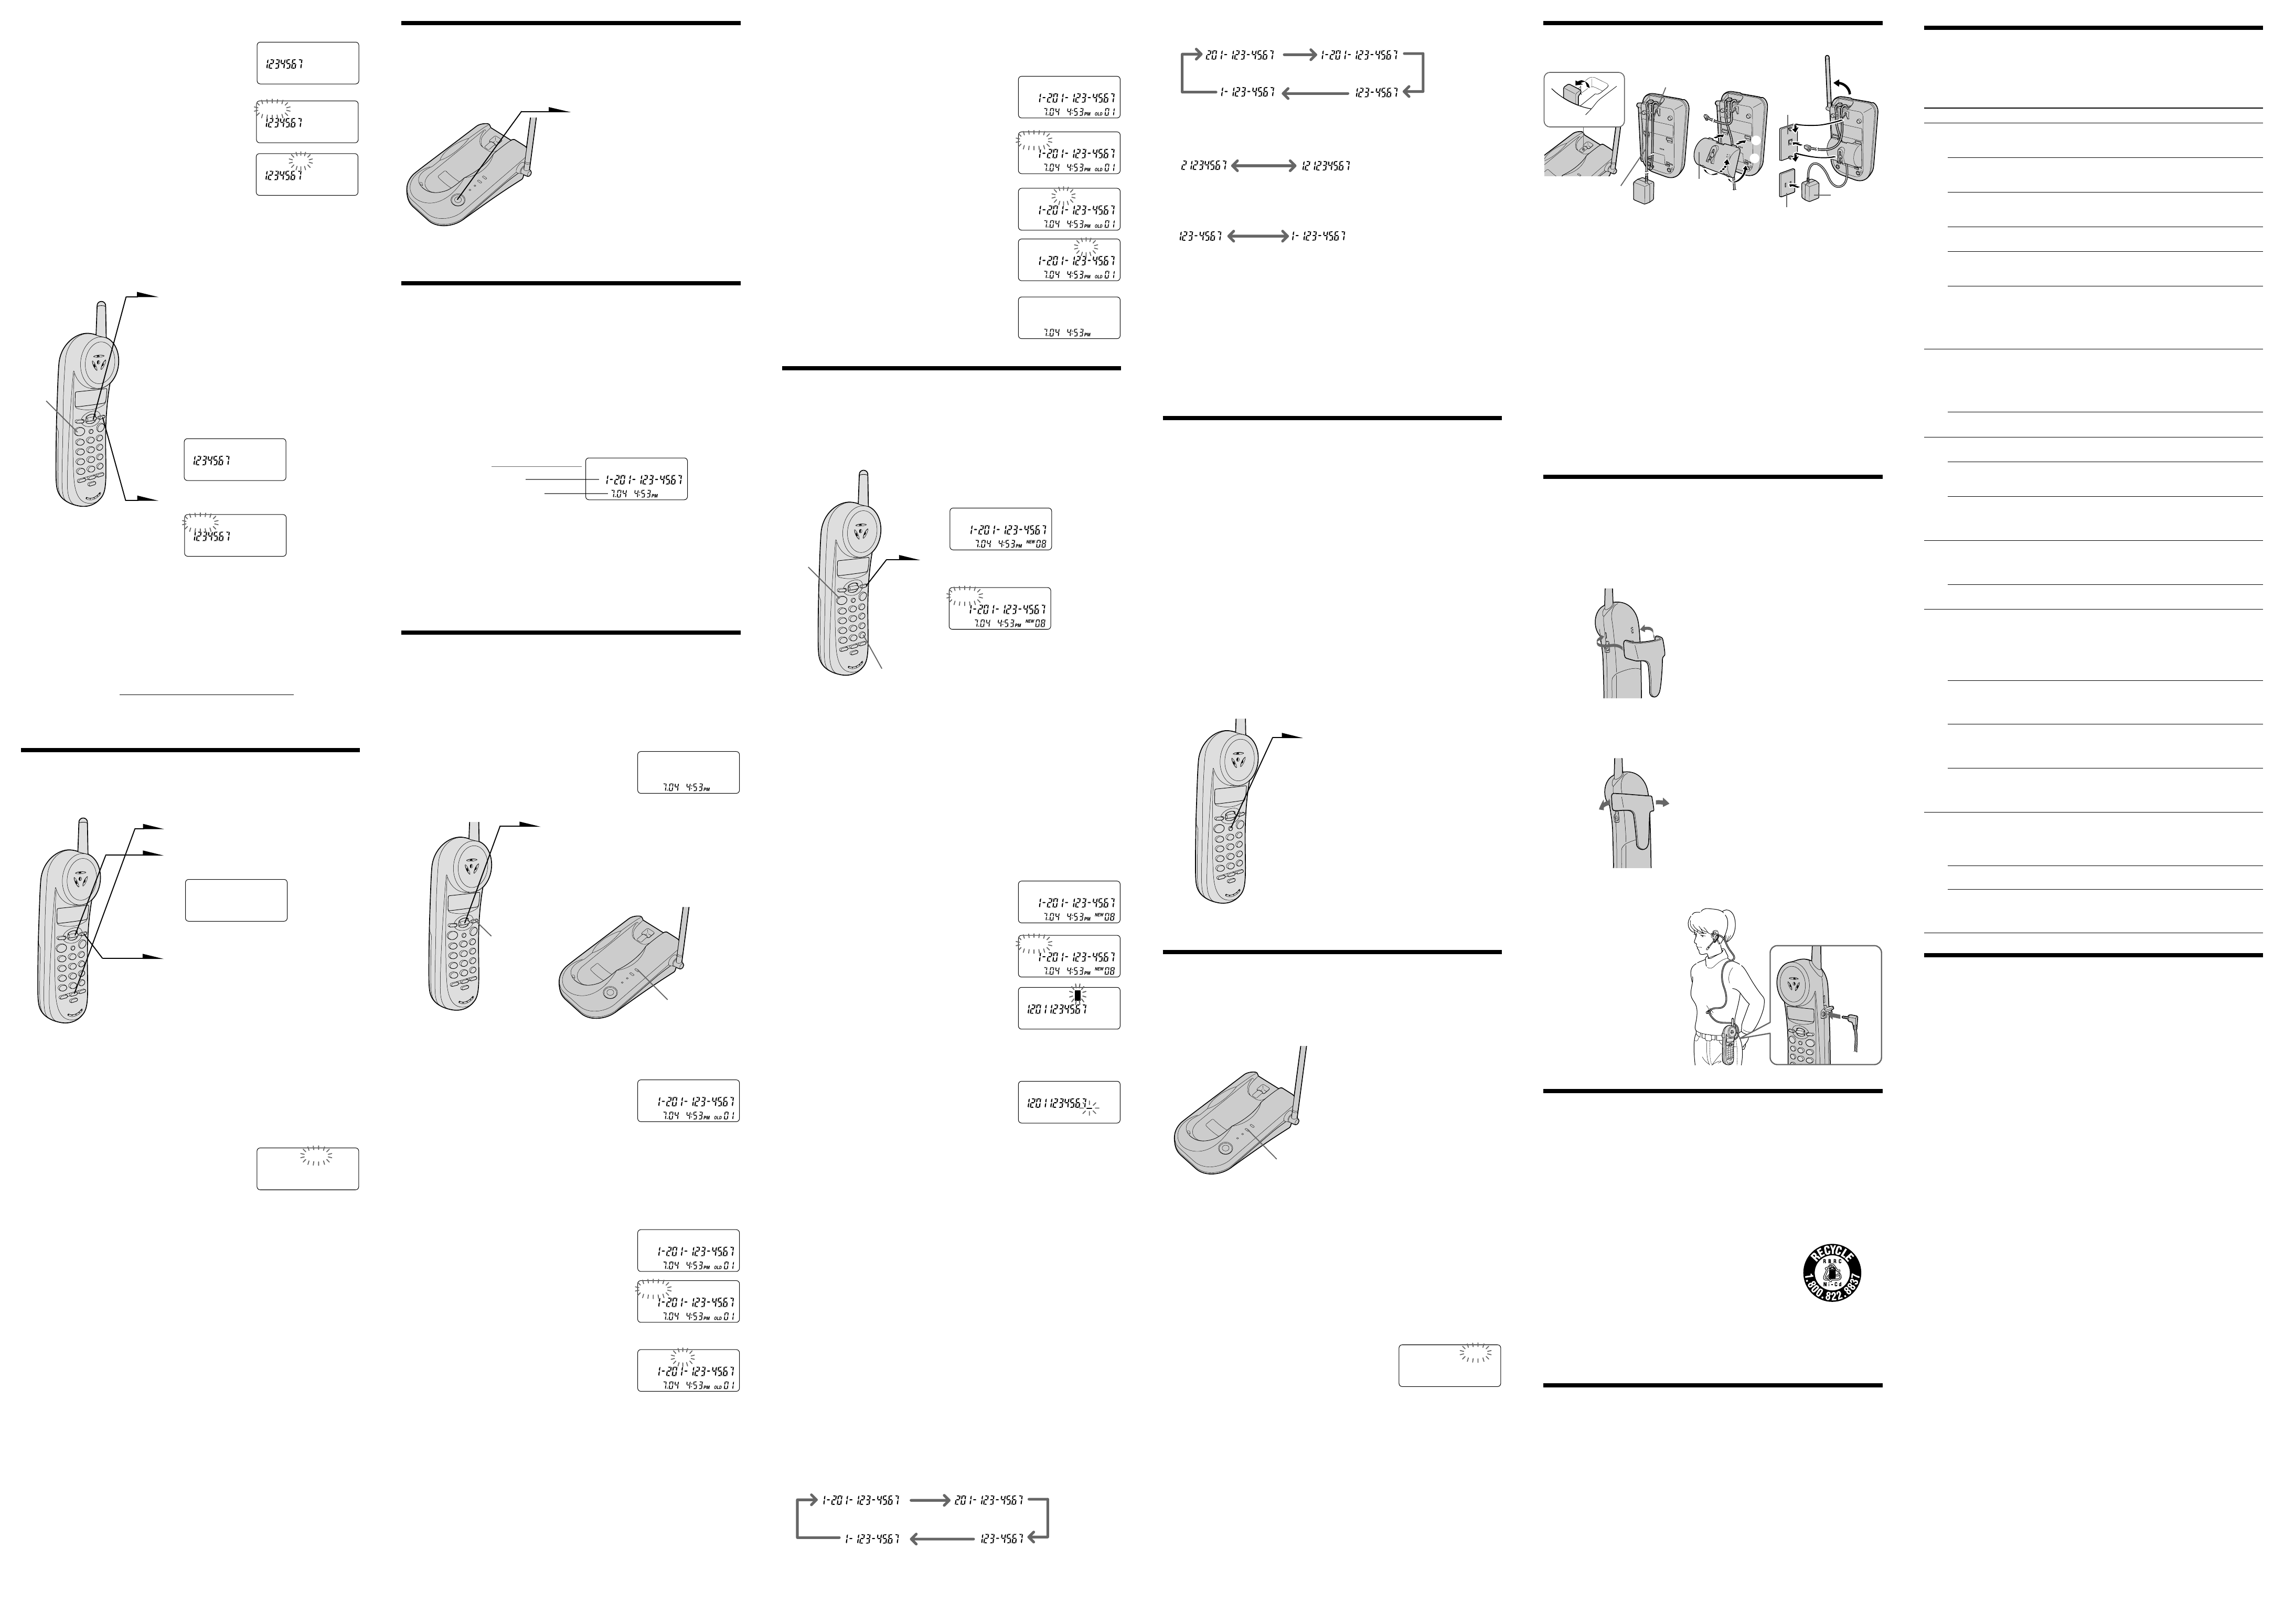
Carrying the handset by the belt
clip
You can hang the handset on the belt by attaching the belt clip to the handset.
Attaching the belt clip
Press the belt clip to the
handset. Make sure that the
side tabs click and go into the
holes on the sides of the
handset.
Note
To prevent the handset from dropping, make sure that each tab is completely inserted.
Detaching the belt clip
While pressing the back of the
belt clip, pull the sides one by
one until the tabs come off from
the holes.
Note
Remove the belt clip carefully to avoid breaking your fingernails.
Using the headset
You can talk on the cordless
handset without using your
hands by connecting a headset
(optional) to the I
(HEADSET) jack on the
handset.
I
(HEADSET)
jack
Storing a number of the Caller ID list into the
Phone Directory
1 Display the name and phone number you
want to store from the Caller ID list (see
“Viewing the Caller ID list”).
2 Confirm the number and press (SELECT).
3 Make “PGM” flash using the Jog lever, then
press (SELECT).
The cursor flashes at the end of the name.
Enter or change the name, if necessary (see
“Changing a stored name and/or phone
number”).
4 Press (SELECT).
The cursor flashes at the right of the phone
number.
Enter or change the phone number, if
necessary (see “Changing a stored name
and/or phone number”).
5 Press (SELECT) again.
You will hear a long confirmation beep and
the name and number are stored.
Notes
• Do not allow more than 20 seconds to elapse between each step of the procedure.
• If the number displayed in step 1 is not the one you should call back, you can change the
number of digits of the phone number (See “To change the number of digits of the
phone number”).
• If the phone is connected to a Private Branch Exchange (PBX), you may need to add an
outside line access digit.
To change the number of digits of the phone
number
If the number of digits of the phone number in the Caller ID list is different from
the actual phone number, you need to adjust the number of digits of the phone
number to call back or store into the Phone Directory.
1 While the phone number from the Caller ID list is displayed, press
(#) repeatedly until the phone number with the correct number of
digits appears on the display.
Each time you press (#), the number of digits changes as follows.
When you receive the 11 digits phone number
Using “Caller ID with call waiting”
service
This telephone is compatible with the “Caller ID with call waiting” service. Make
sure that your telephone company offers this service.
Like the basic Caller ID service, you need to subscribe to “Caller ID with call
waiting” in order to use this service.
Even though you may have already subscribed to “Caller ID” and “call
waiting” as two separate services, you need to request a subscription to
“Caller ID with call waiting” as a single service.
This is a new service that combines the two services.
Even though you now have a “Caller ID with call waiting” compatible
phone, unless you subscribe to the combined “Caller ID with call waiting”
service, you will not be able to see the name and number of the second
caller.
When a new call comes in while you are talking, you hear two short beeps. The
caller’s name and/or phone number of the new call appears on the display for
about 20 seconds.
To switch to another caller
1 To switch to the new caller, press
(FLASH).
2 To switch back to the first caller,
press (FLASH) again.
Using voice mail service
If you subscribe to your telephone company’s message service which includes
this feature, the display will show that you have messages waiting to be
retrieved.
If you have messages
“MESSAGES WAITING” will appear
on the display, and the VOICE MAIL
lamp on the base unit flashes.
The display and the VOICE MAIL
lamp will go off when you retrieve
your messages.
Note
You cannot use this feature, if you have not subscribed to your telephone company’s
message service. For details on the availability of this service, please ask your telephone
company.
Troubleshooting
If you’ve experienced any of the following difficulties while using your phone,
use this troubleshooting guide to help you remedy the problem. Should any
problem persist, consult your nearest Sony dealer.
Making calls
Receiving calls
Specification
General
Frequency band 902 - 928 MHz
Operating channel 30 channels
Dial signal Tone, 10 PPS (pulse) selectable
Supplied accessories AC power adaptor AC-T130
Telephone line cord
Rechargeable battery pack BP-T18
Belt clip
Wall bracket
Handset
Power source Rechargeable battery pack BP-T18
Battery life Standby: Approx. 7 days
Talk: Approx. 7 hours
Dimensions Approx. 2
1
⁄
4
x 1
7
⁄
8
x 7
1
⁄
4
inches (w/h/d), antenna excluded
(approx. 55 x 47 x 183 mm)
Antenna: Approx. 1
3
⁄
8
inches (approx. 34 mm)
Mass Approx. 7.7 oz (approx. 220 g), battery included
Base unit
Power source DC 9V from AC power adaptor AC-T130
Battery charging time Approx. 12 hours
Dimensions Approx. 5 x 2
1
⁄
4
x 7
1
⁄
2
inches (w/h/d), antenna excluded
(approx. 127 x 55 x 189 mm)
Antenna: Approx. 6
1
⁄
8
inches (approx. 153 mm)
Mass Approx. 9 oz (approx. 250 g), wall bracket excluded
Design and specifications are subject to change without notice.
SMITH JOHN
DIAL PGM ERASE
SMITH JOHN
DIAL PGM ERASE
SMITH JOHN
SMITH JOHN
During conversation
Looking at the Caller ID list
The phone stores the data of the last 50 calls received. It keeps track of all calls
received; even if they were not answered.
Viewing the Caller ID list
You can look through the Caller ID list to check the phone number and/or name
of the calls received.
While the handset is not in use the display shows
the number of “NEW” (calls which you have not
viewed) and “OLD” (calls which you have viewed)
calls. If there is a “NEW” data, the NEW CALL lamp
of the base unit flashes.
1 Lower the Jog lever.
Data for the newest call appears for
20 seconds.
2 Lower the Jog lever to display older
data or raise to display newer data.
Note
If a 51st call is received, the oldest data is automatically erased.
About the “*” mark
“*” appears if there are two or more calls in a
row from the same phone number. The older
data will be replaced by the new data, so the
calls are counted as only one call.
Erasing data from the Caller ID list
Old data will be erased automatically when a 51st call comes in, but you can also
manually erase unnecessary data one by one or erase the entire list.
To erase the phone number one by one
1 Display the phone number you want to
erase from the Caller ID list (see “Viewing
the Caller ID list”).
2 Press (SELECT).
3 Make “ERASE” flash using the Jog lever,
then press (SELECT).
4 Make “YES” flash using the Jog lever, then
press (SELECT).
You will hear a long confirmation beep and
the data is erased.
SMITH JOHN *
SMITH JOHN
DIAL PGM ERASE
ERASE NO YES
SMITH JOHN
DIAL PGM ERASE
ERASE NO YES ALL
NEW 00 OLD 00
(SELECT)
NEW CALL lamp
(#)
(TALK)
NEW 00 OLD 05
Mounting the base unit on a wall
1 Raise the hang-up tab.
2 Plug the telephone line cord to the LINE jack and the AC power
adaptor to the DC IN 9V jack, and hook the cords.
3 Attach the wall bracket to the center of the base unit.
Align the f marks of the wall bracket with those of the base unit.
4 Plug the telephone line cord to the telephone outlet, and hook the
base unit to the wall plate.
5 Plug the AC power adaptor to an AC outlet. Then raise the antenna
so that it points towards the ceiling.
Tip
To remove the wall bracket, press the lower tabs.
If you move or change your telephone company
If you turn off the bese unit, it is reset and either FSK or stutter dial tone is
automatically selected according to the voice mail service you are using.
Using the Caller ID list
By using the Caller ID list, you can call back a phone number from the Caller ID
list easily, or store numbers from the Caller ID list into the Phone Directory.
Calling back a number from the Caller ID list
1 Display the phone number you want
to call from the Caller ID list (see
“Viewing the Caller ID list”).
2 Confirm the number and press
(SELECT).
3 Make “DIAL” flash using the Jog
lever, then press (SELECT).
The phone automatically dials the
displayed number.
Notes
• If the number displayed in step 1 is not the one you should call back, you can change the
number of digits of the phone number (see “To change the number of digits of the phone
number”).
• If the phone is connected to a Private Branch Exchange (PBX), you may not be able to
call back from the Caller ID list because an outside line access digit is necessary.
Tip
You may press (TALK) to make a call instead of doing steps 2 and 3.
To erase the entire list at once
You can erase the entire list at once only when all the data has become “OLD”
data. If there is any “NEW” data, you cannot erase the entire list.
1 Display any Caller ID data.
2 Press (SELECT).
3 Make “ERASE” flash using the Jog lever,
then press (SELECT).
4 Make “ALL” flash using the Jog lever, then
press (SELECT).
5 Make “YES” flash using the Jog lever, then
press (SELECT).
You will hear a long confirmation beep and
the entire list is erased.
Locating the handset
You can page the handset from the base unit.
Note that you cannot page if the handset is in use.
Press (HANDSET LOCATOR).
The handset rings for about one
minute.
To stop ringing, press (OFF) on
the handset.
Tip
You can page the handset even when “RINGER” is set to “RINGER OFF”.
Understanding the Caller ID service
Caller ID allows the caller’s phone number to be shown on the display before the
call is answered. In order to use this feature, you must first subscribe to the
Caller ID service. The name of this service may vary depending on your
telephone company.
When you receive a call
The phone number appears on the display with the date and time as shown in
the following example.
If your Caller ID service includes the caller name service, the caller’s name also
appears on the display (up to 15 letters).
When you answer the call, the Caller ID display changes to the “TALK” display.
Note
If the call is from an office which uses multiple lines, the displayed phone number may not
match the number you use to call the extension.
Tip
Even if the ringer of the handset is set to “RINGER OFF”, you can receive Caller ID data.
Setting the ringer type
You can select a ringer type of the handset from four type.
1 Press (PGM).
2 Display “RINGER” using the Jog
lever.
The current ringer type appears.
3 Press (SELECT).
4 Select a ringer type (“1” to “4”) using
the Jog lever.
5 Press (PGM).
You will hear the corresponding
ringer tone.
Tip
You may press (SELECT) instead of doing step 5.
Turning off the ringer of the handset
1 Perform steps 1 to 3 in “Setting the ringer
type”.
2 Select “OFF” using the Jog lever.
3 Press (PGM).
You will hear a long confirmation beep.
Tip
You may press (SELECT) instead of doing step 3.
When “RINGER” is set to “RINGER OFF”
The handset won’t ring. You can still make calls, and also receive calls if another
telephone connected to the same line rings to inform you on incoming calls.
To turn the ringer on again
Follow the instructions described in “Setting the ringer type”.
RINGER: 1
RINGER: OFF
Erasing a memory location
1 Display the name and phone number you
want to erase by doing steps 1 and 2 in
“Making calls from the Phone Directory”
below.
2 Press (SELECT).
3 Make “ERASE” flash using the Jog lever,
then press (SELECT).
4 Make “YES” flash using the Jog lever, then press (SELECT).
You hear a long confirmation beep and the memory location is
erased.
Making calls from the Phone Directory
1 Raise the Jog lever.
“DIRECTORY” appears.
2 Display the name and phone
number you want to call.
To search in alphabetical order:
Raise or lower the Jog lever.
To search by entering the initial
character: Press the dialing key of
the desired character, then lower the
Jog lever.
3 Press (SELECT).
4 Press (SELECT) again.
The phone number will be dialed.
Tip
You may press (TALK) to make a call instead of doing steps 3 and 4.
About the search order
The names appear in the following order when you raise or lower the Jog lever.
• Alphabetical order: ABC...XYZ y symbols y * y # y 0 - 9
• Initial character: To search for “SONY” for example, press (7) and then lower
the Jog lever to search through the names starting with S.
SONY
DIAL EDIT ERASE
ERASE NO YES
SONY
DIAL EDIT ERASE
t
t
(TALK)
Caller’s name
Caller’s phone number
The date and time received
SMITH JOHN
ERASE ALL NO YES
Notes on power sources
On battery pack
• Store the battery pack at a temperature between 41°F (5°C) and 95°F (35°C) for
best performance.
• If you do not use the handset for a long period of time, remove the battery
pack after charging for more than 10 hours. This maintains battery life.
On power failure
• During a power interruption, you cannot make or receive calls.
For the customers in the USA
RECYCLING NICKEL-CADMIUM BATTERIES
Nickel-Cadmium batteries are recyclable. You can help preserve
our environment by returning your unwanted batteries to your
nearest point for collection, recycling or proper disposal.
Note: In some areas the disposal of nickel-cadmium batteries in
household or business trash may be prohibited.
RBRC (Rechargeable Battery Recycling Corporation) advises you about spent battery
collection by the following phone number.
Call toll free number: 1-800-822-8837 (United States and Canada only)
Caution: Do not handle damaged or leaking nickel-cadmium batteries.
Maintenance
• Clean the cabinets with a soft cloth slightly moistened with water or a mild
detergent solution. Do not use any type of abrasive pad, scouring powder or
solvent such as alcohol or benzine as they may damage the finish of the
cabinet.
• If the charge terminals of the base unit and handset are soiled, wipe them with
a soft cloth.
If you have any questions or problems concerning your phone, please consult
your nearest Sony dealer.
LIGHT OFF: YES
If the VOICE MAIL lamp remains flashing
If this lamp does not go off (e.g. When you retrieve your messages with other
phones), you can go off the lamp manually.
To go off the VOICE MAIL lamp
1 Press (PGM) on the handset.
2 Display “MESSAGES WAITING” using the
Jog lever, then press (SELECT).
3 Make “YES” flash using the Jog lever, then
press (PGM).
The VOICE MAIL lamp on the base unit
goes off, and you will hear a long
confirmation beep.
Tip
You may press (SELECT) instead of pressing (PGM) in step 3.
1
2
1234,5
Wall
bracket
AC power
adaptor cord
Telephone
line cord
AC outlet
AC power
adaptor
Wall plate
Hang-up tab
VOICE MAIL lamp