


Note
This equipment has been tested and found to comply with the limits for a
Class B digital device, pursuant to Part 15 of the FCC Rules. These limits
are designed to provide reasonable protection against harmful interference
in a residential installation. This equipment generates, uses and can radiate
radio frequency energy and, if not installed and used in accordance with the
instructions, may cause harmful interference to radio communications.
However, there is no guarantee that interference will not occur in a
particular installation. If this equipment does cause harmful interference to
radio or television reception, which can be determined by turning the
equipment off and on, the user is encouraged to try to correct the
interference by one or more of the following measures:
– Reorient or relocate the receiving antenna.
– Increase the separation between the equipment and receiver.
– Connect the equipment into an outlet on a circuit different from that
to which the receiver is connected.
– Consult the dealer or an experienced radio/TV technician for help.
Setting up the phone
Caution
The cordless telephone operates at a frequency that may cause interference to nearby
TVs and VCRs; the base unit should not be placed near or on the top of a TV or VCR;
and, if interference is experienced, moving the cordless telephone farther away from
the TV or VCR will often reduce or eliminate the interference.
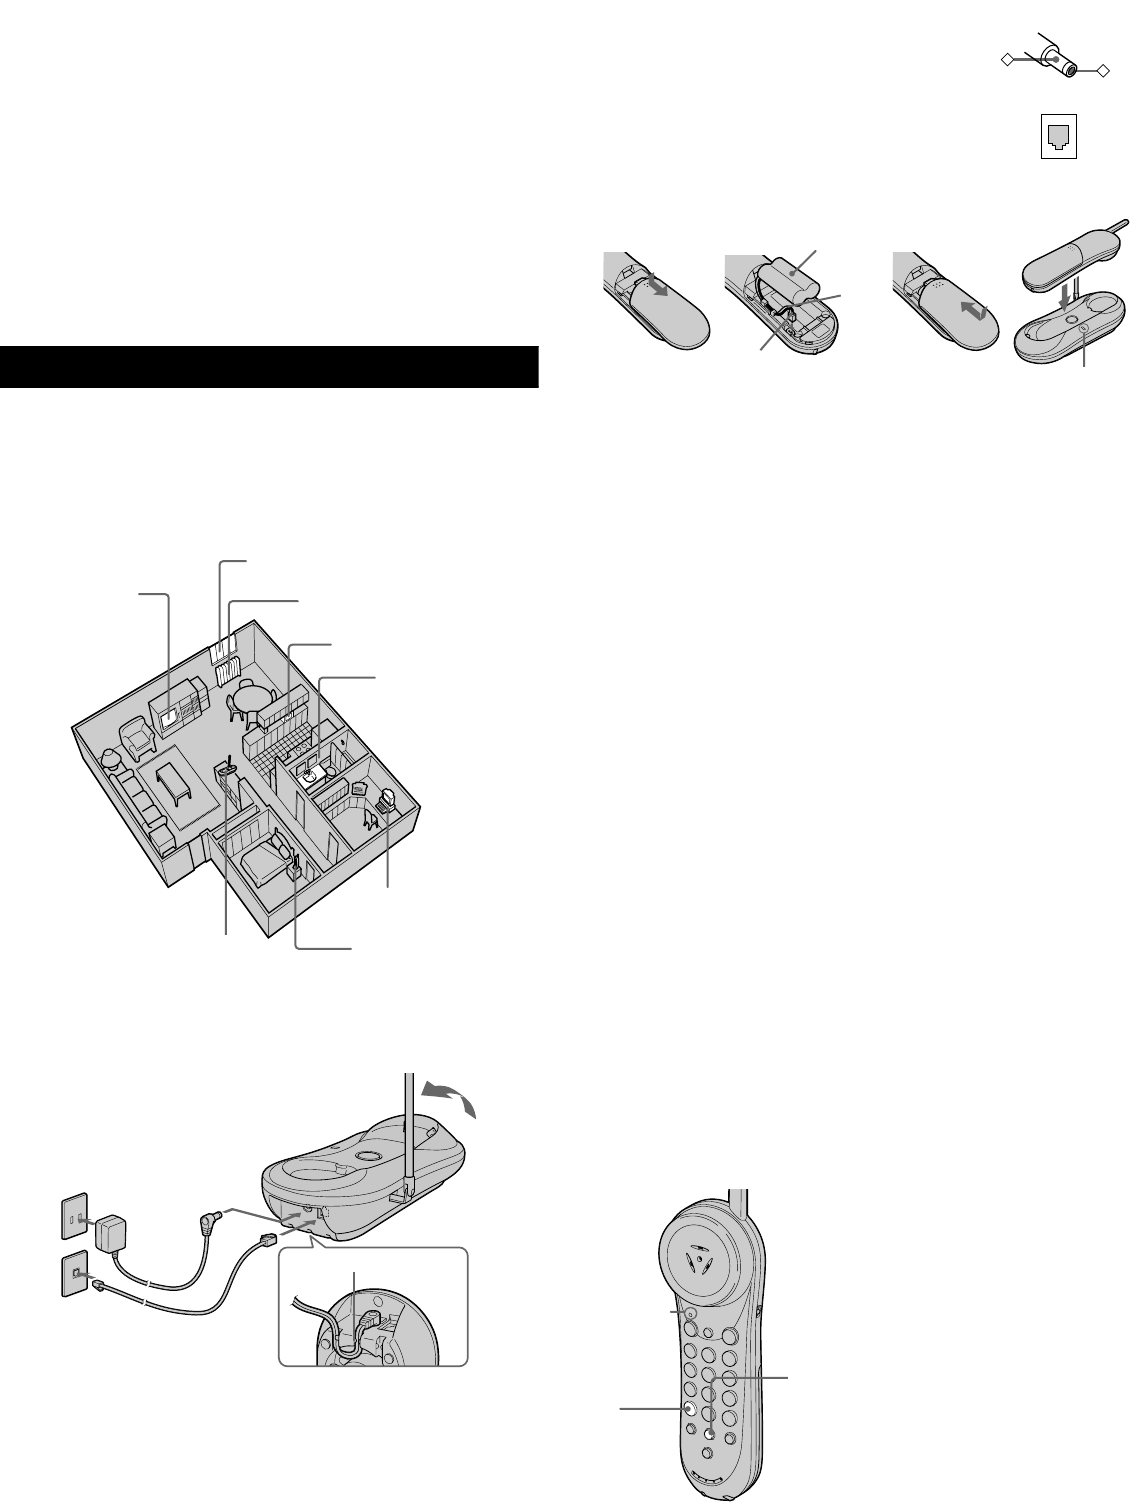
Choose the best location
Connect the base unit
If you want to hang the base unit on the wall, mount the unit first (see “Mounting the
base unit on the wall”).
1
Connect the telephone line cord to the LINE jack and to a telephone
outlet.
2
Connect the AC power adaptor to the DC IN 9V jack and to an AC
outlet.
3
Raise the antenna. Make sure it points toward the ceiling.
Notes
• Use only the supplied AC-T127 AC power adaptor. Do not use
any other AC power adaptor.
• Connect the AC power adaptor to a continuous power supply.
• Place the base unit close to the AC outlet so that you can unplug
the AC power adaptor easily.
Tip
If your telephone outlet is not modular, contact your telephone
service company for assistance.
Prepare the battery pack
Insert the battery into the handset and charge first before you start using your phone.
1
Slide open the battery compartment lid of the handset.
2
Connect the battery connector with correct polarity (black wire goes on
lower side and red wire goes on upper side), and hook the cords.
3
Insert the battery pack, and close the lid.
4
Place the handset on the base unit.
The LINE/CHARGE lamp lights up when the handset is properly seated
on the charge terminals of the base unit. Charge the battery pack for
more than 12 hours so that the battery is fully charged. The LINE/
CHARGE lamp remains lit even after charging is completed.
Battery duration
A fully charged battery pack lasts for about:
• 10 hours when you use the handset continuously.
• 30 days when the handset is in standing by.
Notes
• The battery pack will gradually discharge over a long period of time, even if not in use.
• If you leave the battery pack in the handset without charging it, the battery pack will be
completely discharged. It may require several times of charging to recover to its full capacity.
• If the battery runs out completely, the setting of dialing mode, the speed dial numbers and the
digital security code will be erased. If this happens, charge it on the base unit for over 12 hours.
Then choose the dialing mode, set the ringer type, reprogram the speed dial numbers, and
assign a new digital security code (see “Resetting the digital security code”). You may need to
charge the battery several times before it is recharged to its full capacity.
To obtain the best performance from battery
Do not place the handset on the base unit after each call. The battery works best if the
handset is returned to the base unit after two or three calls. However, do not leave the
handset off the base unit for a long period of time as this will completely discharge
the battery pack.
When to purchase a new battery pack
If the battery lasts only a few minutes even after
12 hours
of charging, the usable
life of the battery has expired and needs replacement. Contact your local Sony
authorized dealer or service center, and ask for Sony
BP-T50
rechargeable battery
pack.
Note
Battery life may vary depending on usage condition and ambient temperature.
Choose the dialing mode
For the telephone to work properly, select an appropriate dialing mode (tone or
pulse). The default setting is tone.
Note
Do not allow more than 20 seconds to elapse between each step of the procedure.
Away from television
sets and other
electronic equipment
Away from noise sources such as a window
by a street with heavy traffic
Away from heat sources, such as
radiators, airducts, and sunlight
Away from a microwave oven
Away from excessive
moisture, extremely low
temperatures, dust,
mechanical
vibration, or shock
Away from a personal
computer
Near a central location
and on a level surface
Away from a another
cordless telephone
2
1
3
Hook the cord.
To AC outlet
AC power adaptor
(supplied AC-T127)
Telephone line cord
(supplied)
To DC IN 9V
To LINE
To telephone
outlet
1
Press (PGM).
The TALK/BATT LOW lamp
flashes.
2
Press (* TONE).
You hear a confirmation beep.
3
Press (1) for pulse dialing or
(2) for tone dialing.
4
Press (PGM).
You hear a long confirmation
beep and the TALK/BATT LOW
lamp goes off.
–
+
Polarity of the plug
Modular
1
2
3
4
LINE/CHARGE lamp
BP-T50
Red
Black
1, 4
2
TALK/BATT
LOW lamp