


Recording a memo message
You can leave messages for other users of the unit.
1 Press (REC/MEMO).
2 Press a mailbox button
((MAILBOX 1), (MAILBOX 2) or
(MAILBOX 3)) to which you want to
leave the message.
“Now recording” is announced
and counting starts.
3 Speak into the base unit
microphone (MIC) to record your
message.
A memo can be up to four minutes
in length.
4 Press (PLAY/STOP) to stop
recording.
The message number on the
display increases by one.
Notes
• If the memory becomes full, the answering machine will stop recording.
• “Memory full” is announced if no recording space is available when you press
(REC/MEMO).
• If your message is shorter than two seconds, the recording will be canceled.
• The display flashes “99” if you record a memo for more than 99 seconds.
• If a call comes in during recording, the recording will be stopped.
Operating from an outside
phone
Setting the remote ID code (security code)
To operate the answering machine from a touch-tone phone while you are
away from home, you need to set the remote ID code (security code).
1 Press (MENU) repeatedly until you
hear “Set security code”.
2 Press (SELECT) to change the
remote ID code (security code)
setting.
3 Press (TIME/SET) to confirm your
choice.
The new remote ID code (security
code) is announced.
4 Press (PLAY/STOP) to exit the
menu setup mode.
Note
Press and hold (SELECT) to increase the remote ID code (security code) by 10.
Picking up new messages
1 Call your telephone number from a touch-tone phone.
2 When you hear the greeting, press (#) and enter your remote
ID code (security code).
You will hear a confirmation beep.
The number of new messages will be announced.
3 Press the keys in the “Table of control codes” below for the
desired operation command.
4 When you are finished, disconnect the line.
Notes
• Do not let two seconds elapse between each digit of the remote ID code (security
code) and the control code.
• If you did not turn on the answering machine, your phone answers automatically
after 10 rings.
• If the message recording memory runs out, the answering machine turns off
automatically. “Memory full. Please enter your security code” is announced.
• If you enter wrong remote ID code (security code) three times, the line will
disconnect.
• If no keys are pressed within 20 seconds, the line will disconnect.
Tips
• Press (*)(0) on the touch-tone keypad or (PLAY/STOP) on the base unit to
disconnect the line.
• Cut off the Remote Control Card and carry it with you to see how to operate from
an outside phone.
Table of control codes
To
Play back messages in MAILBOX 1
Play back messages in MAILBOX 2
Play back messages in MAILBOX 3
Repeat/skip backward
Get help
Stop operation
Skip forward
Record greeting
Check greeting
Record a memo
Erase individual messages
Turn answering machine on/off
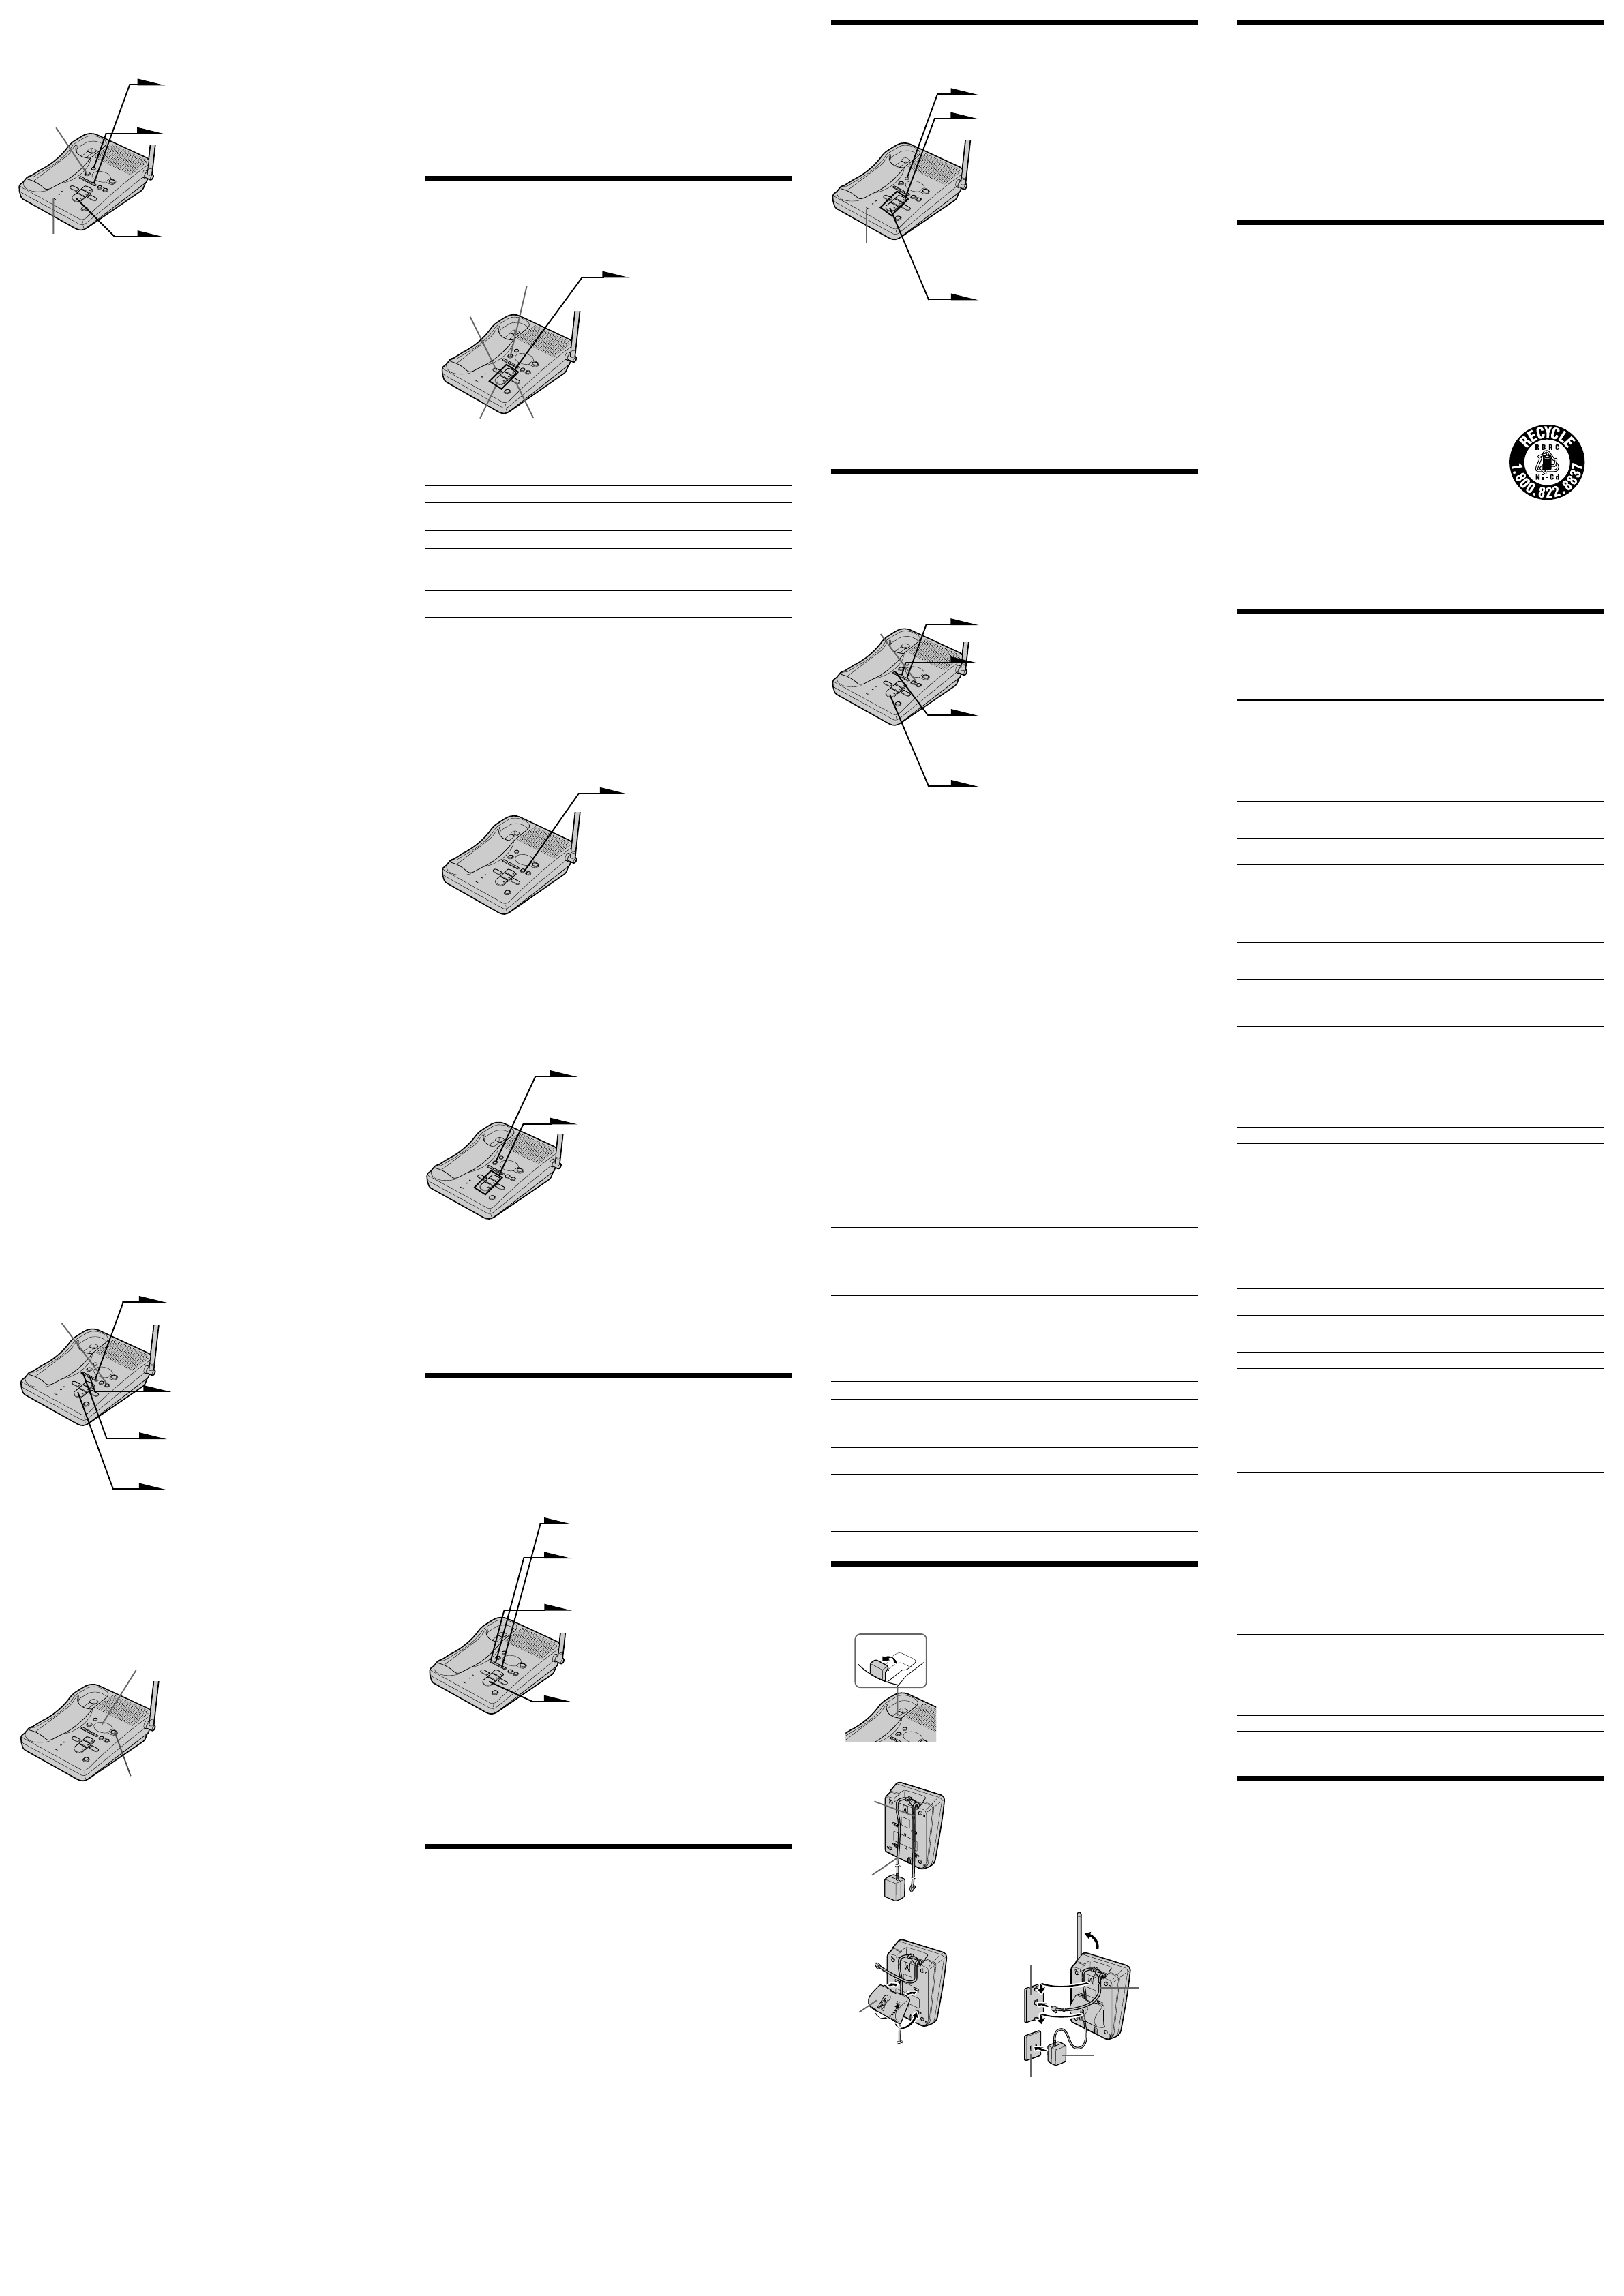
Mounting the base unit on the
wall
1 Raise the hang-up tab.
2 Plug the telephone line cord to the LINE
jack and the AC power adaptor to the
DC IN 9V jack, and hook the cords.
3 Attach the wall bracket to the center of
the base unit.
Align the f marks of the wall bracket
with those of the base unit.
4 Plug the telephone line cord to the
telephone outlet, and hook the base unit
to the wall plate.
5 Plug the AC power adaptor to an AC
outlet. Then raise the antenna so that it
points towards the ceiling.
Tip
To remove the wall bracket, press the lower tabs.
Key
(#)(1)
(#)(2)
(#)(3)
(#)(4)
(*)(5)
(#)(5)
(#)(6)
(*)(7)
(#)(7)
(*)(8)
(#)(9)
(#)(0)
Notes
Plays back from the first new message.
Plays back from the first new message.
Plays back from the first new message.
Press during play back to repeat a
message. To skip backward, press
within two seconds after the current
message starts.
Press to access simple voice menu.
Press again to access advanced voice
menu.
Stops every function
Press during play back to skip forward.
“Now recording” is announced.
Review your greeting
Select the mailbox by entering “1”, “2”
or “3”.
Press during play back
Turns the system on/off. “Answer
machine on” or “Answer machine off”
is announced.
Solution
• Make sure you have set up the base unit correctly.
• Move the handset closer to the base unit.
• Replace the handset to the base unit for a while to
reset the random security code.
• Make sure the telephone line cord is securely
connected to the telephone outlet.
• Make sure the battery is fully charged.
• Make sure the dialing mode is set correctly.
• Make sure the last dialed number is really the one
you want to dial.
• Make sure the ringer is turned on.
• The battery may be weak. Charge the battery for
more than 10 hours.
• Make sure you have set up the base unit correctly.
• Move the handset closer to the base unit.
• Replace the handset to the base unit for a while to
reset the random security code.
• Make sure the telephone line cord is securely
connected to the telephone outlet.
• Make sure the ringer is turned on.
• Move the handset closer to the base unit.
• Place the base unit away from noise sources.
• Press (CHANNEL) for a channel that gives better
reception.
• The battery is weak. Charge the battery for more
than 10 hours.
• Make sure you follow the procedure in storing the
number correctly.
• Replace the handset to the base unit for a while.
• You pressed the number button to which no
phone number has been stored.
• Store a correct number.
• The handset may be engaged in conversation.
• The battery may have little or no power. Charge
the battery for more than 10 hours.
• Replace the handset to the base unit for a while.
• Raise the antenna of the base unit vertically.
• Place the base unit away from noise sources.
•
The remaining recording time is less than 30 seconds
or 99 messages were recorded. The answering
machine becomes “Memory full” status and does not
record messages. Erase messages.
• The message is less than two seconds. The
answering machine does not record messages less
than two seconds in length.
• Adjust the speaker volume.
• The caller’s message is too long.
• The caller’s voice is too low. The unit disconnects
the line when it detects seven seconds of silence.
• There was a power interruption. Reset the time.
• Make sure you call from a touch-tone phone.
• Make sure the remote ID code (security code) is
correct.
• Make sure you entered the remote ID code
(security code) within two seconds after you‘ve
entered (#).
• You entered wrong remote ID codes (security
codes) three times.
• Wipe the charge terminals of the base unit and the
handset with a soft cloth for better contact of the
charge terminals.
• Make sure the handset is placed on the base unit
properly.
• The battery pack was charged less than 10 hours
(due to power failure, etc.).
• The usage life of the battery has expired and
needs replacement.
(ERASE)
MIC
(ANSWER ON/OFF)
Message counter
(PLAY/STOP) (SKIP/QUICK)
(REPEAT/SLOW)
To
Stop playback
Repeat the current message
Skip the current message
Go back to the previous
message
Play back slowly
Play back quickly
1
Hang-up tab
(VOLUME)
Recording the greeting
You can record your own greeting for the “normal” and “announcement
only” modes (see “Selecting the Announcement Only Mode”).
1 Press (MENU) repeatedly until “Set
out-going message” is announced.
“- -” blinks on the display.
2 Press (REC/MEMO).
“Now recording” is announced
and a long beep sounds.
3 Speak into the base unit microphone
(MIC). The display starts counting.
You can record up to 90 seconds.
4 To stop recording, press
(PLAY/STOP).
Your greeting replays
automatically.
Notes
• If you do not record your own greeting, the prerecorded greeting will be assigned
automatically.
• If your greeting is less than two seconds, the greeting is not recorded. The
prerecorded greeting will be assigned automatically.
• If a call comes in during recording, recording stops automatically.
• If 90 seconds have passed or memory becomes full in step 3, recording stops
automatically.
• “Memory full” is announced if no recording space is available when you press
(REC/MEMO). Erase unnecessary messages (see “Erasing messages”).
Tip
To record a greeting for the “announcement only” mode, select the announcement
only mode first (see “Selecting the Announcement Only Mode”), then follow the
instructions above. Otherwise, the normal greeting will be recorded.
To check the greeting
Press (MENU) repeatedly until “Set out-going message” is announced.
Then press (PLAY/STOP) to play back the greeting.
To change the greeting
Record a new greeting by following the instructions on the previous page.
The new greeting replaces the old one.
To erase the greeting
1 Press (MENU) repeatedly until “Set out-going message” is
announced.
2 Press (ERASE).
Notes
• You can also erase the greeting during playback.
• If you have erased your own greeting, the prerecorded greeting will be assigned
automatically.
Prerecorded greetings
Normal mode: “Hello, I’m unable to answer your call right
now. Please leave your name, number and
message after the tone.”
Announcement only mode: “Hello, I’m unable to answer your call right
now. Please call again. Thank you.”
Setting the number of rings
You can select the number of times the phone rings before it answers to take
a message.
There are four modes: 2, 4, 6, and Toll Saver.
1 Press (MENU) repeatedly until you hear “Set number of rings”.
“- -” blinks on the display.
2 Press (SELECT) repeatedly to select a ring duration (2, 4, 6, or
Toll Saver).
To answer after 2 rings, select “2”.
To answer after 4 rings, select “4”.
To answer after 6 rings, select “6”.
Select “Toll Saver” to answer after 2 rings when there are new
messages, and 4 rings where there are no new messages.
3 Press (TIME/SET).
The ring duration setting is announced.
4 Press (PLAY/STOP) to exit the menu setup mode.
Notes
• When the number of rings is set to “Toll Saver”, the phone answers after 2 rings if
new messages are recorded. If no new message are recorded, it answers after 4
rings. When you hear 3 rings, you will know that there are no new messages. You
can save the toll for the call when you pick up messages from an outside phone.
• The number of rings is preset to 4 rings.
Setting the audible message alert
You have the option of having a beep tell you if you have received any new
incoming messages.
1 Press (MENU) repeatedly until you
hear “Set audible message alert”.
“- -” blinks on the display.
2 Press (SELECT) to set the audible
message alert on or off.
3 Press (TIME/SET).
The setting is announced.
4 Press (PLAY/STOP) to exit the
menu setup mode.
Notes
• When the audible message alert is turned on, you will hear a beep every 10 seconds
if there are any new messages.
• To stop the beep, press any button related to the answering machine function or
(VOLUME)(+)/(
-
).
• The audible message alert is preset to off.
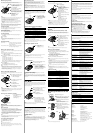
Turning on the answering function
Press (ANSWER ON/OFF) on
the base unit.
The ANSWER ON/OFF
button lights up.
Mailbox usage
This phone offers you three voice mailboxes, providing a convenient way to
share the mailbox feature with other members of your household or
business.
When a caller calls
The caller can choose one of the two ways to leave a message:
• If calling from a touch-tone phone, the caller select a mailbox by pressing
(*)(1) (MAILBOX 1), (*)(2) (MAILBOX 2) or (*)(3) (MAILBOX 3)
while the caller hears the greeting. The greeting stops and a beep will
sound, then the caller can start recording a message
• Wait until the greeting finishes, then start recording a message. When
the caller does not select a mailbox, the message is automatically
recorded to MAILBOX 1.
Notes
• If four minutes have passed while recording the incoming message, the line will be
disconnected automatically.
• If the message is shorter than two seconds, it will not be recorded.
To turn off the answering function
Press (ANSWER ON/OFF) on the base unit.
The ANSWER ON/OFF button goes off.
Note
The answering function is preset to on.
Tip
The answering machine will automatically answer a call after 10 rings, even if the
answering function is off and announces “Please enter your security code” to prompt
the caller to turn on the answering function.
When the memory is full
The total recording time of this answering machine is approximately 15
minutes (including the greeting, messages, and memo).
When the remaining recording time becomes less than 30 seconds, “F”
flashes on the display and the answering machine goes into the memory
full status.
In this status, the answering machine will not answer a call until after 10
rings even if the answering function is on.
To avoid this erase unnecessary messages (see “Erasing messages”). You
can also erase the messages from an outside phone (see “Picking up new
messages”).
Playing back messages
If there are new messages, the display flashes the number of new messages.
You will hear beeps if the audible message alert setting is on (see
“Setting the
audible message alert”
).
Press a mailbox button
((MAILBOX 1), (MAILBOX 2)
or (MAILBOX 3)) to play
back new messages in the
selected mailbox.
Additional tasks when playing back messages
Do this
Press a mailbox button ((MAILBOX 1), (MAILBOX 2)
or (MAILBOX 3)).
Press (REPEAT/SLOW) during play back.
Press (SKIP/QUICK).
Press (REPEAT/SLOW) within the first two seconds
of the current message playback.
Press and hold (REPEAT/SLOW) during play back.
Release (REPEAT/SLOW) to return to normal.
Press and hold (SKIP/QUICK) during play back.
Release (SKIP/QUICK) to return to normal.
Notes
• If a call comes in, the play back will stop.
• A time and day stamp is announced after each message.
Tips
• If there are no new messages, all the previously reviewed messages are played back.
• The messages are saved even after a power failure.
Adjusting the speaker volume
To adjust the speaker
volume, press
(VOLUME)(+) or (
-
).
Notes
• When you have reached the minimum or maximum volume level, you will hear
three short beeps.
• You cannot adjust the speaker volume while the phone is ringing.
Tip
There are 8 steps for the volume level (1 to 8). The volume level is preset to 5.
Erasing messages
1 Press and hold (ERASE) for more
than two seconds.
2 Press a button for the mailbox you
want to erase ((MAILBOX 1),
(MAILBOX 2) or (MAILBOX 3)).
You will hear a long confirmation
beep and all “old” messages in the
selected mailbox are erased.
To erase individual messages
Press (ERASE) while playing back the message that you want to erase.
Note
The display shows the total number of “new” (i.e. unreviewed) messages. Therefore,
the display is reset to “0” when you have played back all new messages, whether they
have been erased or not. Be sure to erase unnecessary messages before the memory
becomes full.
Selecting the Announcement
Only Mode
You can set the answering machine to play the greeting without recording
incoming messages (announcement only mode). You might want to select
this mode when, for example, you expect to be away for a while and you
cannot pick up messages.
1 Press (MENU) repeatedly until you
hear “Set announce only”.
2 Press (SELECT) to set the
announcement only mode on or
off.
3 Press (TIME/SET).
The setting is announced.
4 Press (PLAY/STOP) to exit the
menu setup mode. The display
shows “A” when the answering
machine is set to the
announcement only mode.
Notes
• To activate announcement only mode, you have to turn on the answering machine.
• The announcement only mode is preset to off.
Screening calls
You can screen calls by leaving the answering machine on while you are at
home. When a call is answered, you can hear the message being recorded
through the base unit. You can decide either to continue recording or to
answer the call.
The message will be recorded, but to hear it you will need to play back the
message (see “Playing back messages”).
To answer the call
Press (TALK) on the handset.
Notes
• Press (VOLUME)(+) or (
-
) to
adjust the speaker volume. If the speaker volume is
set at its minimum level, you will not be able to hear incoming calls.
• The answering machine will stop automatically when the handset or a parallel phone
is picked up. If the answering machine does not stop, press either (PLAY/STOP) on
the base unit, or (*)(0) on the handset or parallel phone.
The recording will remain as a new message.
Maintenance
• Clean the cabinets with a soft cloth slightly moistened with water or a
mild detergent solution. Do not use any type of abrasive pad, scouring
powder or solvent such as alcohol or benzine as they may damage the
finish of the cabinet.
• If the charge terminals of the base unit and handset are soiled, wipe them
with a soft cloth.
If you have any questions or problems concerning your phone, please
consult your nearest Sony dealer.
Notes on power sources
On battery pack
• Store the battery pack at a temperature between 41°F (5°C) and 95°F
(35°C) for best performance.
• If you do not use the handset for a long period of time, remove the
battery pack after charging for more than 10 hours. This maintains
battery life.
On power failure
• During a power interruption, you cannot make or receive calls, and you
cannot use the answering machine.
For the customers in the USA
RECYCLING NICKEL-CADMIUM BATTERIES
Nickel-Cadmium batteries are recyclable. You can help
preserve our environment by returning your unwanted
batteries to your nearest point for collection, recycling or
proper disposal.
Note: In some areas the disposal of nickel-cadmium
batteries in household or business trash may be
prohibited.
RBRC (Rechargeable Battery Recycling Corporation) advises you about spent battery
collection by the following phone number.
Call toll free number: 1-800-822-8837 (United States and Canada only)
Caution: Do not handle damaged or leaking nickel-cadmium batteries.
Troubleshooting
Should any problem persist after you have made these checks, consult your
nearest authorized Sony dealer.
Problem
You hear four short error
beeps when you press
(TALK/FLASH).
You hear no dial tone.
The phone does not connect
at all, even though the
number you dial is correct.
The phone does not redial
correctly.
The handset does not
ring.
The base unit does not
ring.
You hear interference
during conversation.
You hear a beep every
three seconds during the
conversation.
You cannot store a speed
dialing number.
You cannot make a speed
dialing call.
Speed dialing is incorrect.
The handset does not ring
when calling from the
base unit.
Message is not recorded.
No sound from the
speaker of the base unit.
The caller’s message is
interrupted.
The clock is incorrect.
The phone does not
accept your remote ID
code (security code).
The line is disconnected
when you call your phone
from a touch-tone phone.
The CHARGE lamp does
not light up when you
place the handset to
charge.
The battery duration is
short.
Message counter
The message counter on the base unit shows the following information.
It means
Number of messages not yet played back.
Flashes when the day and time is cleared or delayed
due to a power interruption, or when you connect the
base unit to the AC outlet for the first time. Reset the
time correctly.
The announcement only mode is selected.
The recording area is full. Erase unnecessary messages.
Specification
General
Frequency band 902 - 928 MHz
Operating channel 30 channels
Dial signal Tone, 10 PPS (pulse) selectable
Supplied accessories AC power adaptor AC-T130
Telephone line cord (1)
Rechargeable battery pack BP-T18
Directories (1 sheet)
Wall bracket (1)
Handset
Power source Rechargeable battery pack BP-T18
Battery life Standby: Approx. 6 days
Talk: Approx. 7 hours
Dimensions Approx. 56 x 43 x 178 mm (w/h/d), antenna excluded
(approx. 2
1
⁄
4
x 1
3
⁄
4
x 7
1
⁄
8
inches)
Antenna: Approx. 32 mm (approx. 1
1
⁄
4
inches)
Mass Approx. 220 g (approx. 7.7 oz), battery included
Base unit
Power source DC 9V from AC power adaptor AC-T130
Battery charging time Approx. 10 hours
Dimensions Approx. 172 x 65 x 205 mm (w/h/d), antenna excluded
(approx. 6
7
⁄
8
x 2
5
⁄
8
x 8
1
⁄
8
inches)
Antenna: Approx. 153 mm (approx. 6
1
⁄
8
inches)
Mass Approx. 500 g (approx. 1 lb 2 oz), wall bracket excluded
Answering machine
Maximum recording time About 15 minutes, using incorporated IC
Greeting message Up to 90 seconds per each
Incoming and Memo message Up to 4 minutes per message
Design and specifications are subject to change without notice.
When the counter shows
Flashing number
CL
A
F
(ERASE)
MIC
(VOLUME)
2
Telephone
line cord
AC power
adaptor
cord
3
Wall
bracket
4,5
Telephone
line cord
AC power adaptor
Wall
plate
AC outlet