


The Wi-Fi SIP Phone requires a wireless connection to a Wi-Fi network
access point to operate. In addition, the access point network must
provide access to a VoIP SIP server, either on the local network or over
the Internet, to be able to make calls.
Connect to a Wi-Fi Network — When the Wi-Fi SIP Phone is used for
the first time, you must set up a Wi-Fi network connection. Follow these
steps:
1. Press the Navigation Key to select the main
menu.
2. From the main menu, select Network
Settings.Then, from the Network Settings
menu, select “Wireless Network.”
3. Press the Left Soft Key to select the options,
then select “New.”
4. In the New Profile screen, move the
Navigation Key down to highlight “Scan,”
then press down to perform a search for
nearby Wi-Fi networks.
5. A list of detected Wi-Fi networks displays.
From the list, select the wireless network that
you want to connect to and press down on
the Navigation Key.
Normally, you need to be within 90 m (300 ft)
of a network’s wireless access point to be
able to connect to it. If the network you want
to connect to is not on the list, move to
another location and try again.
6. The New Profile screen displays again with
the Wi-Fi network name already configured.
You can change other settings for the
wireless network, such as IP address
configuration. (The default setting is DHCP.)
If authentication is required by the network,
select the authentication type and enter the
encryption key value, as provided by the
wireless network operator.
The wireless network information is retained in the Wireless
Configuraion list. The wireless networks in the list are stored in the
phone’s memory and will be used every time the phone is powered
on.
Set Up VoIP Details — Once you have established a network
connection, you need to enter your SIP account details as provided by
your SIP service provider. Follow these steps:
1. Press the Navigation Key to select the main
menu. From the main menu, select Network
Settings, and then select “VoIP.”
2. From the VoIP Setting menu, select the
profile to configure, then press the Left Soft
Key to access the Options menu. Select
View/Edit.
3. On the VoIP configuration, enter details as
provided by your SIP service provider. The
minimum SIP details required are:
• Phone Number — Your SIP account phone
number.
• Auth Name — Your SIP account username
that uniquely identifies you to the SIP server.
• Auth Password — An alphanumeric string
that uniquely identifies the SIP user’s
permission rights.
• SIP Proxy address — The Domain name or IP address of the SIP
proxy server.
• SIP Proxy port — The proxy server port number, normally 5060.
• SIP Registrar Address — The Domain name or IP address of the
SIP registrar server.
• SIP Registrar Port — The SIP registrar server port number.
When you finish configuring the VoIP details, the phone will restart
automatically. When the phone has restarted, it automatically connects
to the wireless network and logs into the SIP proxy server.
For detailed instructions on setting up preferred networks, refer to the
User Guide that is on the included Documentation CD.
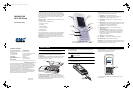
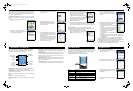
The Wi-Fi SIP Phone’s color LCD display provides various status
indicators and access to the menu-based interface. The illustration
below shows the main screen and its elements.
Battery Status — Indicates the status of the battery. Shows a fully
charged or partially charged level, and when charging.
Network Status — Indicates the status of the Wi-Fi network connection
or the current connected network.
IP Status — Indicates the network IP status or current IP address of the
phone.
SIP Status — Indicates the SIP service status.
Wireless Signal Status — Indicates the strength of the Wi-Fi network
signal.
Current Time — The current time set on the phone. You can set the
phone’s time and date by using the Menu to select “Phone Settings” and
then “Date/Time.”
Navigation Key Action — The action that happens when you press
down on the Navigation Key. Typically, the Navigation Key selects the
current menu item or confirms a setting. From the main screen, this
provides access to the main menu.
Right Soft Key Action — The action that happens when you press the
Right Soft Key. Typically, the Right Soft Key cancels the last action or
returns to the previous menu.
Left Soft Key Action — The action that happens when you press the
Left Soft Key. Typically, the Left Soft Key selects the Options menu.
The main menu provides access to all network and phone settings, plus
other features. The menus are easy to move through using the four-way
Navigation key. Just move the Navigation key up or down to highlight a
menu item, then push down on the key to select it.
The following table outlines the phone menu structure.
To make a VoIP call, follow these steps:
1. Press the keypad keys to directly enter the
number you want to call.
2. Press the Send button to make the call. Wait
for the call to connect and be answered.
3. While the call is in progress, the contact
number and length of time the call is active
are displayed.
4. When you have finished the call, press the
End button.
Battery Status
Right Soft
Key Action
Wireless
Signal Status
Left Soft
Key Action
Current Time
Navigation
Key Action
IP Status
Network Status
SIP Status
Menu Description
Call History Lists missed calls, incoming and outgoing calls
Contacts Your contacts list
Applications Access to other phone features
Phone Settings Access to phone settings and call features
Network Settings Network configuration, SIP settings, and current
wireless network status
Calendar Access to the calendar application
THE PHONE’S LCD DISPLAY
INITIAL SET UP
THE MAIN MENU
MAKING A CALL
vm1188t-17_QSG.fm Page 2 Thursday, February 15, 2007 3:34 PM