REVIEWING CALL RECORDS
• Press the up or down arrows to view the newest
call record.
• Press the down arrow to scroll through the call
records from the most recent to the oldest.
• Press the up arrow to scroll through the call
records from the oldest to the newest.
• When all of the records have been viewed,
START/
END
appears in the display.
DELETING CALL RECORDS
• To delete the record shown in the display, press
the DELETE button once.
• To delete all records while reviewing, press and
hold the DELETE button for about 3 seconds.
DELETE ALL?
appears in the display. Press DELETE
again to complete.
NOTE: This feature DOES NOT work when the
handset is picked up. This prevents the buttons
from being accidentally pressed on the back of
the handset.
DIALING BACK
When reviewing Caller ID records, you can dialback
the numbers shown on the display by pressing the
DIAL button.
NOTE: This feature DOES NOT work when the
handset is picked up. This prevents the buttons
from being accidentally pressed on the back of
the handset.
IF YOU PROGRAMMED YOUR LOCAL AREA
CODE
IN THE SETUP MENU
1. Use the arrow buttons to display the number you
want to dial.
• If you see a number with 7 digits (i.e. 555-1234),
then the call was received from within your area
code. However, this does not guarantee the call is
a local call.
• If you see a number with 11 digits (i.e. 1-234-555-
1234), then the call received was not from your area
code.
2. Press the DIAL button and the display shows
PICKUP or ADJ
. A 15 second timer will also start at
this point on the upper right side of the display,
letting you know the time until the unit will return
to the Caller ID record. If you adjust the number to
be dialed, the timer will reset after each adjust-
ment.
3. To adjust the phone number, press the DIAL
button. For instance, a 7-digit local number
sometimes cannot be dialed because it requires a
10-digit or 11-digit format. Press the DIAL button
repeatedly to scroll through the 7, 10, and 11-digit
numbers.
7-digits:
7-digit telephone number
(i.e. 555-5555)
10-digits:
3-digit area code + 7-digit telephone number
(i.e. 425-555-5555)
11-digits:
long distance code 1 + 3-digit area code + 7-
digit telephone number
(i.e. 1-425-555-5555)
4. To dial the displayed number, pick up the handset
before the timer reaches 0.
NOW DIALING
shows
in the display and the number is dialed.
IF YOU DID NOT PROGRAM YOUR LOCAL
AREA
CODE IN THE SETUP MENU
1. Use the arrow buttons to display the number you
want to dial. You will only see 11-digit numbers
(i.e. 1-234-555-1234).
2. See steps 2 through 4 in the above section to
complete the dialback sequence.
NOTE: If only PICKUP PHONE shows on the
display, no other changes to the number can be
made. The information sent from the telephone
company is known to be a valid number for
dialing back (available only in limited areas).
Once you pick up the phone, the number will be
automatically dialed.
MESSAGE INDICATORS
The following special messages indicate the status of
a message or the unit:
NO CALLS
The Caller ID memory log is
empty.
UNKNOWN CALL
The incoming call does not have
Caller ID service or their service
area is not linked to yours. If
UNKNOWN CALL
appears along
with a calling number, the name
information for that number was
not available.
BLOCKED CALL
The caller is registered as “Private
Number” and their Caller ID
information is withheld.
ERROR
Caller information has been
interrupted or corrupted during
transmission.
NO DATA
No Caller ID signal has been
detected, or Caller ID service has
not been activated.
START/END
You are at the beginning or the
end of the Caller ID memory log.
Battery power level is low.
TELEPHONE BASICS
REDIALING A NUMBER
If you want to call the last number you dialed again
(up to 32 digits), use REDIAL.
1. Pick up the handset.
2. Press REDIAL.
3. The last number called is automatically redialed.
ONE-TOUCH REDIAL
If the last call you dialed was busy, you can redial it
immediately by just pressing the REDIAL button
without hanging up the handset. The number dials
automatically.
NOTE: Using the FLASH button and then
pressing REDIAL will not perform a redial.
FLASH
This feature is used to activate customer calling
services available through your local phone
company, such as Call Waiting.
Press the FLASH button to put the person you’re
talking to on hold and answer the incoming call.
TEMPORARY TONE DIALING
If you have pulse service, you can temporarily
change from pulse to tone service. After dialing the
telephone number, press and release the * button on
the telephone. This allows access to phone services
that require a tone, such as banking and long-
distance services. After you hang up the handset, the
telephone automatically returns to pulse service.
MEMORY
Before you store any telephone number into
memory, make sure the dial mode is correct for the
type of telephone you’re using. The default dial
mode is tone (touch-tone), so if you have pulse
(rotary) service, you must first change the dial mode.
See “Setting the Dial Mode.”
The following buttons can be stored into any
memory location: 0-9, *, # and PAUSE (REDIAL). See
"Inserting a Pause in the Dialing Sequence" and
"Temporary Tone Dialing".
STORING A NUMBER IN MEMORY
1. Pick up the handset.
2. Press STORE.
3. Enter the telephone number, up to 20 digits (it will
not actually call the number in this mode). If you
make a mistake, hang up and repeat the procedure
for storing from the beginning.
4. Press STORE.
5. Press the desired memory location button (0-9 or
quick dial A,B, or C.)
6. Hang up the handset.
7. Write the name or number of party stored in the
memory location on the directory card.
CHANGING A STORED NUMBER
Repeat the storage sequence. The new number will
replace the old number at the memory location.
ERASING A STORED NUMBER
1. Pick up the handset.
2. Press STORE.
3. Press STORE again.
4. Press the location (A, B, C, 0-9) to be erased.
DIALING A QUICK DIAL NUMBER
1. Pick up the handset.
2. Press the quick dial location A,B, or C. The number
dials automatically.
DIALING STORED NUMBERS
1. Pick up the handset.
2. Press MEMORY.
3. Press 0-9 for the memory location. The number
dials automatically.
INSERTING A PAUSE IN THE DIALING
SEQUENCE
The REDIAL button becomes a pause function when
the STORE button has been pressed first. It is valid
only when storing a number into memory locations.
Use the REDIAL button to insert a pause when a
delay is needed in an automatic dialing sequence.
For example, when you must dial a 9 to get an
outside line or when you enter codes to access your
long distance company.
You may need to adjust the length of the pause
duration. It can be adjusted from 1 to 9 seconds. The
default setting is 4 seconds.
1. Pick up the handset.
2. Press the STORE button.
3. Press 1-9 (1=1 second, 2=2 seconds, etc.)
4. Press STORE again.
5. Press the REDIAL button to save.
GENERAL PRODUCT CARE
To keep your telephone working and looking good,
follow these guidelines:
• Avoid putting the phone near heating appliances
and devices that generate electrical noise (for
example, motors or fluorescent lamps).
• DO NOT expose to direct sunlight or moisture.
• Avoid dropping the handset, as well as other
rough treatment to the phone.
• Clean the phone with a soft cloth.
• Never use a strong cleaning agent or abrasive
powder because this will damage the finish.
• Retain the original packaging in case you need to
ship the phone at a later date.
REN NUMBER
On the bottom of this equipment is a label indicating,
among other information, the FCC Registration
number and Ringer Equivalence Number (REN) for
the equipment. You must, upon request, provide this
information to your telephone company.
The REN is useful in determining the number of
devices you may connect to your telephone line and
still have all of these devices ring when your
telephone number is called. In most (but not all)
areas, the sum of the RENs of all devices connected
to one line should not exceed 5. To be certain of the
number of devices you may connect to your line as
determined by the REN, you should contact your
local telephone company.
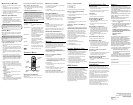
AB
*
0
#
OPER
7
8
1
2
3
4
5
6
9
ABC
DEF
JKLGHI
MNO
TUV
PQRS
WXYZ
MEMORY
FLASH
REDIAL
VOLUME
Store Memory Dial
C
REDIAL
button
FLASH
button
CHANGING THE VOLUME
You are able to control the listening level with the
VOLUME button.
It remains at the last level set until you change it.
TROUBLESHOOTING TIPS
NO DIAL TONE
• Check all cabling to make sure that all connections
are secure and not damaged.
• Check hook switch: Does it fully extend from the
handset when it is lifted from cradle?
NO DISPLAY
• Replace batteries.
• Check for proper battery installation.
NO INFORMATION IS SHOWN
AFTER THE PHONE RINGS
• Did you order Caller ID service from your local
telephone company?
• Be sure to wait until the second ring before
answering.
ERROR MESSAGE IS DISPLAYED
•
ERROR
appears in the display if the unit detects
anything other than valid Caller ID information
during the silent period after the first ring. This
message indicates either the presence of noise on
the line, or that an invalid message has been sent
from the telephone company.
• Be sure to wait until the second ring before
answering.
PHONE DOES NOT DIAL OUT
• Check the dial mode in the setup menu.
PHONE DOES NOT RING
• Is the ringer switch in the OFF position?
• Are you using too many phones on one line? (The
total REN of all phones on the same line should
not be greater than the maximum REN for your
calling area. See FCC Registration Information)
• See”NO DIAL TONE”.
INCOMING AND OUTGOING VOICE
VOLUME LOW
• Are other phones off hook at same time? If so, this
is normal condition as volume drops when
additional phones are used at once.
TONE FEEDBACK FLUTTER WHEN
DIALING IN PULSE MODE
• This is normal as power is fluctuating with phone
outpulsing.
TELEPHONE NETWORK
INFORMATION
Should your equipment cause trouble on your line
which may harm the telephone network, the
telephone company, where practicable, may notify
you that temporary discontinuance of service may be
required. Where prior notice is not practicable and
the circumstances warrant such action, the telephone
company may temporarily discontinue service
immediately.
The telephone company may make changes in its
communications facilities, equipment, operations or
procedures where such action is required in the
operation of its business. If these changes are
expected to affect the use or performance of your
telephone equipment, the telephone company will
likely give you adequate notice to allow you to
maintain uninterrupted service.
Notice must be given to the telephone company
upon termination of your telephone from your line.
SERVICE
ATLINKS Communications Canada, Inc.
warrants to the purchaser or gift recipient that
if any manufacturing defect becomes apparent
in this product within
1 year from the original date of purchase, it
will be replaced free of charge, including return
transportation.
This warranty does not include damage to the
product resulting from accidents, misuse or
leaking batteries.
Should your product not perform properly
during the warranty period, either:
1. Return it to the selling dealer with proof of
purchase for replacement,
OR
2. Remove the batteries (where applicable), and
pack product complete with accessories in
the original carton (or equivalent).
— Mail prepaid (with proof of purchase) and
insured to:
ATLINKS Communications Canada, Inc.
c/o Thomson Consumer Electronics Canada
6200 Edwards Boulevard
Mississauga, Ontario
L5T 2V7
The provisions of this written warranty are in
addition to and not a modification of or
subtraction from the statutory warranties and
other rights and remedies contained in any
applicable legislation, and to the extent that
any such provisions purport to disclaim,
exclude or limit any such statutory warranties
and other rights and remedies, such provisions
shall be deemed to be amended to the extent
necessary to comply therewith.
If you are unable to find a qualified servicer for
out of warranty service, you may write to:
ATLINKS Communications Canada, Inc.
c/o Thomson Consumer Electronics Canada
P.O. Box 0944
Indianapolis, Indiana, U.S.A., 46206-0944
Attach your sales receipt to this booklet for
future reference. This information is required if
service is needed during the warranty period.
PURCHASE DATE
____________________________________________________________
NAME OF STORE
____________________________________________________________
Model 29190C
15527770 (Rev. 1 CAN E)
00-26
Printed in China
Quick Dial
buttons
VOLUME
button
STORE
button
MEMORY
button
ATLINKS Communications Canada, Inc.
(An Alcatel / Thomson Joint Venture)
© 2000 ATLINKS Communications Canada, Inc.
Trademark(s) ® Registered
Marque(s) ® déposée(s)