


1. If both the straight and coiled line cords are
already connected, disconnect them from the base
unit. Place the handset off to the side.
2. To remove the battery doors, you must first
unloosen the retaining screw in each battery door.
3. Slide the battery doors in the direction of the
arrows.
4. Insert 4 AA-size alkaline batteries as shown on the
diagram in the battery compartments. Two
batteries will be inserted for each compartment.
5. Replace the battery compartment doors securely
and tighten the screws.
6. If the cords were previously connected, re-attach
the line cords to the unit and check your memory
locations.
NOTE: If the low battery icon appears in
the display, you need to replace the batteries. It
is important that you replace the batteries as
soon as possible in order to maintain Caller ID
operation.
During the replacing of batteries, a backup
circuit in the unit will retain your stored
information for up to 60 seconds. Write down
any stored information you do not want erased.
IMPORTANT: If you’re not going to use the
telephone for more than 30 days, remove the
batteries because they can leak and damage the
unit.
29190
13-Number Memory
Caller ID Telephone
User's Guide
We bring good things to life.
WARNING: TO PREVENT FIRE
OR ELECTRICAL SHOCK HAZARD,
DO NOT EXPOSE THIS PRODUCT
TO RAIN OR MOISTURE.
SEE MARKING ON BOTTOM / BACK OF PRODUCT
CAUTION
RISK OF ELECTRIC SHOCK
DO NOT OPEN
THE EXCLAMATION
POINT WITHIN THE
TRIANGLE IS A
WARNING SIGN
ALERTING YOU OF
IMPORTANT
INSTRUCTIONS
ACCOMPANYING
THE PRODUCT.
THE LIGHTNING
FLASH AND ARROW-
HEAD WITHIN THE
TRIANGLE IS A
WARNING SIGN
ALERTING YOU OF
"DANGEROUS
VOLTAGE" INSIDE
THE PRODUCT.
CAUTION: TO REDUCE THE
RISK OF ELECTRIC SHOCK,
DO NOT REMOVE COVER
(OR BACK). NO USER-
SERVICEABLE PARTS IN-
SIDE. REFER SERVICING
TO QUALIFIED SERVICE
PERSONNEL.
INDUSTRY CANADA NUMBER IS LOCATED ON THE
CABINET BOTTOM
REN NUMBER IS LOCATED ON THE CABINET
BOTTOM
IMPORTANT INFORMATION
NOTICE: The Industry Canada label identifies
certified equipment. This certification means that the
equipment meets certain telecommunications
network protective, operational and safety
requirements. The Industry Canada does not
guarantee the equipment will operate to the user’s
satisfaction.
Before installing this equipment, users should ensure
that it is permissible to be connected to the facilities
of the local telecommunications company. The
equipment must also be installed using an
acceptable method of connection. The customer
should be aware that compliance with the above
conditions may not prevent degradation of service in
some situations.
Repairs to certified equipment should be made by an
authorized Canadian maintenance facility designated
by the supplier. Any repairs or alterations made by
the user to this equipment, or equipment malfunc-
tions, may give the telecommunications company
cause to request the user to disconnect the
equipment.
Users should ensure for their own protection that the
electrical ground connections of the power utility,
telephone lines and internal metallic water pipe
systems, if present, are connected together. This
precaution may be particularly important in rural
areas.
CAUTION: Users should not attempt to make such
connections themselves, but should contact the
appropriate electric inspection authority, or
electrician, as appropriate.
NOTES: This equipment may not be used on coin
service provided by the telephone company.
Party lines are subject to telephone company tariffs
and, therefore, you may not be able to use your own
telephone equipment if you are on a party line.
Check with your local telephone company.
INTRODUCTION
Your telephone is designed to give you flexibility in
use and high quality performance. To get the most
from your new telephone, we suggest that you take a
few minutes right now to read through this
instruction manual.
CALLER ID
This feature allows you to see either the caller's
number or the caller's name and number before you
answer the phone.
CALL WAITING
This feature allows you to answer incoming calls
while you talk on the phone.
IMPORTANT: In order to use this feature, you
must subscribe to the standard Name/Number
Caller ID Service.
BEFORE YOU BEGIN
PARTS CHECKLIST
Make sure your package includes the following
items:
SETTING THE LCD CONTRAST
This adjustment allows optimization of the contrast
and viewing angle of the display.
1. Press and hold the up arrow button then press and
hold the down arrow button. Continue to hold
both buttons for 3 seconds.
SETUP MENU ^ v
appears.
2. Press the up arrow until
LCD CONTRAST
appears.
3. Press the DELETE button to show the current
contrast setting. There are 5 levels of contrast,
with the default set to 3.
4. To decrease the contrast, press the down arrow. To
increase, press the up arrow.
5. Press DIAL to store the contrast setting and return
to the
LCD CONTRAST
display.
SETTING THE DIAL MODE
This adjustment allows you to select tone (touch-
tone) or pulse (rotary) mode dialing.
1. Press and hold the up arrow button then press and
hold the down arrow button. Continue to hold
both buttons for 3 seconds.
SETUP MENU ^ v
appears.
2. Press the up arrow until
T/P DIAL MODE
appears.
3. Press the DELETE button to show the current dial
mode. The default is set to tone.
4. Use the arrow buttons to change the dial mode.
The display will alternate between the two modes.
5. Press DIAL to store the dial mode and return to the
T/P DIAL MODE
display.
EXITING SETUP
To exit the setup mode after your changes have been
made, you can immediately exit by selecting the
EXIT SETUP
menu and pressing the DIAL button.
NOTE: The phone will exit setup after 10
seconds if no buttons are pressed.
REMINDER: The time and date are
programmed automatically when the first Caller
ID information is successfully received after
setup.
INSTALLATION
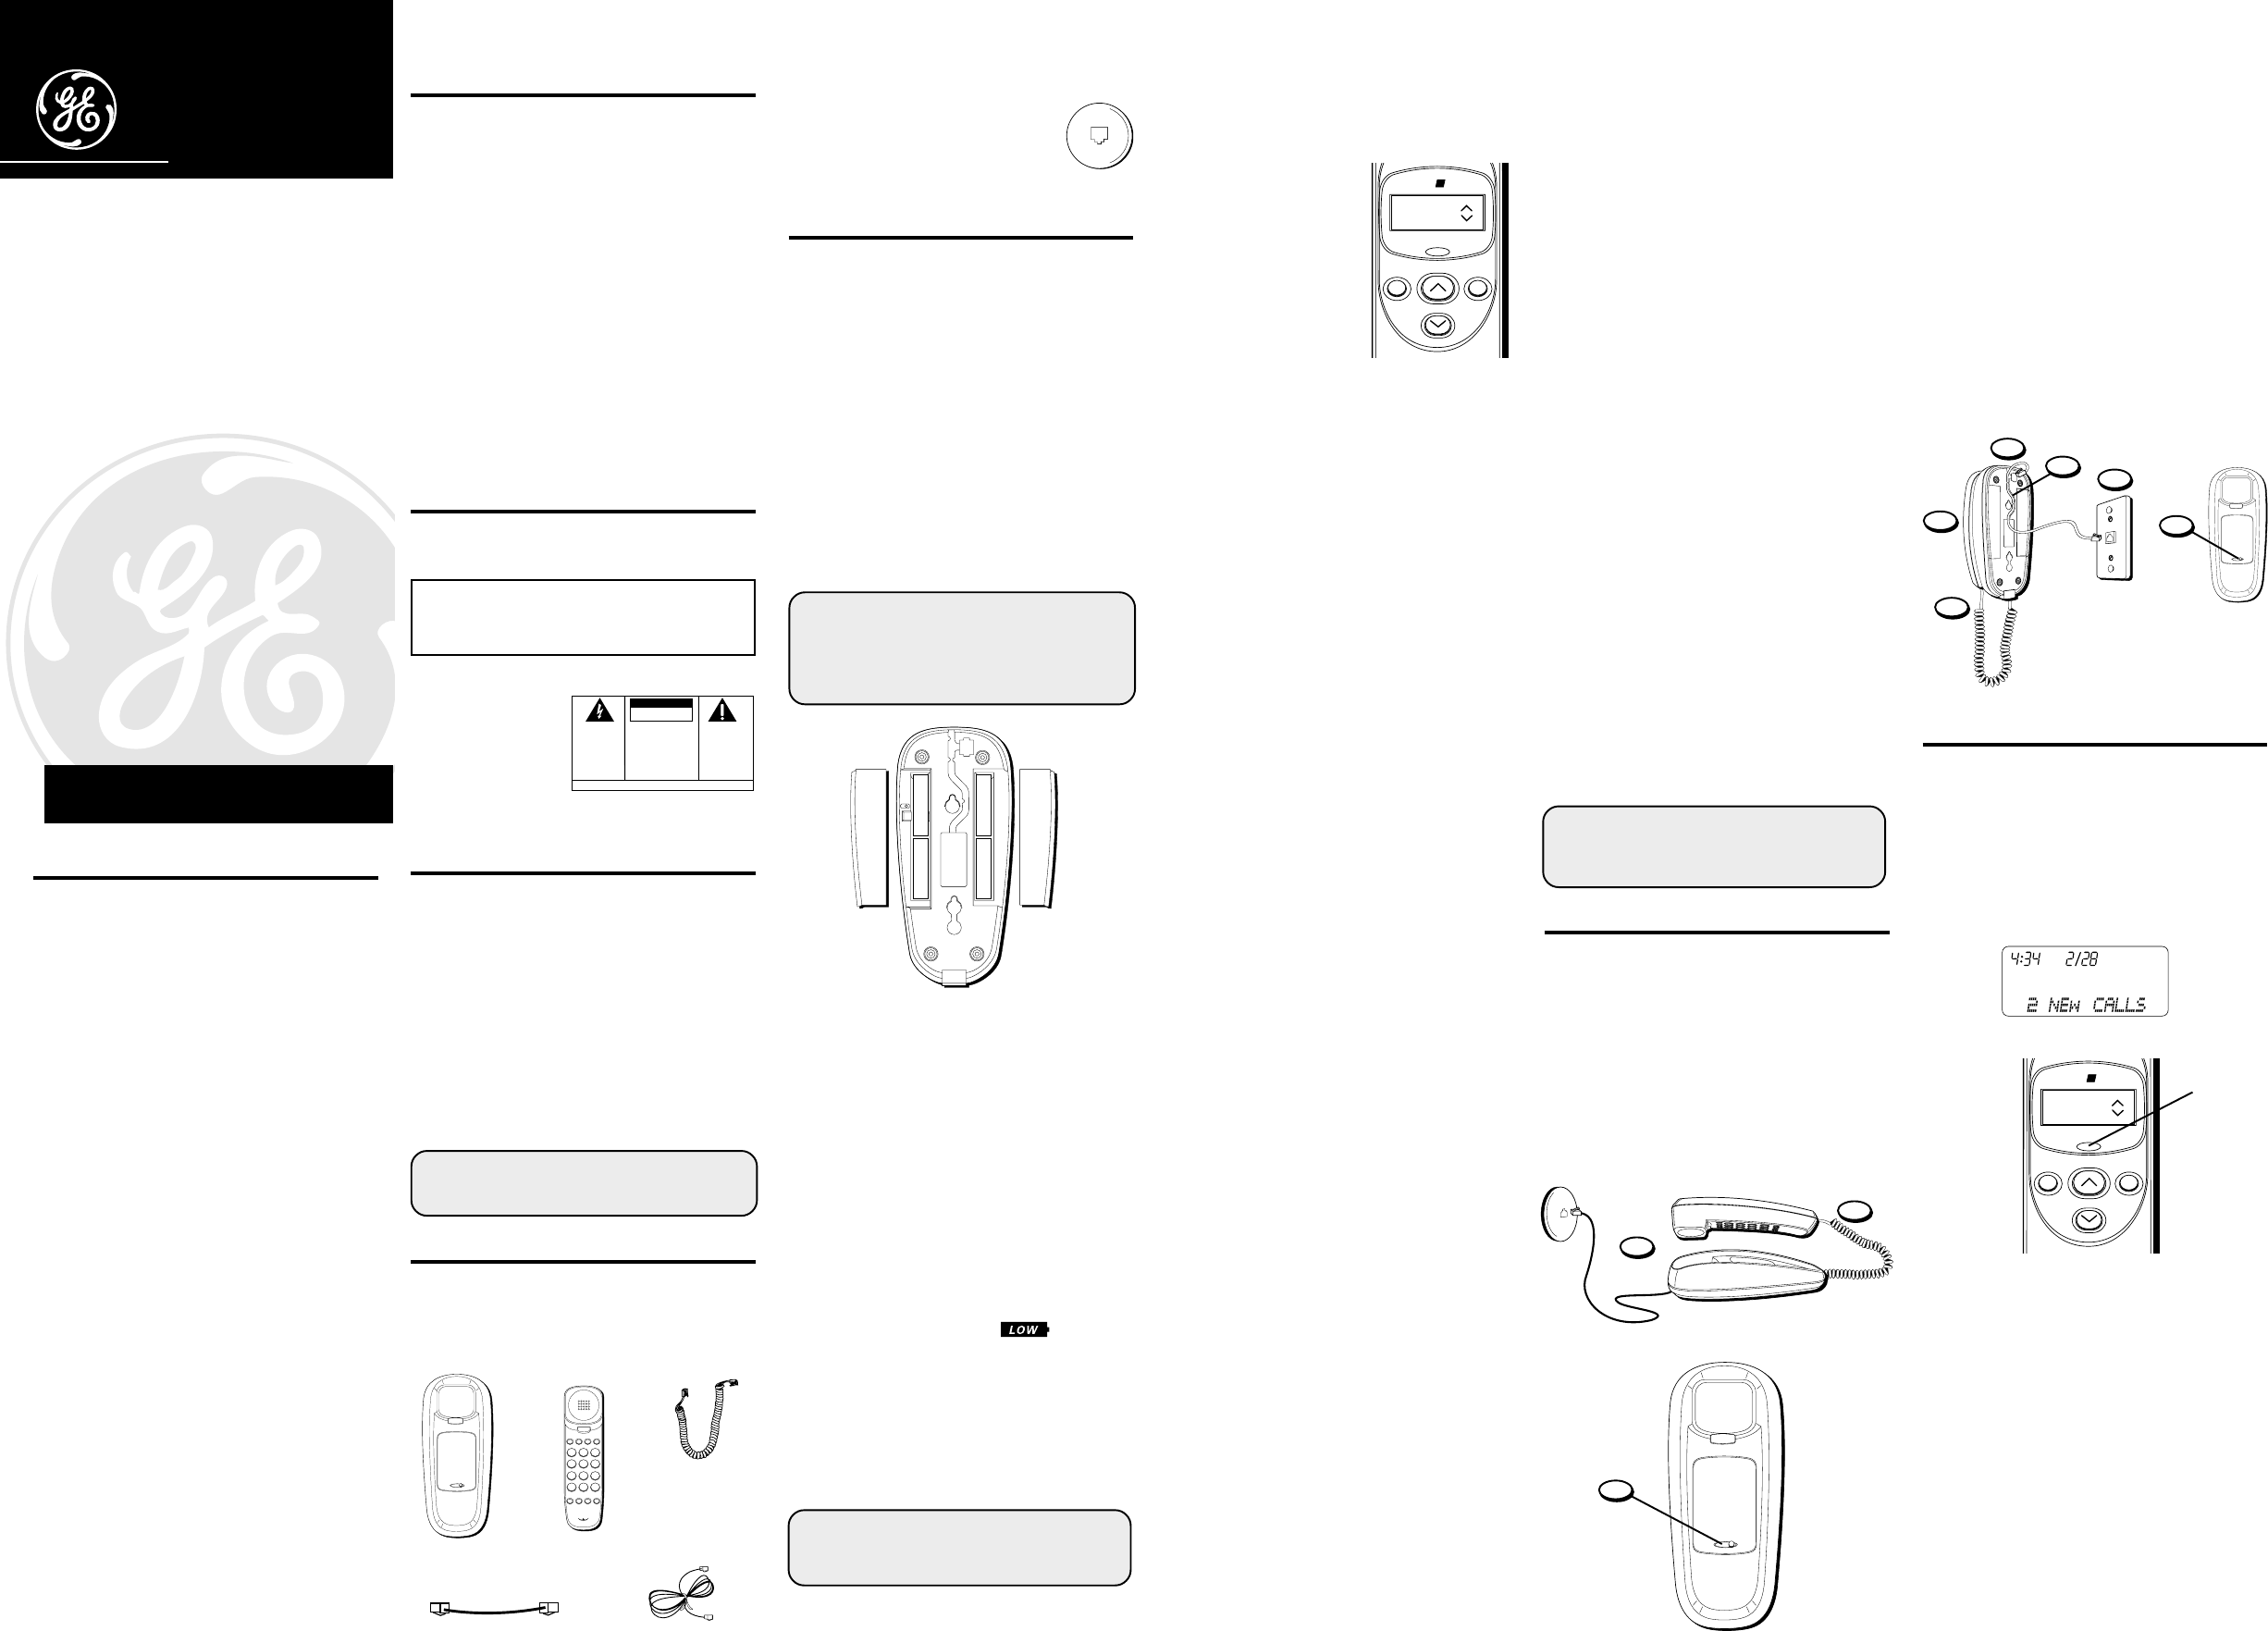
DESKTOP INSTALLATION
1. Plug the coiled cord into the handset. Plug the
other end into the jack on the bottom end of the
base.
2. Plug the long straight line cord into jack on the
bottom of the base. Plug the other end into a wall
jack.
3. Set the RINGER switch on the base to HI.
• LO = Sound will be lower.
• OFF = Telephone will not ring.
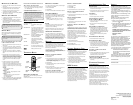
WALL MOUNT INSTALLATION
1. Plug the short line cord into the jack on the bottom
of the base and connect the other end to a wall
phone jack.
2. Feed the short line cord through the grooves
provided so that the base area is flat and ready to
mount on the wall.
3. Slip the mounting holes of the base (on bottom of
unit) over the wall plate posts and slide the base
down until the phone is firmly in place.
4. Plug the coiled cord into the handset. Plug the
other end into the jack on the lower end of the
base.
5. Set the RINGER switch on the base to HI.
• LO = Sound will be lower.
• OFF = Telephone will not ring.
6. Place the handset in the base.
INTERFERENCE INFORMATION
This equipment generates and uses radio frequency
energy which may interfere with residential radio
and television reception if not properly installed and
used in accordance with instructions contained in
this manual. Reasonable protection against such
interference is ensured, although there is no
guarantee this will not occur in a given installation. If
interference is suspected and verified by switching
this equipment on and off, the user is encouraged to
try to correct the interference by one or more of the
following measures: Reorient the radio/television
receiver’s antenna, relocate the equipment with
respect to the receiver, plug the equipment and
receiver into separate circuit outlets. The user may
also wish to consult a qualified radio/television
technician for additional suggestions. This
equipment has been fully tested and complies with
all limits for Class B computing devices pursuant to
part 15 FCC Rules and Regulations. This apparatus
does not exceed the class B limits for RF noise
emissions specified in the RFI regulations of the
Industry Canada.
HEARING AID COMPATIBILITY
This telephone system meets FCC/Industry Canada
standards for Hearing Aid Compatibility.
Base
Long telephone line
cord
RINGER VOLUME
OFFLO HI
AB
*
0
#
OPER
7
8
1
2
3
4
5
6
9
ABC
DEF
JKLGHI
MNO
TUV
PQRS
WXYZ
MEMORY
FLASH
REDIAL
VOLUME
Store Memory Dial
C
Handset
Short telephone
line cord
Handset cord
MODULAR JACK REQUIREMENTS
You need an RJ11 (CA11A) type modular
jack, which is the most common type of
phone jack and might look like the one
pictured here. If you don’t have a
modular jack, call your local phone
company to find out how to get one installed.
SETUP
IMPORTANT INSTALLATION
INFORMATION
• Never install telephone wiring during a lightning
storm.
• Never touch uninsulated telephone wires or
terminals, unless the telephone line has been
disconnected at the network interface.
• Use caution when installing or modifying
telephone lines.
INSTALLING THE BATTERIES
Your Caller ID phone uses 4 AA-size alkaline batteries
for receiving and storing Caller ID records and for the
numbers you use for memory dialing.
IMPORTANT: You will have approximately 60
seconds to replace the batteries before the
memories stored in the handset are lost. Please
read the instructions before replacing the
batteries and have the batteries ready to be
inserted beforehand.
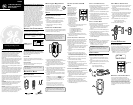
SETTING UP THE CALLER ID
M
ENU
You should not plug the
telephone into the wall
line jack while setting up
the Caller ID menu. An
incoming call may
invalidate the change if it
was not yet saved. The
phone must display
xx
CALLS
before you can
enter the setup menu.
1. Press and hold the up
arrow button then press
and hold the down
arrow button. Continue
to hold both buttons for
3 seconds.
SETUP
MENU ^ v
appears.
2. At this point you can press either arrow to scroll
among the 6 menu screens, which are:
• SETUP MENU ^ v
• LOCAL AREA CODE (default - - -)
• CID LANGUAGE (default English)
• LCD CONTRAST (default 3)
• T/P DIAL MODE (default tone)
• EXIT SETUP
3. You have 10 seconds following any key press
before the phone will automatically return to the
CALLS
summary screen.
SETTING YOUR LOCAL AREA CODE
You need to program the local area code in order for
the phone to determine the number format to be
displayed when a valid Caller ID signal is received.
Numbers that match the local area code are
displayed as 7 digits and are used for dialing back
previous numbers.
1. Press and hold the up arrow button then press and
hold the down arrow button. Continue to hold
both buttons for 3 seconds.
SETUP MENU ^ v
appears.
2. Press the up arrow until
LOCAL AREA CODE
appears.
3. To enter or change the area code, press the
DELETE button. The display shows the present
area code stored. The first digit flashes, indicating
it is ready to accept the area code entry.
4. Press the down arrow to choose 9-0 for the first
digit.
5. When the desired digit is flashing, press the up
arrow to advance to the next digit.
6. Repeat steps 4 and 5 until all the digits for your
area code are correct.
If you make a mistake, you can simply retrace the
previous steps until your area code is set.
7. Press DIAL to store the area code and return to the
LOCAL AREA CODE
display.
SETTING THE CID DISPLAY LANGUAGE
This adjustment changes the Caller ID prompts to be
displayed in English, French or Spanish.
1. Press and hold the up arrow button then press and
hold the down arrow button. Continue to hold
both buttons for 3 seconds.
SETUP MENU ^ v
appears.
2. Press the up arrow until
CID LANGUAGE
appears.
3. Press the DELETE button to show the current
language setting. The default is English.
4. Use the arrow buttons to change the language.
5. Press DIAL to store the language and return to the
CID LANGUAGE
display.
CALLER ID PHONE
SETUP MENU
delete dial
review
RINGER VOLUME
OFF LO HI
2
1
3
RINGER VOLUME
OFFLOHI
5
4
1
2
6
3
CALLER ID FEATURES
SUMMARY SCREEN
The summary screen shows the current time, current
date and number of new calls to be reviewed. It is
displayed until any button is pressed. Within 10
seconds of receiving a new call, the summary screen
is displayed and the red
NEW
indicator comes on.
NOTE: The number of new calls is displayed
until all new calls have been reviewed.
AM
PM
CALLER ID PHONE
SETUP MENU
delete dial
review
NEW indicator
RECEIVING AND STORING CALLS
This unit receives and displays information
transmitted by your local phone company. This
information can include the phone number, date, and
time; or the name, phone number, date, and time.
The unit can store up to 60 calls for later review.
When the memory is full, a new call automatically
replaces the oldest call in memory.
NEW
will appear
in the display for calls received that have not been
reviewed.