


2
Note:
You must not connect your CID to:
• coin-operated systems
• party-line systems
• most electronic key telephone systems
In the unlikely event that your CID causes problems on the phone
line, the phone company can temporarily disconnect your service. If
this happens, the phone company attempts to notify you in advance.
If advance notice is not practical, the phone company notifies you as
soon as possible and advises you of your right to file a complaint
with the FCC.
Also, the phone company can make changes to its lines, equipment,
operations, or procedures that could affect the operation of this CID.
The phone company notifies you of these changes in advance, so
you can take the necessary steps to prevent interruption of your tele-
phone service.
This CID complies with the limits for a Class B digital device as
specified in Part 15 of
FCC Rules
.
These limits provide reasonable protection against radio and TV in-
terference in a residential area. However, your equipment might
cause TV or radio interference even when it is operating properly. To
eliminate interference, you can try one or more of the following cor-
rective measures:
• Reorient or relocate the TV or radio's receiving antenna.
• Increase the distance between the equipment and the radio or
TV.
• Use outlets on different electrical circuits for the equipment and
the radio or TV.
Contact your local RadioShack store if the problem continues.
ˆ
Preparation
CONNECTING THE CID
The CID connects to any modular phone jack and your phone. You
can also connect it to an answering machine.
Connecting to a Single-Line Phone
1. Disconnect the telephone line cord from the phone and plug it
into the CID's
LINE
jack.
2. Plug one end of the supplied line cord into the CID's
PHONE
jack.
3. Plug the other end of the cord into the phone's jack.
Connecting to an Answering Machine
1. Disconnect the phone line cord that connects your answering
machine to the phone line from the answering machine's jack.
Then plug it into the CID's
LINE
jack.
2. Plug one end of the supplied line cord into the CID's
PHONE
jack.
3. Plug the cord's other end into the answering machine's jack.
4. Set your answering machine to answer after two or more rings.
This gives the CID time to record the call information that the
phone company sends between the first and second rings.
Note:
If you subscribe to Call Waiting service with your telephone
company and you receive a new Call Waiting call at the same time
your answering machine is recording another call, the Call Waiting
information sent by the phone company disconnects the recording.
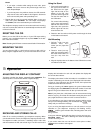
CONNECTING POWER AND SETTING UP
THE CID
To power the CID, you must connect it to AC power using the sup-
plied AC adapter. The CID will then prompt you to set the display
language and your local area code.
You can use the CID without setting the area code, but you will not
be able to use the callback feature (see “Using Callback” on
Page 4).
Cautions:
You must use a Class 2 power source that supplies
9V DC and delivers at least 200 mA. Its center tip
must be set to negative and its plug must fit the CID's
DC 9V 200mA
jack. The supplied adapter meets these specifica-
tions. Using an adapter that does not meet these specifications
could damage the CID or the adapter.
• Always connect the AC adapter to the CID before you connect it
to AC power. When you finish, disconnect the adapter from AC
power before you disconnect it from the CID.
1. Plug the supplied AC adapter's barrel plug into the
DC 9V 200mA
jack on the back of the CID.
2. Route the adapter's cord through the strain relief on the bottom
of the CID.
3. Connect the other end of the adapter to a standard AC outlet.
The CID displays
SET
LANGUAGE
for a few seconds, then
ENGLISH
(the default display language) flashes for about 2
minutes.
4. To select a different language, while
ENGLISH
appears, press
REVIEW 8
88
8
once to display
FRENCH
or twice to display
SPAN-
ISH
.
Notes:
• The display shows
ENGLISH
again if you press
REVIEW 8
88
8
a third time.
• If you do not press a key within 2 minutes, the CID automati-
cally selects English, then beeps once and displays
12:00AM
1/01
. To select another language, disconnect
then reconnect AC power and repeat Step 4.
5. Press
REVIEW
9
99
9
to store the selected language. The CID
beeps once,
000
and
SET
AREA
CODE
appear. The first
0
flashes.
6. Within 2 minutes, repeatedly press
REVIEW
8
88
8
until the first
digit of your area code appears, then press
REVIEW
9
99
9
. The
second
0
flashes.
!