


2
MAKING THE CONNECTIONS
The system connects to any modular phone jack and your phone.
You can also connect it to an answering machine.
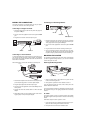
Connecting to a Single-Line Phone
1. Disconnect the phone line cord from the phone and plug it into
the system’s
LINE
jack.
2. Plug one end of the supplied line cord into the system’s
PHONE
jack.
3. Plug the other end of the cord into the phone’s jack.
Connecting to a Two-Line Phone
To record information about calls received on a two-line phone, you
can connect two caller IDs using a triplex adapter (not supplied).
Each system only records information about calls received on the
line to which it is connected.
Follow these steps to connect two caller IDs to a two-line phone.
1. Disconnect the telephone line cord from the modular phone jack
(on the wall) and plug it into
L1 + L2
on the triplex adapter.
2. Plug the triplex adapter into the modular phone jack.
3. Plug one end of the supplied line cord into the
LINE
jack on one
of the systems.
4. Plug the other end of the cord into either
L1
or
L2
on the triplex
adapter.
5. Repeat Steps 3 and 4 to connect another system to the remain-
ing open jack (
L1
or
L2
) on the triplex adapter.
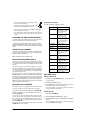
Connecting to an Answering Machine
1. Disconnect the phone line cord that connects your answering
machine to the phone line from the answering machine’s jack.
Then plug the cord into the system’s
LINE
jack.
2. Plug one end of the supplied line cord into the system’s
PHONE
jack.
3. Plug the cord’s other end into the answering machine’s jack.
4. Set your answering machine to answer after two or more rings.
This gives the caller ID time to record the call information that
the phone company sends between the first and second rings.
MOUNTING THE SYSTEM
You can place the system directly on a desk, shelf, or table by itself
(or with the supplied mounting bracket), or you can use the bracket
to mount the system on a wall.
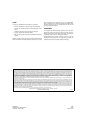
Attaching the Mounting Bracket
1. Align the keyhole slots on the bottom of the system with the
hooks on the mounting bracket.
2. Gently push the system down on the bracket to secure it.
If you are placing the system on a desk, shelf, or table, pull out the
stand on the back of the bracket.
To remove the bracket, position it so the display faces down and the
line connections face you. Then gently press down on the bracket to
remove it.
On a Wall
To mount the system on a wall, you need two screws (not supplied)
with heads larger than the keyhole slots on the back of the mounting
bracket.
Follow these steps to mount the system on a wall.
1. Using the keyholes in the supplied mounting bracket as a tem-
plate, mark the mounting screw locations on the wall.
2. Drill a pilot hole in the wall at each marked location.
PHONE Jack
LINE Jack
L1 + L2
L1
L2
Answering Machine’s
Jack
PHONE Jack
LINE Jack
Keyhole Slots
Hooks