


2
Setting the Doorbell’s Volume
Slide
VOL
located inside the battery
compartment to level
1
,
2
or
3
.
Testing the Doorbell
Test the doorbell before permanently
mounting it. With the indoor intercom plugged
into a standard AC outlet, adjust
VOLUME
on
the indoor intercom to its middle position.
Press
BELL
on the doorbell intercom. The
doorbell should sound.
Mounting the Doorbell
1. Drill four
3
/
16
inch diameter holes into the
mounting surface. Insert an anchor into
each hole.
2. Align the supplied metal mounting
bracket with the drilled holes and drive a
screw (not supplied) through the bracket
into each hole. Do not overtighten the
screws.
3. Align the slot on the back of the doorbell
with the hook on the mounting bracket.
Carefully push the doorbell onto the hook
and slide it down to secure it.
4. Once the doorbell is securely on the
bracket, insert the pan-head machine
screw (supplied) through the hole on the
lower edge of the doorbell into the
threaded holes in the bracket.
Mounting the Indoor Intercom
Follow these steps to mount the indoor
intercom on a wall.
Note:
You need two screws (not supplied)
with heads that fit into the keyhole slots on the
bottom of the intercom.
1. Mark the mounting screw locations 2
1
/
2
inches (64 mm) apart, one above the
other.
2. Drill a starter hole at each mark.
3. Thread a screw into each hole until the
screw’s head extends about
1
/
8
inch
(3.5mm) from the wall.
4. Align the keyhole slots on the bottom of
the intercom with the screw heads in the
wall, then slide the intercom down to
secure it and lift and extend the antenna.
Connecting the Indoor Intercom to
AC Power
Locate a standard AC outlet in the area where
you want to hear the chime and use the
intercom. Plug the indoor intercom’s power
cord into the outlet.
Caution:
This product is equipped with a
three-wire grounding-type plug ( a plug having
a third grounding pin). This plug will only fit
into a grounding-type power outlet. This is a
safety feature. If you are unable to insert the
plug into your AC outlet, contact your
electrician to replace your outlet. Do not
defeat the safety purpose of the grounding-
type plug.
Important:
Be sure you install the stations at
least 10 feet away from each other. Placing
the stations too close together produces
feedback (a squeal or howl from the
speakers). The stations can transmit up to
300 feet, including between buildings, as long
as they are connected to the same power line
transformer.
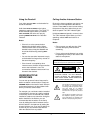
OPERATION
Turning the Indoor Intercom On
and Off and Adjusting the Volume
Rotate
VOLUME
counterclockwise until it
clicks. The POWER indicator lights. Then
adjust
VOLUME
to the desired listening level.
To turn off the indoor intercom, rotate
VOLUME
clockwise until it clicks. The POWER
indicator turns off.