


7
IMPORTANT SAFETY INFORMATION
Please read the following instructions before use:
•This product is suitable for indoor use only
•Use only the AC Adapter specified, with a power supply of the
correct voltage
•Use of battery types other than two alkaline AA or equivalent may
cause the unit to malfunction and could be hazardous
•Remove the batteries when using the AC Adapter or when the
MX10 Multimedia Adapter will not be used for more than one week
•Dispose of the batteries in accordance with local law
•Do not exceed a comfortable listening level. Do not listen to loud
material for long periods
•Do not use the MX10 with one piece telephones (i.e. telephones in
which the dial keypad is part of the handset).
INSTALLATION
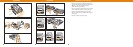
Identify the components as shown in Fig (A).
Install the MX10 Multimedia Adapter as shown in Fig (B).
We recommend the use of the AC power supply (included).
Alternatively two AA alkaline batteries (not included) may be used but
will need to be replaced frequently.
To install batteries refer to Fig (C) and follow these instructions:
1. Remove the Battery Access Door (1) located on the side of the
adapter by placing your thumb on the door and pushing down.
2. Install two AA alkaline batteries and replace the door.
3. You will hear three "beeps" through the headset when the batteries
are low.
6
1 Battery Access Door
2 Compatibility Slide Switch
3 Compatibility Slide
Switch Cover
4 Speak Volume Control
5 Listen Volume Thumbwheel
Control
6 Headset/Handset Selector
7 Telephone/Computer Audio
Switch (controls direction of
incoming sound)
8 Microphone Selection
Switch (controls direction
of microphone)
9 Headset Jack
10 External Audio Listen
Volume Control
DIAGRAM KEY DEFAULT SETTINGS
Refer to Fig (D).
These are the default switch settings for headset use:
1. Headset/Handset Selector (6) is switched to Headset.
2. Telephone/Computer Audio Switch (7) is released (no coloured
indicator showing).
3. Microphone Selection Switch (8) is released (no coloured
indicator showing).
4. Listen Volume Thumbwheel (5) is set to number 4.
5. Speak Volume Control (4) has been preset. You can adjust it when
you place your test call.
TELEPHONE/ADAPTER COMPATIBILITY
The Compatibility Slide Switch (2) has been preset to position 5, which
will work with most telephones. If adjustment is required refer to Fig (E)
and follow these instructions:
1. Remove the Compatibility Slide Switch Cover (3) by placing two
fingers or thumbs on the raised bumps and pushing down.
2. Using the flat screwdriver provided on the base of the adapter, move
the Compatibility Slide Switch (2) until you hear a clear dial tone.
Experimenting with various switch settings will not harm the adapter
or your telephone.
MAKING A TEST CALL
1. Make sure your adapter switch settings are as shown in Fig (D).
2. Put on the Headset and lift the telephone handset.
3. If a dial tone cannot be heard, adjust the Compatibility Slide
Switch (2) as described in the Telephone/Adapter Compatibility
section above.
4. Call a colleague and adjust the Listen Volume Thumbwheel
Control (5) as shown in Fig (F).
5. Adjust the Speak Volume Control (4) (how loud you sound to others)
to a comfortable level, as shown in Fig (G). The screwdriver is
provided on the base of the adapter.
6. To activate the telephone mute function press the Microphone
Selection Switch (8) as shown in Fig (H).
7. To finish the call, replace the telephone handset back on
the telephone.