


Wearing the CERULEAN F1
Following the diagram, install the CERULEAN F1
over each ear and ensure the right (R) and left (L)
earpieces are correctly placed. Then adjust ear
hooks for a secure and comfortable t.
Swapping Ear Hooks
Included with the CERULEAN F1 is an additional
pair of ear hooks. These ear hooks feature a dierent
design and may oer a better t.
Warning!
A headset that covers both ears may impair your
ability to hear environmental sounds. Use of this
headset while operating a motor vehicle or riding a
bicycle may pose a serious hazard to your personal
safety and is not recommended.
Note: When removing ear hooks, be sure to rmly hold the CERULEAN F1 securely and carefully snap o the hook from the base.
Snap replacement ear hooks over the base while ensuring they are facing the correct direction (see diagram above).
Pairing the CERULEAN F1 with your CERULEAN TX equipped iPod Page 2
Step 1. Make the CERULEAN F1 discoverable using the following steps:.
• Check that the CERULEAN F1 is powered o and its battery is charged.
• While pressing and holding down the Multi-function button, switch the power on until "beep".
• When the status LED light on the F1 ashes alternating BLUE/WHITE, release the Multi-function
button. The CERULEAN F1 is now discoverable and ready to pair with the CERULEAN TX.
Reconnecting the CERULEAN F1 to the CERULEAN TX Equipped iPod Page 3
How to wear the CERULEAN F1
1. Ensure that the CERULEAN TX is plugged into the iPod and its status LED light is ashing rapidly
indicating that it was previously paired with F1.
2. Switch the F1’s power ON.
3. Press and release the Multi-function button once.
4. The CERULEAN F1 and TX will automatically reconnect after a few seconds.
5. The status light on both the CERULEAN F1 and TX will ash slowly indicating that they have
successfully reconnected.
Note: If connection fails, power o the CERULEAN F1 and unplug the CERULEAN TX from the iPod
and repeat the steps on page 2.
Correct ear hook
position
Right earpiece contains all
controls and microphone.
Note. The CERULEAN TX is powered by the iPod and does not contain
a battery. It is designed to self power o to conserve the iPod’s battery
life when:
A. The iPod has been powered o
B. The CERULEAN TX is unable to establish a connection with the
CERULEAN F1 within one minute.
It is thus necessary to remove and re-insert the CERULEAN TX into the
iPod to re-establish power and connection with the CERULEAN F1.
Step 2. Connect the CERULEAN TX to the iPod as shown.
The CERULEAN TX and F1 will automatically pair within 20
seconds. Music from your iPod can be heard on the
CERULEAN F1 when successfully paired.
Status LED light on TX ashes
rapidly as it attempts to pair
with the CERULEAN F1.
PRESS and HOLD
(Multi-function button)
SWITCH
the power ON
Flashing Light BLUE/
WHITE (discoverable)
Note: The CERULEAN F1
will remain discoverable for
approximately 3 minutes.
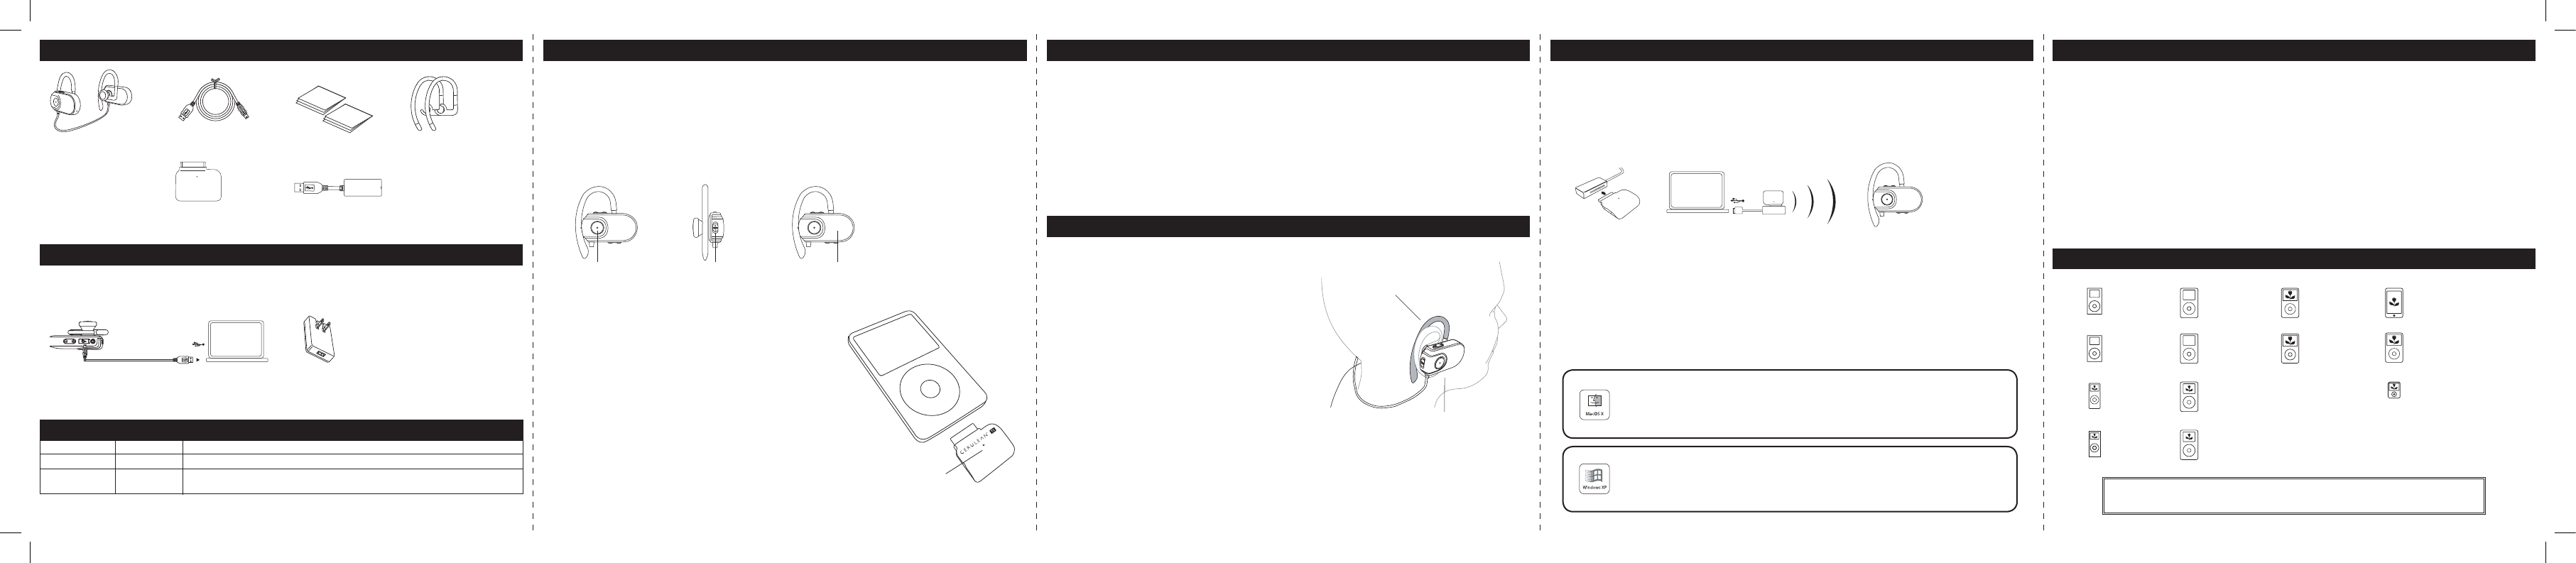
Wirelessly Stream Audio from Your Mac or PC to the F1 Page 4
You can stream audio from any application on your Mac or PC to the F1 using the CERULEAN TX
USB Adapter and CERULEAN TX.
1. Plug TX into the TX USB Adapter.
2. Plug the TX USB Adapter into the USB port on your computer.
3. Pair the CERULEAN F1 with the TX (See Page 2).
(If you have previously paired the F1 with TX, reconnect the devices as described on page 3)
Note: Only the volume controls and Play/Pause functions on the F1 are available when using TX
with your computer. You may also adjust the volume using the application’s volume controls on
your computer.
The Status LED Light on both the TX and F1 will begin to ash rapidly and automatically pair within
twenty seconds. See below for selecting TX as your computer’s output device.
Selecting CERULEAN TX for audio output streaming on your computer.
The iSkin CERULEAN TX will appear as a USB speaker on your Mac/PC. No additional software or
setup is required.
1. Choose "System Preferences" from the Apple Menu.
2. Select the "Sound" preference pane.
3. Select the "Output" Tab.
4. Select "iSkin CERULEAN TX" from the list of available sound output devices.
1. Select START g Control Panel.
2. Choose the "Sound and Audio Devices" control panel.
3. Select the "Audio" tab.
4. Select "iSkin CERULEAN TX" as the default device from the "Sound playback" list.
CER
ULEAN TX
TX + TX USB Adapter
Mac or PC
USB
TX
TX USB Adapter F1 Headset
Multi-point Pairing (Pair CERULEAN TX With iPod and Mobile Phone Together) Page 5
You can pair both your mobile phone and the CERULEAN TX equipped iPod with the CERULEAN F1
to listen to your music and accept incoming phone calls.
1. Pair the CERULEAN F1 with your mobile phone (refer to your device's manual).
2. Pair the CERULEAN F1 with your TX equipped iPod (doing so will temporarily disconnect
your mobile phone).
3. Using your mobile phone’s Bluetooth menu, select the previously paired iSkin CERULEAN F1
as a headset device.
Note: While listening to music from the TX equipped iPod, the F1 is in stereo earphone mode and may
be used to control the iPod. Upon an incoming phone call, the F1 will switch to mono headset mode
and may be used to control your mobile phone. After terminating a phone call, the F1 returns to stereo
earphone mode and resumes music playback. This ability will dependent on mobile phone features.”
iPod Compatibility
It is important that your iPod is up to date with the latest iPod software.
For more information visit: www.apple.com/support
What’s Inside the Box Page 1
Getting Started
Charging the Battery:
It is recommended that you charge the CERULEAN F1's battery at least 6 hours prior to first use;
however, subsequent charges require only 2-3 hours to fully charge.
CERULEAN F1
Stereo Bluetooth Earphones
with Headset functionality.
Us
e
r
Ma
n
u
a
l
Warranty
R
L
CERULEAN TX
USB Charging Cable
Type A to Mini-A 4 pin
User’s Guide
Warranty Info
Alternate Ear
hooks
CERULEAN TX
Stereo Bluetooth 2.0
Transmitter for iPod
CERULEAN TX USB Adapter
Using the included USB charging cable, plug the smaller end of the cable into the CERULEAN F1
USB port and the wider end into the USB port on your computer. The following chart describes
battery status indicated by the Status LED light located in the centre of the Multi-function button.
Mac / PC or
USB AC Power Adapter
Output: 5V(DC)
(sold separately)
ON BLUE Battery charging in progress
ON WHITE Battery charging completed
FLASHING BLUE Low battery indicator. Charging required. In addition, a low battery
sound will alert you when recharging is necessary (3% or below)
Status Light Colour Status / Description
Note: Longer distances between paired devices and higher volume levels impact battery performance. To conserve battery
life, turn the power off when not in use.
USB
Warning
iPod
4th generation
20GB
iPod
4th generation
40GB
iPod
4th generation (clour display)
20GB 30GB
iPod
4th generation (clour display)
40GB 60GB
iPod mini
1st genereation
4GB
iPod mini
2nd generation
4GB 6GB
iPod
5th generation
(video)
30GB
iPod touch
8GB 16GB
iPod
5th generation
(video)
60GB 80GB
iPod Classic
6th generation
80GB 160GB
iPod nano
3rd generation
4GB 8GB
iPod nano
2nd generation
2GB 4GB 8GB
iPod nano
1st generation
1GB 2GB 4GB