


Grandstream Networks, Inc., 1297 Beacon St., 2
nd
Flr, Brookline, MA 02446 USA
Tel: (617) 566-9300, FAX: (617) 249-1987
www.grandstream.com
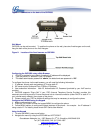
Figure 1: Connectors on the back of the GXP2000
Wall Mount
GXP2000 can be wall mounted. To position the phone on the wall, place two fixed hangers on the wall,
hang the back of the phone on the fixed hangers.
Figure 2: Location of the fixed hangers on GXP2000
Configuring the GXP2000 using a Web Browser
1. If DHCP is enabled in your network, the phone’s IP address will be displayed.
2. Type the phone’s IP address in your PC browser.
3. The default administrator password is “admin”; the default end-user password is “123”.
To configure the phone via the web browser, you will need the following information:
1. IP address, subnet mask and gateway IP if using static IP.
2. SIP server and/or Outbound Proxy FQDN or IP address.
3. User subscriber information: User ID, Authentication ID, Password (provided by your VoIP service
provider).
4. GXP2000 supports “Plug-n-Call” if your ITSP (Internet Telephony Service Provider) provides this
automatic provisioning service. Ensure the phone has an internet connection (either DHCP or static IP in
your internet ready network), then power up the phone.
5. Please contact your ITSP for additional settings that may be necessary to configure the phone.
Configure the GXP2000 using the Keypad
1. Make sure the phone is idle.
2. Press the “OK” button to enter the keypad MENU to configure the phone.
3. Follow MENU options to configure the basic features of the phone – for example: the IP address if
using a static IP. For details, please check GXP Series User Manual.
Using the Keypad
1. To enter the MENU, press round button.
2. Navigate the menu by using the UP/DOWN and LEFT/RIGHT.
Last updated on April 1, 2008
3