


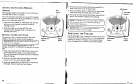
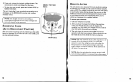

ftvrponuNr fNsrnucrroNs FoR
MovrNc rrn ANswnnnn
To
move
the answerer to
a
different location
in the house, follow these instructions:
1. Disconnect
the
phone
line
or
any
phones you
may have connected to the unit.
2. Install a battery, if
you
have not already
done so.This will ensure that
your
messages
are
not
lost.
See
"lnstalling
the Battery'l
3.
Go to the
electrical outlet and unplug the
power
supply. DO NOT UNPLUGTHE POWER
JACK CONNECTEDTOTHE UNIT lf
you
do,
all memory will be
erased.
4. Move the unit
and ohone
line
to the desired location.
5.
Plug
in the
power
supply into an
electrical outlet.
6.
The MESSAGES indicator
shows that the messages have not
been erased.
7. Connect all necessary
phone
lines.
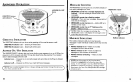
Snrup
RnconorNc rHE GREETTNG
Before
using
your
new answerer,
you
should record
a
greeting
(the
announcement callers
hear when
your
answering system
answers a call).Two
greetings
can
be
recorded. lf
you
don't record a
greeting,
callers hear a
default
greeting
which
says,
"Aftcr
tone, record. message."
You can record two types
of
greetings,
one to use only
one
mailbox,
or one to direct callers to leave
messages
in specific mailboxes.This is
especially useful for
active
families or small
businesses.
When
recording
the
greeting,
you
should be
about 6
inches from the unit.This
ensures the best recording
quality.
Eliminate as much background
noise as
possible.
Both types of
greetings
are
recorded
by the following:
1. Prepare
your greeting.
Sample Single Mailbox
Greeting:
Hi,
thh is
(use
your
name here). I can't answer
the
phone
right nou, so
plzase
bave
your
name, numbq and a brief russage
after the tone, arul I'il
get baek to you. Thanks
for
calling.
NOTE: You
can direct callers
to leave messages in a
specific mailbox by having
them press
the desired
mailbox
(14)
after
the
greeting
plays. If no mailbox
is selected,
the
incoming
messages
automatically go
into mailbox 1.
NOTE: The greeting
must be
2
seconds or longer
to be
valid.
Default Mailbox
for
incomi
Mailbox
I
Sample Multi-Mailbox Greeting: Hi, this is
(use
your
name here). We ran't answtr the
phone right
now,
so
pl.euse press
I to dired
Jour
message to
(namel),
press
2 to tlirect your
message
to
(name2),
press
3 to
to tlirect
,your
message
to
(name3),
press
1 to dired
pur
message to
(namel).
Leoue your name,
numb4
and a
brief musage
after
the tone, and ue'll get back to
vu.
Thanks
for
calling.
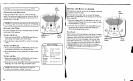
2. Hold down the
desired
GREETING
button.The unit
displays of for
greeting
A record
and 02Ior
greeting
B record.
3. After the tone, say
your greeting.
4.
Release
GREETING
A
or
B when
you
finish.
-
RnrrrnvrNc rHE
GREETTNG
To review the
greeting, press
and
release
GREETING
A
or B.
EnesrNc rrrE GREETTNG
There are two ways to erase
your greeting.
1. To erase
your greeting
while listening to it.
press
and
hold ERASE until the
unit
announces,
"CreetingErased.'.
Then record
your
new
greeting.
2. To re-record
your greeting
from any
point, press
and
hold GREETING
A
or B.
After
the tone, say
your
greeting.
Release
GREETING
A or B when
you
finish.
RrrunNrNc ro rHE Dnmulr Gnnnrnlc
To return to the answerer's default
greeting
after
you've
recorded one,
press
and hold the GREETING
A
or
GREETING B button until
a
beep sound is heard and
then
release the button.
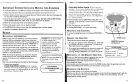
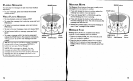
GREETING buttons
and
indicators
Default
Time
12
a.m. Sunday
Rings to
Answer 4
Message Length
2
minutes
Security Code 0123
Alternatively,
you
can
also
press
and hold the ERASE button when the
greeting
is
playing,
release the ERASE button until the unit announces
"&eetinsErased".
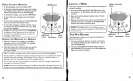
RnvrnwrNc rrrn SETTTNGS
This
function
allows
you
to review the current
number
of
rings before
the
unit
answers a call,
incoming message length,
and
the
security code.
Press
and
release
the SET button to review
the
current settings.The
unit
the current setting.