


Three-Way Calling
1. During an external call, press the INTERCOM button. LINE ON HOLD EXTENSION?
shows in the display.
2. Use the touch-tone pad to select Handset #. You will hear a paging tone and
PAGING shows in the originating handset’s display.
NOTE: PAGING FROM... shows in the display on the receiving handset, and
the receiving handset presses the INTERCOM or TALK/CALL BACK button to
answer the intercom.
3. When the receiving handset connects, press the FORMAT/CONF button on the
originating handset to conference with the receiving handset and the external
caller. CONFERENCE shows in the display on the originating and receiving handsets.
NOTE: A handset can enter conference mode directly by pressing TALK/
CALL BACK on the second handset during a call.
Transferring External Calls to Other Handsets
During an external call, you may transfer the external call to another handset.
1. Press the INTERCOM button on the originating handset to put an external call on
hold, and then page the receiving handset.
2. Use the touch-tone pad on the handset to select Handset #. You will hear a paging
tone. PAGING shows on the originating handset’s display, and PAGING FROM...
shows on the receiving handset’s display.
3. When the receiving handset connects, press the TALK/CALL BACK button on the
originating handset to transfer the call.
-OR-
4. Press the TALK/CALL BACK button on the originating handset to transfer the call. If
the receiving handset does not answer within 30 seconds, the originating handset
rings back and displays CALLBACK. If the originating handset does not answer
within 20 seconds, the call is automatically dropped.
Caller ID (CID)
IMPORTANT: In order to use this unit’s Caller ID features, you must
subscribe to either the standard Name/Number Caller ID Service or Call
Waiting Caller ID Service. To know who is calling while you are on the
phone, you must subscribe to Call Waiting Caller ID Service.
This unit receives and displays information transmitted by your local phone company.
This information can include the phone number, date, and time; or the name, phone
number, date, and time.
Storing CID Records (In CID Memory)
If you are not at home or cannot answer, your telephone’s Caller ID memory stores the
data for the 40 most recent calls you received so you can see who called while you
were unavailable. When the 41st call is received, the oldest Caller ID record (1st call) is
automatically deleted.
You may review the stored information at any time. Calls received since your last
review show as NEW in the display. Calls that have not been previously reviewed but
were received from the same number more than once show as REPT in the display.
Reviewing CID Records
As calls are received and stored, the display is updated to let you know how many calls
have been received. To scroll CID records:
1. Make sure the phone is OFF (not in talk mode).
2. Press the CALLER ID-VOLUME ( 6 ) button to review the newest CID record.
3. Press the CALLER ID-VOLUME ( 5 ) button to review the oldest CID record first.
Dialing a CID Number
1. Make sure the phone is OFF (not in TALK mode).
2. Use the CALLER ID-VOLUME ( 6 or 5) button to display the desired record.
3. Press the TALK/CALL BACK or SPEAKER button. The number dials automatically.
NOTE: Depending on (a) how the incoming caller’s phone number is
formatted when it is received, and (b) whether or not you previously pre-
programmed your local area code into the set up menu, you may need to
adjust the format of the incoming caller’s stored phone number before
making the call, press the FORMAT/CONF button to adjust the number, and
try again.
Available formats include:
Number of digits Explanation Example
Eleven digits long distance code “1 ” 1-317-888-8888
+3-digit area code
+7-digit telephone number.
Ten digits 3-digit area code + 317-888-8888
7-digit telephone number.
Seven digits 7-digit telephone number. 888-8888
Storing CID Records in Internal Memory
You may also store CID information in the phone’s internal memory.
NOTE:
It is important that you format CID records correctly BEFORE
storing in internal memory as you cannot reformat CID records
stored in memory.
1. Make sure the phone is OFF (not in talk mode).
2. Use the CALLER ID-VOLUME ( 6 or 5) button to scroll to the desired CID record.
3. Press the Memory button to display SELECT MEMORY 01-50.
4. Use the touch-tone pad to enter a memory location to store the number in that
memory location. You will hear a confirmation tone.
NOTE: If the memory location is occupied, REPLACE MEMO? is displayed, and
you must confirm replacement by pressing the MEMORY button.
NOTE: Press the *EXIT button once to keep the previous setting (making no
changes) and return to the menu.
NOTE: If the selected CID record contains any information that is non-
numeric, the unit will not allow this record to transfer to the internal user
memory. The handset will display UNABLE TO STORE.
To Replace a Stored CID Record
1. Repeat steps 1 through 3 in Storing CID Records in Internal Memory. After you enter
the memory location, REPLACE MEMO? shows in the display.
2. Press the Memory button again, and the new CID record replaces the old memory in
that location. You will hear a confirmation tone.
Deleting a CID Record
1. Make sure the phone is OFF (not in TALK mode).
2. Use the CALLER ID-VOLUME ( 6 or 5) button to display the CID record you want to
delete.
3. Press the DELETE button. The display shows DELETE CALL ID?
4. Press the DELETE button to erase the record showing in the display. The display
shows DELETED.
NOTE: Press the *EXIT button to return to the standby mode.
Deleting All CID Records
1. Make sure the phone is OFF (not in TALK mode).
2. Use the CALLER ID-VOLUME ( 6 or 5) button to display any Caller ID record.
3. Press and hold the DELETE button until DELETE ALL? shows in the display.
4. Press DELETE button to erase all of the current CID records. The display shows
DELETED followed by NO CALLS.
NOTE: Press the *EXIT button to return to the standby mode.
Memory
Each handset can store up to fifty 20-digit numbers with up to 15-character names in
memory for quick dialing. This memory feature is in addition to the CID memory log,
which stores up to 40 CID records in each handset.
Storing a Name and Number in Memory
1. Make sure the phone is OFF (not in talk mode).
2. Press the MEMORY button to display SELECT MEMORY 01-50.
3. Press the desired memory location button (01 through 50) or use the CALLER ID-
VOLUME ( 6 or 5) button to scroll to desired the memory location.
NOTE: If the memory location is occupied, the memory location number and
stored name and telephone number shows in the display. If the memory
location is empty, EMPTY shows in the display.
4. Press the MEMORY button. The display shows ENTER NAME.
5. Use the touch-tone pad to enter a name (up to 15 characters). More than one letter
is stored in each of the number keys. For example, to enter Bill Smith, press the 2 key
twice for the letter B. Press the 4 key 3 times for the letter I. Press the 5 key 3 times
for the letter L. Press the 5 key 3 times for the second letter L, and press the 1 key to
insert a space between the first and last name. Press the 7 key 4 times for the letter
S; press the 6 key once for the letter M; press the 4 key 3 times for the letter I; press
the 8 key for the letter T; press the 4 key twice for the letter H.
NOTE: If you make a mistake press the DELETE button to backspace and
erase the wrong character(s) or number(s).
6. Press the MEMORY button to confirm and save the record. The display shows ENTER
TEL NUMBR.
7. Use the touch-tone pad to enter the telephone number (up to 20 digits, including
pauses (press #PAUSE button), and press the MEMORY button again to save the
record. The unit beeps to confirm.
NOTE: The system treats PAUSES as delays or spaces in the dialing
sequence.
8. To enter another name and number in a different memory location, return to step 2
and repeat the process.
Storing the Last Number Dialed
You may transfer all three redial numbers into internal user memory.
1. Make sure the phone in OFF (not in TALK mode).
2. Press REDIAL button to display the most recent redial number.
3. Use the CALLER ID-VOLUME ( 6 or 5) button to scroll to desired redial number.
4. Press MEMORY button to display SELECT MEMORY 01 - 50.
5. Use touch-tone pad to enter two digit desired memory location (01 through 50).
Display will show ENTER NAME.
6. Follow step 5 in the “Storing a Name and Number in Memory” section to enter
name.
NOTE: If the memory location is occupied, REPLACE MEMO? is displayed,
and you must confirm replacement by pressing the MEMORY button.
7. Press MEMORY button to save.
8. To enter another name and number in a different memory location, return to step 2
and repeat the process.
NOTE: If the redial number has more than 20 digits, it cannot be stored in
memory.
Inserting a Pause in the Dialing Sequence (of a Stored
Number)
Press the #PAUSE/RINGER button on the handset’s touch-tone pad to insert a delay in
dialing sequence when a pause is needed to wait for a dial tone (for example, after you
dial 9 for an outside line, or to wait for a computer access tone.) Each pause counts as
one digit in the dialing sequence.
Reviewing Records Stored in Memory
1. Make sure the phone is OFF (not in talk mode).
2. Press the MEMORY button to display SELECT MEMORY 01-50.
3. Press the CALLER ID-VOLUME ( 6 or 5) buttons to scroll the records, or use the
handset’s touch-tone pad to enter the memory location number.
Changing Records Stored in Memory
Follow the procedure for Storing Names and Numbers in Memory, except replace a
stored telephone number with a new one.
Deleting Records Stored in Memory
1. Make sure the phone is OFF (not in talk mode).
2. Press the MEMORY button to display SELECT MEMORY 01-50.
3. Press the CALLER ID-VOLUME ( 6 or 5) button to scroll to the record you want to
delete or use the touch-tone pad to enter the desired memory location.
4. Press the DELETE button to mark the record for deletion. The display shows DELETE?
5. Press the DELETE button to delete the record. DELETED shows in the display.
NOTE: If you don’t want to change or delete a record, simply press the *EXIT
button, or wait for one minute to exit the review mode automatically.
Dialing a Number from Memory
1. Make sure the phone is ON (in talk mode) by pressing the TALK/CALL BACK or
SPEAKER button.
2. Press the MEMORY button to display MEMO # - -.
3. Use the touch tone pad to enter the memory location number. The number dials
automatically.
-OR-
1. Make sure the phone is OFF (not in talk mode).
2. Press the MEMORY button to display SELECT MEMORY 01-50.
3. Press the memory location for the phone number you want to dial, or use the
CALLER ID-VOLUME ( 6 or 5) button to scroll to the number you want to dial.
4. Press the TALK/CALL BACK or SPEAKER button. The number dials automatically.
Chain Dialing from Memory
Use this feature to make calls from records stored in memory which require a sequence
of numbers, such as a calling card number used for a frequently called long distance
number. The following example shows how you can store each part of the dialing
sequence and use chain dialing to make a call through a long distance service:
The Number For Memory Location
Long Distance Access Number 7
Authorization Code 8
Frequently called long distance number 9
1. Make sure the phone is ON (in talk mode) by pressing the TALK/CALL BACK or
SPEAKER button.
2. Press the MEMORY button, and then press 07.
3. When you hear the access tone, press the MEMORY button, and then press 08.
4. At the next access tone, press the MEMORY button and then 09.
Answering system OperAtiOn
This section discusses the buttons and features on the answering system.
Message Counter
The message counter gives you a numeric display of how many messages you have.
See below for the details.
a) Message counter has a number displayed without flashing - No new messages.
Shows total number of old messages.
b) Message counter has a flashing number displayed - There are new messages.
Shows total number of old and new messages.
c) Message counter has bars ( - - ) - Answerer is off.
d) Message counter has an “F“ flashing on the display - Memory is full.
e) Message counter has a “CL” flashing on the display - Clock is not set since power up
or after power failure.
f) Message counter has six horizontal bars flashing on the display - MEMO recording.
g) Message counter has a “AN“ flashing on the display - Answering incoming calls and
recording an incoming call.
h) Message counter has “LA” - The answering system is being accessed remotely.
i) Message counter has a “A1“ or “A2“ on the display - Announcement 1 or
Announcement 2 is selected as an current outgoing announcement during
Announcement selection and announcement recording/playing.
j) Message counter has “En“ on the display - English is selected as the current voice
prompt during language selection.
k) Message counter has “Fr“ on the display - French is selected as the current voice
prompt during language selection.
l) Message counter has “SP“ on the display - Spanish is selected as the current voice
prompt during language selection.
NOTE: While the messages are playing, the message counter will display
the messages in the order they were received.
NOTE: The maximum recording time for each message is 3 minutes and the
total recording time of this unit is 20 minutes.
Leaving a Message
After the answering system picks up the call, the caller can enter the mailbox number
desired (1, 2 or 3) either during the outgoing announcement or within the 2 seconds
after the end of it, and then leave a message in that specific mailbox.
If there is no entry of mailbox number during that period, then your message will be left
in the default mailbox 1.
Screening Calls from the Base
1. When the answering system answers the call, listen while the caller leaves a
message (to determine who is calling).
2. To speak to the caller, pick up the handset, and press the TALK/CALL BACK or
SPEAKER button.
The answering system automatically stops recording when you activate the handset or
pick up an extension phone.
TIP: Make sure the volume on the base is set loud enough to hear your
incoming calls.
Mailbox Indicator
The mailbox button/indicators inform you of messages for each individual mailbox and
whether they are new or old.
Mailbox button/indicator is on; stored messages.
Mailbox button/indicator is off; no messages.
Mailbox button/indicator is flashing; new messages.
Messages Playback
The message counter and the base mailbox button/indicators (PLAY/STOP 1, 2 or 3) let
you know when you have message(s) or new message(s). To play the messages, press
the corresponding PLAY/STOP 1, 2 or 3 button.
While a message is playing, you may do the following:
• Press the corresponding PLAY/STOP 1, 2, or 3 button to stop the message
playback.
• Press and release the REV button to restart the current message.
• Press and release the REV button twice to go to the previous message.
• Press and release the SKIP button to go to the next message.
• Press the DELETE button to erase the current message.
Memory Full
When the answering system memory is full, the system answers after 10 rings. You
should erase some messages so the answering system may record new messages.
Erasing Messages
You may erase messages in the following three ways:
To erase a message while it is playing
1. Press and release the respective mailbox button (PLAY/STOP 1 or PLAY/STOP 2 or
PLAY/STOP 3)
2. Press the REV and SKIP buttons to select and play the message you want to erase.
3. Press the DELETE button, the current message is erased, and the next message
plays.
To erase all previously played Messages in a mailbox
1. Make sure the phone is OFF (not in talk mode)
2. Press the DELETE button, the answerer will announce “TO ERASE MESSAGES,
PRESS MAILBOX”.
3. Press the mailbox button (PLAY/STOP 1 or PLAY/STOP 2 or PLAY/STOP 3).
4. The answerer will announce “ALL OLD MESSAGES ERASED MAILBOX X ".
To erase a message from the handset :
1. Press the FLASH/answerer button on the handset
2.
Press the PLAY/STOP (key 2) followed by the mailbox number on the handset (eg. Press key
2 and then key 3 to play messages in mailbox in mailbox 3)
3. Press the erase (key 0) on the handset to erase a message during playback.
NOTE: Erased messages cannot be restored.
Leaving a Memo
Use the memo feature to leave a message.
1. Press the memo button and it will announce “TO RECORD, PRESS AND HOLD
MAILBOX”
2. Press and hold the PLAY/STOP 1, 2, or 3 button. You must hold the button until you
finish recording the memo.
3. Begin speaking after it announces “RECORD MESSAGE”.
4. Release the mailbox button when finished.
Remote Access
You may access the answering system with the cordless handset or from any tone-dial
compatible telephone.
Cordless Handset
Use the corresponding handset keys just like you would use the base buttons (see
“Answering System Setup”). The button functions are located on the handset above
each number key. For example, to play messages:
• Press the FLASH/answerer button. The display shows ANSWERER REMOTE ACCESS.
• Press 2 (PLAY/STOP) followed by the mailbox number to play the message in that
mailbox. For example, press 2 and 3 to play the message in mailbox 3.
• When you are finished listening to your messages, press the FLASH/answerer button
again.
Screening Calls from the Handset
Use the handset to screen calls even when you can’t hear the answering system.
When the answering system picks up:
1. Press the FLASH/answerer button to access the answering system.
2. Listen as the caller leaves a message.
3. Press the TALK/CALL BACK or SPEAKER buttons to speak to the person or press the
FLASH/answerer button to stop screening the call.
NOTE: Programming for Remote Access feature, can ONLY be done with
the 28031 handset and 28011 optional handset, this function cannot be
programmed using the optional 28001 handset.
Accessing the Answering System from Another Location
You can access your answering system from any touch-tone phone by entering your
3-digit security code during the playing of outgoing announcement or after you hear
the outgoing announcement.
1. Dial the telephone number to which the answering system is connected.
2.
Enter the security code during the outgoing announcement or after you hear the tone.
3. Follow the voice menu to use the answering system’s remote functions.
The remote feature lets you perform the following functions:
To Press this button
Review message 1
Play back messages 2
Select mailbox 1 or 2 or 3
Stop message playback 2
Erase message 0 (during message playback)
Skip message 3
Turn off/on answerer 4
Review voice menu options 7
Memory Full
When answering system memory is full, the system answers after 10 rings, beeps and
waits for you to enter the 3-digit security code. If you don’t enter the security code
within 8 seconds, the phone hangs up.
You should erase some messages so the answering system can record new messages.
NOTE: The unit also answers after the 10th ring if it is turned off. To access
the answering system, enter your 3-digit security code.
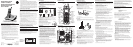
Time call received
Date call received
Number of new calls received
Caller’s nameCaller’s phone number
Call Waiting Caller ID
Provided you subscribe to Call Waiting Caller ID service from your phone company;
if you receive an incoming call and you are using the GE multi handset system, a beep
indicates the presence of a Call Waiting call on the line. The Call Waiting Caller ID
information will be displayed and stored in the history of all handsets in the system.
• When you hear the call waiting beep in the handset receiver, press the FLASH/
answerer button to put the current call on hold and answer the incoming call.
Press FLASH/
answerer
again to return to the original call.
Receiving CID Records
When you receive a call, the Caller ID information is transmitted between the first and
second ring. The Caller ID information appears on the display while the phone rings,
giving you a chance to monitor the information and decide whether or not to answer
the call.