INSTALLATION
2-6
February 2001
Part No. 001-9800-001
Installing Ignition Sense Wire Assembly
The ignition sense input is connected using the
connector with the 22-foot red wire pre-installed in pin
6. The white jumper between pins 1 and 3 is not used
with this transceiver, so it can be clipped off or left as
is. It is used only Summit
®
or Viking
®
HT/GT trans-
ceivers to route audio to the internal speaker. The other
connector and wire assemblies in the kit can also be
used if desired.
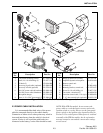
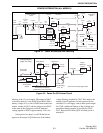
The red wire from pin 6 (see Figure 2-4) is
connected to a 13.6-volt source that is switched by the
vehicle ignition switch. Connect this wire using the
included fuseholder and 1-amp fuse. Be sure to install
the fuse as close as possible to the connection point so
that it provides optimum short circuit protection.
2.4.4 CONNECTING HORN ALERT WIRE
NOTE: The horn alert feature is not available with
SMARTNET/SmartZone models.
To utilize the horn alert, the horn alert output of
the accessory connector is connected and special
programming is required. When the horn alert sounds,
pin 4 of the accessory connector goes low. The
disabled condition is a high impedance state.
Maximum sink current of the horn alert output is
500 mA. Therefore, some type of horn alert driver
circuit is usually required. If connecting to a relay, a
diode should be connected across the relay coil with
the cathode toward the battery side. This protects
Q100 on the audio/logic board when the relay de-
energizes.
The horn alert output is connected by using one
of the 22- or 2-foot wire assemblies included in the
Accessory Wire Kit. Insert the pin of the wire
assembly into the pin 4 slot of the connector as shown
in Figure 2-4. Then connect the other end to the horn
alert driver.
2.4.5 OTHER ACCESSORY CABLE OUTPUTS
Speaker Output (pin 1) - This is a low-level, volume
controlled, speaker output. It provides drive to an
external device such as an audio power amplifier. The
input impedance of the external device should be
greater than 20k ohms.
For this output to operate properly, the audio
amplifier requires an 8-ohm load. Therefore, if not
using the internal speaker and no speaker is connected
to the external speaker jack, connect an 8-ohm, 5-watt
resistor to the external speaker jack.
Sw Bat Out (pin 2) - This output can provide a
switched battery output current of up to 1.5 A
(including the current supplied to the microphone
connector). This current is limited by fuse F100 on the
audio/logic board. CAUTION: Do not change this fuse
to one with a higher current rating because PC board
damage may result.
Horn Alert (pin 4) - See Section 2.4.4.
Ignition Sense (pin 6) - See Section 2.4.3.
Output D (pin 7) - This output is available with LTR-
Net/Multi-Net models only. It is controlled by the
menu OPTION parameter or by an option switch
programmed for that function. It can also be controlled
by several I/O functions (see Appendix B).
2.5 REMOTE CONTROL UNIT INSTALLATION
2.5.1 GENERAL
NOTE: Install the remote mount transceiver, power
cable, and accessory cable as described in Sections
2.2, 2.3, and 2.4, respectively.
No special control unit programming or PC board
modifications are required prior to installing the
remote control unit. An diagram showing a remote
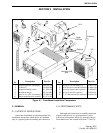
installation is located in Figure 2-2. As indicated in
this diagram, the control unit has a 5-ft pigtail cable
and the transceiver has a 1-ft pigtail cable. These
cables can be directly connected if the control unit is
mounted within approximately 6-ft of the transceiver.
Otherwise, the optional 11-ft extension cable can be
used to allow a mounting distance of up to approxi-
mately 17 feet.
2.5.2 MOUNTING REMOTE CONTROL UNIT
1. Check the area underneath the selected mounting
surface for such things as wires, electrical compo-
nents, and brake and gas lines that could be
damaged when the mounting bracket screws are


