


3
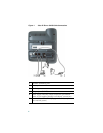
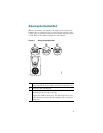
Next, use the Ethernet cable included with your phone
to connect the access port on the back of your phone to
your desktop computer. Your Cisco IP Phone now
shares a network connection with your computer.
Step 2 Connect the handset to the handset port. Ensure that
the end of the cord with the longer uncoiled section is
connected to the body of the phone.
Step 3 If your system administrator delivered your
Cisco IP Phone with a power supply, connect the power
supply plug to the adapter port on the back of the
phone. Then use the power cable to connect the power
supply to a standard power outlet in your workspace.
If your system administrator delivered your phone
without a power supply, your phone probably receives
power through the Ethernet connection.
Once you connect the Cisco IP Phone to its power source, a
start-up process begins. After several minutes, startup is
complete and your phone is ready to use.
Caution If you plan to power your phone locally (instead of
receiving power through the Ethernet connection),
use only a Cisco 48 volt power supply designed to
work with a Cisco IP Phone.
Tip If your Ethernet cable has a cover over the RJ-45
connector, the cover can prevent the phone from sitting
squarely on a surface. To fix this problem, pull the
cable cover back to expose the RJ-45 connector.