


17
8 SETTINGS
Your phone comes with a selection of settings that you can change to personalise your phone the way you
8.1 Handset Settings
8.1.1 Set the audio volume
1. Press <MENU> and <UP/DOWN> to select HS Settings.
2. Press <Select> and <UP/DOWN> to select Audio Setup.
3. Press <Select> and <UP/DOWN> to select Speaker Volume or Ear Volume.
4. Press <Select> and <UP/DOWN> or <LEFT/RIGHT> to select the volume level from level 1 to level 5.
5. Press <OK> to confirm.
8.1.2 Set the internal ringer melody
1. Press <MENU> and <UP/DOWN> to select HS Settings.
2. Press <Select> and <UP/DOWN> to select Ring Setup.
3. Press <Select> and <UP/DOWN> to select Internal Ring.
4. Press <Select> and <UP/DOWN> to select your desired internal ringer melody (10 ringer melodies and 5
standard tones are provided).
Note: The respective ringer melody will be played while browsing the melody list.
5. Press <Select> to confirm.
8.1.3 Set the external ringer melody
1. Press <MENU> and <UP/DOWN> to select HS Settings.
2. Press <Select> and <UP/DOWN> to select Ring Setup.
3. Press <Select> and <UP/DOWN> to select External Ring.
4. Press <Select> and <UP/DOWN> to select your desired external ringer melody (10 ringer melodies and 5
standard tones are provided).
Note: The respective ringer melody will be played while browsing the melody list.
5. Press <Select> to confirm.
8.1.4 Adjust the Ringer Volume
1. Press <MENU> and <UP/DOWN> to select HS Settings.
2. Press <Select> and <UP/DOWN> to select Ring Setup.
3. Press <Select> and <UP/DOWN> to select Ring Volume.
4. Press <Select> and <UP/DOWN> or <LEFT/RIGHT> to select your desired ringer volume level from Level 1 to
Level 5 or Ringer Off.
Note: The respective ringer volume will be played while changing the levels.
If Volume Off is selected, < > icon will display.
5. Press <OK> to confirm.
8.1.5 Set the alert tones
1. Press <MENU> and <UP/DOWN> to select HS Settings.
2. Press <Select> and <UP/DOWN> to select Tone Setup.
3. Press <Select> and <UP/DOWN> to select Key Tone / Battery Low / Out of Range.
4. Press <Select> and <UP/DOWN> to turn on or off these tones.
5. Press <Select> to confirm.
8.1.6 Set
1. Press <Menu> and <UP/DOWN> to select HS Settings.
2. Press <Select> and <UP/DOWN> to select Language.
3. Press <Select> and < UP/DOWN> to select the desired language.
4. Press <Select> to confirm.
8.1.7 Rename the handset
1. Press <Menu> and <UP/DOWN> to select HS Settings.
2. Press <Select> and <UP/DOWN> to select Rename HS.
3. Press <Select> and then enter your desired handset name. Press <Clear> to delete one character or
Note: The maximum number of characters for the handset name is 10.
4. Press <OK> to confirm.
8.1.8 Select a colour theme
1. Press <Menu> and <UP/DOWN> to select HS Settings.
2. Press <Select> and <UP/DOWN> to select Colour Theme.
3. Press <Select> and <UP/DOWN> to select
4. Press <Select> to confirm.
8.1.9 Set the contrast level
1. Press <Menu> and <UP/DOWN> to select HS Settings.
2. Press <Select> and <UP/DOWN> to select Contrast.
3. Press <Select> and <UP/DOWN> to select
4. Press <Select> to confirm.
8.1.10 Turn on or off the auto answer
1. Press <Menu> and <UP/DOWN> to select HS Settings.
2. Press <Select> and <UP/DOWN> to select Auto Answer.
3. Press <Select> and <UP/DOWN> to turn on or off the Auto Answer feature.
4. Press <Select> to confirm.
8.1.11 Select base station
1. Press <Menu> and <UP/DOWN> to select HS Settings.
2. Press <Select> and <UP/DOWN> to select Select Base.
3. Press <Select> and <UP/DOWN> to select your desired base station.
Note:
4. Press <Select> to confirm.
Note: If the selected base is found successfully, “Saved” will display, otherwise, “Fail” will display.
8.1.12 Reset handset settings to default
You can reset your phone to the default settings. After a reset, all your handset settings will be
but your phonebook entries remain unchanged.
1. Press <Menu> and <UP/DOWN> to select HS Settings.
2. Press <Select> and <UP/DOWN> to select HS Default.
3. Press <Select> and then enter the 4-digit system PIN (Default 4-digit system PIN: 0000)
4. Press <OK> to show "Confirm?"
5. Press <OK> again to confirm the reset.
Note: If the PIN code is entered correctly and
If the PIN code is entered incorrectly, “PIN Invalid” will display.
8.2 Base Settings
8.2.1 De-register a Handset
Note: You cannot de-register the handset that you are currently using.
1. Press <Menu> and <UP/DOWN> to select Base Settings.
2. Press <Select> and <UP/DOWN> to select Delete HS.
3. Press <Select> and you are requested to enter the 4-digit system PIN.
4. Enter the 4-digit system PIN.
5. Press <OK> and a list of registered handsets is displayed.
6. Press <UP/DOWN> to select the handset that you want to de-register.
7. Press <Select> to confirm.
Note: If handset de-registration is successfully done, “HS Deleted” will display.
18 19
7.2.2 Set and turn on the alarm
1. Press <Menu> and <UP/DOWN> to select Clock/Alarm.
2. Press <Select> and <UP/DOWN> to select Alarm.
3. Press <Select> and <UP/DOWN> to select Alarm On.
4. Press <Select> and then enter the alarm time.
5. Press <OK> to confirm the alarm time.
6. Press <UP/DOWN> to select Snooze On or Snooze Off.
7. Press <Select> to confirm.
7.2.3 Set the alarm melody
1. Press <Menu> and <UP/DOWN> to select Clock/Alarm.
2. Press <Select> and <UP/DOWN> to select Alarm.
3. Press <Select> and <UP/DOWN> to select Alarm Melody.
4. Press <Select> to select your desired alarm melody.
5. Press <Select> to confirm.
20
21
22
8.2.2 Change the dial mode
1. Press <Menu> and <UP/DOWN> to select Base Settings.
2. Press <Select> and <UP/DOWN> to select Dial Mode.
3. Press <Select> and <UP/DOWN> to select Tone or Pulse.
4. Press <Select> to confirm.
23
9.4 Record Memo
You can record a memo message for another
Memo
recording can still function even when the answering machine is turned off.
1. Press <Menu> and <UP/DOWN> to select Answer Machine.
2. Press <Select> and <UP/DOWN> to select Memo.
3. Press <Select> to start memo recording and “Recording” is displayed.
4. Press <OK> to stop memo
OR
4. Press <Cancel> at any time to stop memo recording without saving and return back to the Answer Machine
9.5 Answering Machine Settings
You can use the TAM
Settings menu in the handset to change the settings of your answering machine.
9.5.1 Set the Answer Mode
By default, the answer machine is set in Answer & Record mode which allows callers to leave a message. This
mode can be changed to Answer Only which does not allow callers to leave a message. In that case, your callers
will be prompted to call back later.
1. Press <Menu> and <UP/DOWN> to select Answer Machine.
2. Press <Select> and <UP/DOWN> to select TAM Settings.
3. Press <Select> and <UP/DOWN> to select Answer Mode.
4. Press
<Select> and <UP/DOWN> to select Answer & Record or Answer Only.
5. Press <Select> to confirm.
9.5.6 Set the Recording Time of Incoming Message
You can set the maximum length of the recording time
1. Press <Menu> and <UP/DOWN> to select Answer Machine.
2. Press <Select> and <UP/DOWN> to select TAM Settings.
3. Press <Select> and <UP/DOWN> to select Recording Time .
4. Press <Select> and <UP/DOWN> to select
5. Press <Select> to confirm your choice.
9.5.7 Activate Remote Access
Your phone lets you check your messages, or otherwise operate your answering machine, by calling the answering
machine when you are away from home by entering a 4-digit remote access PIN on a tone-dialling phone. The
4-digit remote access PIN code is used to prevent other people from unauthorised access of your answering machine.
9.5.7.1 Change the 4-Digit Remote Access PIN
1. Press <Menu> and <UP/DOWN> to select Answer Machine.
2. Press <Select> and <UP/DOWN> to select TAM Settings.
3. Press <Select> and <UP/DOWN> to select Chg Remote PIN.
4. Press <Select> and then enter the Old remote access PIN (Default Remote Access PIN is 0000).
Note: If the Old remote access PIN is incorrect, “Old PIN Invalid” is displayed and then it returns to the
menu.
5. Press <OK>
6. Press <OK> and then enter your new remote access PIN again.
7. Press <OK> to confirm.
Note: If the new remote access PIN entered in Step 6 is not the same as the new remote access PIN entered in
Step 5, “New PIN Invalid” is
9.5.7.2 Activate or Deactivate the Remote Access
1. Press <Menu> and <UP/DOWN> to select Answer Machine.
2. Press <Select> and <UP/DOWN> to select TAM Settings.
3. Press <Select> and <UP/DOWN> to select Remote Access.
4. Press <Select> and <UP/DOWN> to select On or Off to turn on or off the remote access respectively.
5. Press <Select> to confirm.
9.5.7.3 Access Your Answering Machine Remotely
1. Place a call from a tone-dialling phone to your
2. When the answering machine answers the call and starts playing the OGM, press <KEY *>.
3. Enter the 4-digit Remote Access
Note: If the 4-digit Remote
released automatically.
4. Pres
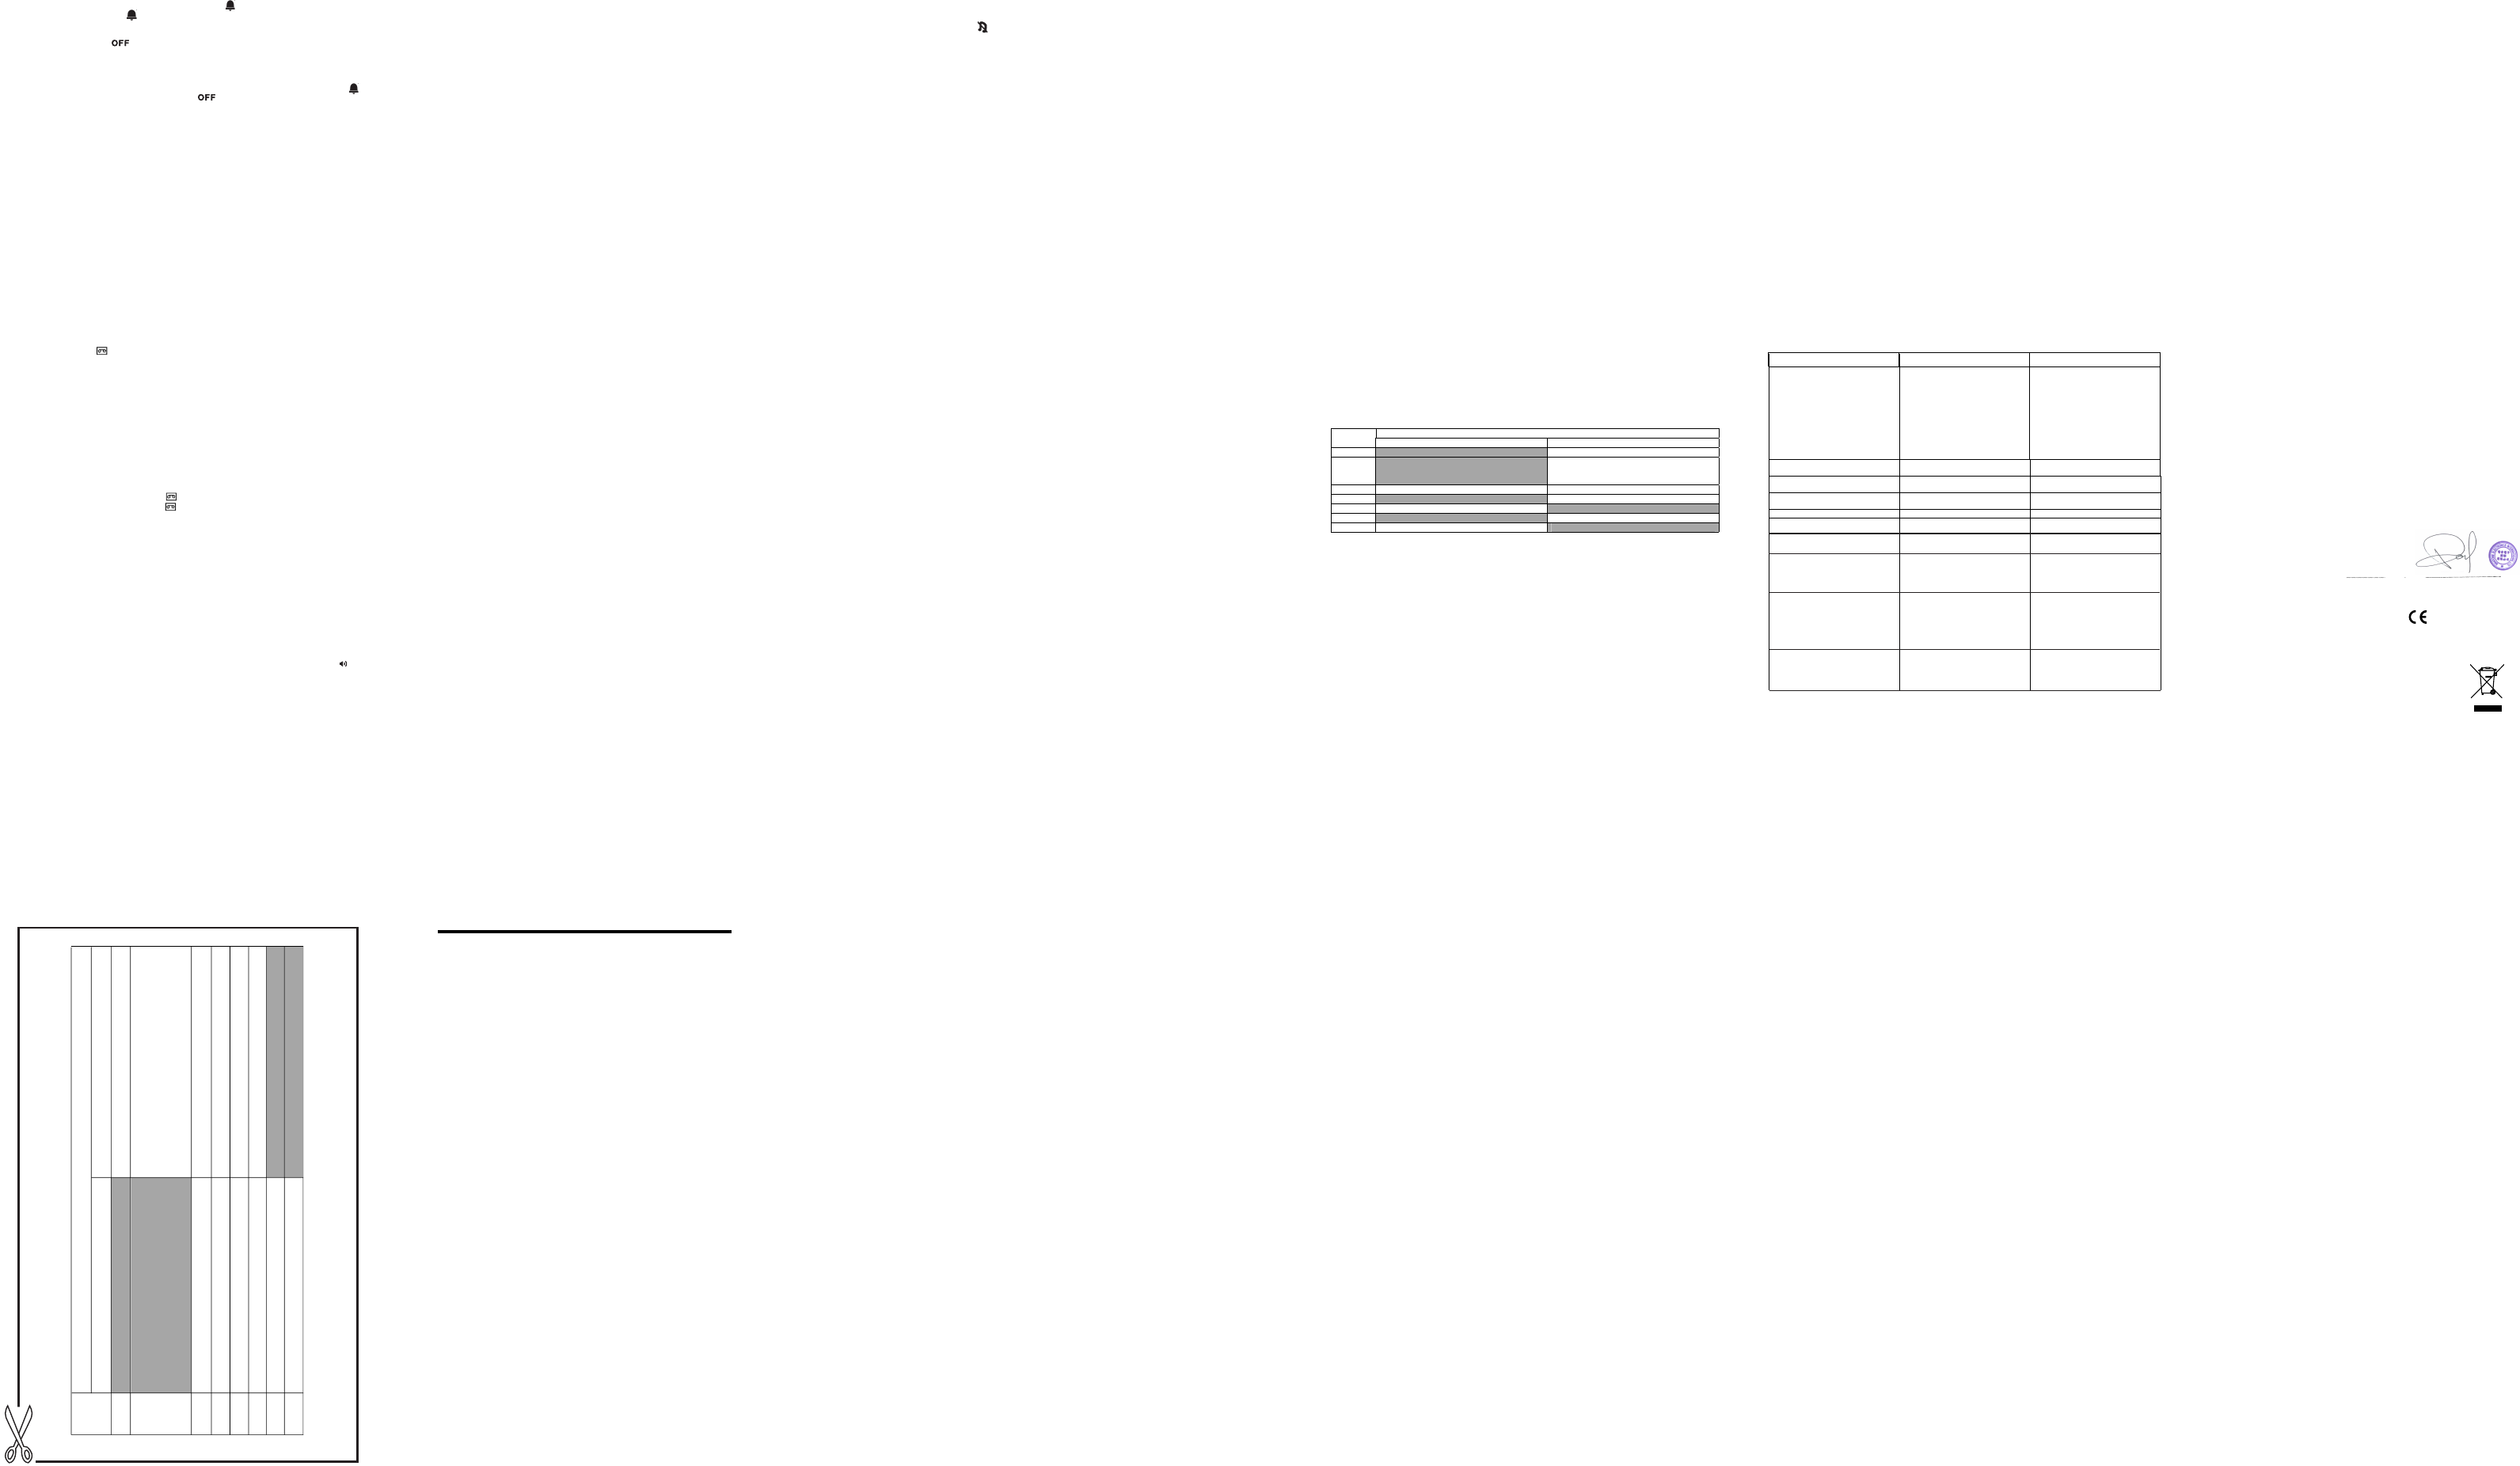
s the following keys to carry out your desired function.
Functions
Keys
While message is not playing While message is playing
2
Delete the current message playback
4
Repeat playing the current message from the
beginning. Press twice to skip backward to
play the previous message.
5 Play the message Stop the current message playback
6
Skip to play the next message
7 Turn on the answering machine
8
Stop the current message playback
9 Turn off the answering machine
Note: If your answering machine is switched off, the phone will
You can then enter * followed by the 4-digit remote access PIN (Default Remote Access PIN is 0000) to activate
the remote access feature.
When your answering machine memory is full and the answer mode is in Answer & Record, the answer mode will
change to Answer Only automatically. It will change back to Answer & Record mode automatically after some
messages have been deleted.
9.5.8 Call Screening
When the answering machine is on and takes a call, you can listen to the caller leaving a message. You can then
identify the caller and decide whether to take the call in person.
If the answering machine is set to ON, when there is an incoming message, the handset will display “Screen?”
1. Press <OK> to start call screening.
whether to pick up the call or not.
2. The handset will display “Screening”.
3. You can adjust the speaker volume by pressing <UP or DOWN>.
OR
3. Press <Back> to return to showing "Screen?" and stop listening to the recording.
At any time if you want to pick up the call, you can press <PickUp> or <TALK> and the message recording will
be stopped
24 25
26
27
28
9.5.3 Record Your Own Outgoing Message (OGM)
You can record your own OGM for Answer & Record mode or Answer Only mode. When you record your own
OGM, it will be used when the answering machine answers the call.
1. Press <Menu> and <UP/DOWN> to select Answer Machine.
2. Press <Select> and <UP/DOWN> to select TAM Settings.
3. Press <Select> and <UP/DOWN> to select OGM Settings.
4. Press <Select> and <UP/DOWN> to select Answer & Record or Answer Only.
5. Press <Select> and <UP/DOWN> to select Record.
6. Press <Select> to start recording your personalised OGM and “Recording” is displayed on the screen.
7. Press <OK> to stop and save your personalised OGM or press <Cancel> to return to the previous screen
Note: Any subsequent newly recorded OGM will overwrite the previously recorded OGM.
9.5.4 Playback (OGM)
You can playback your own personali Answer & Record mode or Answer Only
mode.
9.5.4.1 Playback the OGM
1. Press <Menu> and <UP/DOWN> to select Answer Machine.
2. Press <Select> and <UP/DOWN> to select TAM Settings.
3. Press <Select> and <UP/DOWN> to select OGM Settings.
4. Press <Select> and <UP/DOWN> to select Answer & Record or Answer Only.
5. Press <Select> and <UP/DOWN> to select Playback.
6. Press <Select> to playback your current OGM and
“Playing” is displayed on the screen.
7. Press <Back> to stop the OGM playback and return to the previous menu.
9.5.4.2 Restore to default OGM
1. Repeat Steps 1 to 4 in Section 9.5.4.1
2. Press <Select> and <UP/DOWN> to select Default.
3. Press <Select> and <OK> to confirm restoring to default OGM.
9.5.5 Set the Answer Delay
You can set the number of rings before the answering machine answers and starts playing your OGM. You can set
the answering machine to answer after two to nine rings or Time Saver.
1. Press <Menu> and <UP/DOWN> to select Answer Machine.
2. Press <Select> and <UP/DOWN> to select TAM Settings.
3. Press <Select> and <UP/DOWN> to select Answer Delay
4. Press <Select> and <UP/DOWN> to select
5. Press <Select> to confirm your choice.
1
If you have difficulty with your phone, please try the suggestions listed below.
Problem Cause Solutions
No dialling tone when pressing <TALK>
key
a. The connection cord of the base
station is not plugged in.
b. The adapter cord is not plugged in
correctly in the base station.
c.
d. Wrong telephone line cord
a. Check the connections. Unplug
and plug back in the mains.
Check that the telephone line cord
has been plugged into the base
station and the phone socket.
b. Check the base station plug and
the 230V plug (remove and plug-
in).
c. Wait until the line is unoccupied.
d. Use the original
When connect to a PBX, no and/or
wrong connection after dialling.
Dialling prefix is needed. Insert the dialling prefix
"Searching" is displayed.
Base station out of range.
Base station not connected to mains.
Reduce the range.
Connect base station to mains.
The call does not work.
Service not activated or wrong setting
Check your Subscription with network
or change the dial mode.
No display. Empty battery Recharge battery
This telephone is not equipped with a grounding function! Therefore some of the functions may be limited when
used in PBX systems.
Technical Support
If the fault persists...
Disconnect all other instruments connected to the same line as the
Disconnect the base unit from the telephone line and plug a different phone into the master telephone
Try making a call. If this works, the line is OK.
If the cal l does not work, and you are using a two-way socket adapter, remove it and plug a telephone
If you still cannot identify the cause of the problem, please read out the serial number of this telephone to
the Binatone Customer Service Center. The serial number can be found in the battery compartment after
For technical support, call Binatone Customer Service at 0845 345 9677
(UK only).
If you cannot make a call, the fault may be on the
exchange line. Contact your telephone service provider.
0 TROUBLESHOOTING
Functions
Keys
While message is playing
2
Delete the current message playback
4
Repeat playing the current message
5
Play the message
Stop the current message playback
6
Skip to play the next message
7
8
Stop the current message playback
9
Turn off the answering machine
from the beginning. Press twice to
skip backward to play the previous
message.
Turn on the answering machine
While message is not playing
11 DECLARATION OF CONFORMITY
UK (
) Ver 1, Ju 20
31
7 CLOCK & ALARM
7.1 Date & Time
7.1.1 Change date format
1. Press <Menu> and <UP/DOWN> to select Clock/Alarm.
2. Press <Select> and <UP/DOWN> to select Date & Time.
3. Press <Select> and <UP/DOWN> to select Date Format.
4. Press <Select> and <UP/DOWN> to select your desired date format from DD-MM-YYYY or MM-DD-YYYY
5. Press <Select> to confirm.
7.1.2 Change time format
1. Follow steps 1 to 2 in Section 7.1.1.
2. Press <Select> and <UP/DOWN> to select Time Format.
3. Press <Select> and <UP/DOWN> to select your desired time format from 12 Hours or 24 Hours.
4. Press <Select> to confirm.
7.1.3 Set the date
1. Follow steps 1 to 2 in Section 7.1.1.
2. Press <Select> and <UP/DOWN> to select Set Date.
3. Press <Select> and then enter the date according to the date format you set in Section 7.1.1
Note: If an incorrect input is detected, an error tone will be emitted , the date will not be saved and you can try
4. Press <OK> to confirm.
7.1.4 Set the time
1. Follow ste
ps 1 to 2 in Section 7.1.1.
2. Press <Select> and <UP/DOWN> to select Set Time.
3. Press <Select> and then enter the time according to the time format you set in Section 7.1.2.
Note: If an incorrect input is detected, an error tone will be emitted and the cursor will stop at the incorrect input.
4. When the cursor is at the AM/PM field, press <UP/DOWN> to select AM or PM.
5. Press <OK> to confirm.
7.2 Alarm
You can set an alarm on the handset. When an alarm is set, the < > displays on the LCD.
When the alarm time is reached, the < > and “Alarm On” flash on the handset display, and the alarm
melody rings for a duration of 45 seconds. You can press any key to stop the alarm. If the snooze function is
two minutes. When the alarm time is
Note:
a. locked when the alarm rings.
b. The alarm volume level is the same as the settings of the handset ringer volume. If the handset ringer is set to
Volume Off, the alarm still sounds at Volume 1 level.
c. During an external call or internal call, if an alarm is set and when the alarm time is reached, the < >
and “Alarm On” will still flash.
will revert to the call duration screen.
d. During ringing, the alarm will not sound when the alarm time is reached. However, if the snooze function is
enabled, the alarm will sound again at the end of the snooze period provided that it is not ringing or in paging
mode at the end of the snooze period.
7.2.1 Turn off the alarm
1. Press <Menu> and <UP/DOWN> to select Clock/Alarm.
2. Press <Select> and <UP/DOWN> to select Alarm.
3. Press <Select> and <UP/DOWN> to select Alarm Off.
4. Press <Select> to confirm.
8.2.3 Change the Flash Time
1. Press <Menu> and <UP/DOWN> to select Base Settings.
2. Press <Select> and <UP/DOWN> to select Flash Time.
3. Press <Select> and <UP/DOWN> to select your desired Recall (Flash) time (Short, Medium, Long).
4. Press <Select> to confirm.
8.2.4 Change the System PIN Code
A 4-digit system PIN code is used for changing the system settings of the base station. It is used to protect your
phone against unauthori ed use. The default system PIN code is 0000.
1. Press <Menu> and <UP/DOWN> to select Base Settings.
2. Press <Select> and <UP/DOWN> to select Modify PIN.
3. Press <Select>
4. Enter the current 4-digit system PIN.
Note: If the old system PIN is incorrect, “Old PIN Invalid” is displayed and it returns to the Modify PIN menu.
5. Press <OK> and enter your new 4-digit system PIN.
6. Press <OK> and enter your new 4-digit system PIN again.
Note: If the new PIN entered in Step 6 is not the same as the new system PIN entered in Step 5,
7. Press <OK> to confirm.
8.2.5 Reset base settings to default
You can reset your phone to the default settings. After a reset, all your base and answering machine settings
but your phonebook entries remain unchanged.
1. Press <Menu> and <UP/DOWN> to select Base Settings.
2. Press <Select> and <UP/DOWN> to select BS Default.
3. Press <Select> and then enter the 4-digit system PIN (Default 4-digit system PIN: 0000)
4. Press <OK> to show "Confirm?"
5. Press <OK> again to confirm the reset.
Note: If the PIN code is entered correctly and
If the PIN code is entered incorrectly, “PIN Invalid” will display.
8.3 Registration
1. Press and hold <PAGE> on the base station for into
2. Press <Menu> and <UP/DOWN> to select Registration.
3. Press <Select> and <UP/DOWN> to select the base
4. Press <Select> and then enter the 4-digit system PIN. (Default 0000)
5. Press <OK> to
If the handset registration is successful, you will hear a confirmation tone and the display will return to idle
cally be allocated the next available
standby mode.
9 ANSWERING MACHINE
9.2 Listen to the Messages in the Answering Machine
When new messages are recorded on the answering machine,
Old messages are
played after all new messages have been played.
1. Press <Menu> and <UP/DOWN> to select Answer Machine.
2. Press <Select> and <UP/DOWN> to select Playback.
3. Press <Select> to start message playback and the screen displays the message number and the date and
message received.
message number to indicate that it is a new message.
you
listen to this
message again.
During message playback, press <UP> or <DOWN> to increase or decrease the message playback volume
4. Stop, Next, Previous or Delete
5. Press <Select> to perform the following functions.
Stop: Stop the current message playback and return to the Answer Machine menu.
Next: Skip to play the next message. The date and time information of the next message will display if there
Previous: Skip to repeat playing the current message from the beginning. The date and time information of
the current message will display.
Delete: Delete the current message and start playing the next message.
Note: Alternatively, you can use the following shortcut keys on handset to control different operations during
message playback.
Press <Key 5> to stop message playback.
Press <Key 4> once to restart the current message from the beginning. Press twice to skip
backward to play the previous message.
Press <Key 6> to skip forward and play the next message.
Press <Key 2> to delete the current message being played.
9.3 Delete All Messages in the Answering Machine
1. Press <Menu> and <UP/DOWN> to select Answer Machine.
2. Press <Select> and <UP/DOWN> to select Delete All.
3. Press <Select> to
4. Press <OK> to delete all old messages. (Note: New messages will not be deleted).
Your phone includes a telephone answering machine (TAM) that records unanswered calls when it is on.The
answering machine can store up to 59 messages within the maximum
recording time of approximately 17 minutes.
As well as recording incoming messages, you can
record memos for other users of your phone. If the answering
machine memory is full, the < >
Turn the Answering Machine On/Off
You can turn the answering machine on or off using the handset menu. When the answering
and is in Answer & Record mode, calls will be answered after the set
When the answering machine is set to OFF, calls will be answered after 14 rings and the
be played to your callers. They will not be able to leave you a
message.
9.1
answer delay and the
you a message.
machine is set to ON
caller can then leave
answer only message will
1. Press <Menu> and <UP/DOWN> to scroll to Answer Machine.
2. Press <Select> and <UP/DOWN> to scroll to TAM On/Off.
3. Press <Select> and <UP/DOWN> to scroll to On or Off.
4. Press <OK> to confirm.
If the answering machine is set to On,
If the answering machine is set to Off, the < > icon will not be on the handset display.
the < > icon will be shown on the handset standby display.
message can be played back in
the same way as
Language
The answering machine announces the outgoing message when it answers a call. There is a
pre-set OGM for each
Answer & Record mode or Answer Only mode. You may be able to
OGMs.
9.5.2 Set the Outgoing Message (OGM)
of
select a different language for your default
1. Press <Menu> and <UP/DOWN> to select Answer Machine.
2. Press <Select> and <UP/DOWN> to select TAM Settings.
3. Press <Select> and <UP/DOWN> to select TAM Language.
4. Press <Select> and <UP/DOWN> to select your desired OGM language, if available.
5. Press <Select> to confirm the language.
The default remote access PIN is 0000.
29
30
Fusion 2925.
Fusion 2925 and try to make a call.
You can press <Off> or < > to turn off the alarm or any other key to activate
the snooze, if set, and the display
A key press will still disable the alarm even if the handset keypad is
stop the alarm and turn off the snooze function.
activated, the alarm will sound again at the end of the snooze period of
reached, you can press <Off> or < > to
again to enter a valid date.
If you subscribe to Caller Display, the time and date settings will be automatically updated by the
network when you receive a call, although the year is not sent, so you may need to set it.
You can also change the format of how the time and date are displayed, and set an alarm on your
handset.
If required, the handset name shown on the standby screen can be changed from its
default of "Handset".
To adjust the volume of the sound in the earpiece or loudspeaker.
To set the ringer melody that will sound when an intercom call is received.
To set the ringer melody that will sound when an external call is received.
like it to work.
When the Auto Answer is turned on, you can answer a call automatically by just lifting the handset
off the base or charger, without having to press any key.
the contrast level you prefer. There are four contrast levels,
you step through the list of options.
and the contrast will change as
To change the contrast level of the handset display:
the colour theme you prefer. There are four colour themes,
change as you step through the list of options.
and the display colours will
To change the colours used in the handset display:
press and hold <Clear> to delete the whole character string.
the Handset Language
If required, you can change the language used for the handset display.
Three different alert tones are set on by default, but can be turned off, if desired.
Key Tone - a single beep is emitted when you press a key.
Low Battery Tone - emitted while you are talking on the phone to alert you that you need to charge the
handset battery.
Out of Range Tone - emitted while you are talking on the phone to alert you to move closer to the base
unit, before the call is lost.
You should normally leave the dial mode at its default setting of Tone (also called DTMF),
unless the phone is connected to an old exchange that only recognises Pulse dialling.
Note: If Pulse dialling is set, you can press the key to switch to Tone dialling for the rest
of that call
This operation should only be necessary if one of your handsets becomes faulty or lost and needs to
needs to be replaced.
You will need to enter the 4-digit system PIN code (default 0000) in order to de-register a handset
from the base station. A de-registered handset will have the antenna icon flashing and
" ! Unregistered " on the display.
confirmed, the handset will chime and the display will return
to its standby screen.
reset, and your redial and calls lists made empty,
The currently selected base is indicated in the list by an asterisk.
Your handset can be registered to up to four different base stations, but can only link to one base at a
time. To select the base you want to use:
selection list.
If the handset registration is
screen, with the <antenna icon> steady on. The handset will automati
handset number, which is shown in the handset display in
unsuccessful, the display will time out and return to the base
confirm and the handset shows " Waiting "
already registered to a base, it will be
indicated by an asterisk.)
number you want to register to. (If the handset is
more than five seconds to put the base station
It will stay in registration mode for about one minute, so the following handset
registration mode.
sequence must be completed within this time.
IMPORTANT: When you purchase your Fusion 2925 system, all handsets are already registered
to the base, so you do not need to register them.
Handset registration is only necessary if you buy extra handsets or if a handset has
become faulty.
Up to five handsets can be registered to a base station, with each handset's number (1 to
5) shown on its display.
A handset can be registered to up to four base stations.
To register a new handset to your base:
Base Settings menu.
confirmed, the handset will chime and the display will return to the
sed OGM or the pre-set OGM for
When the OGM recording is stopped, it will be played back automatically, and if it is not what you want
simply repeat the recording process.
will b e reset, including erasing all answering machine messages,
is displayed and you must enter your new remote access PIN
again in step 5.
New PIN
Invalid
to show a " Old PIN " with the cursor line flashing after it.
s
Recall ( )
You may need to change the Recall (Flash) time if your phone is connected to a
options are Short (the default value of 100ms) Medium
(300ms) or Long (600ms).
PBX. The recall time
show "? Delete Confirm"
is next message.
During message playback, press <Menu> and <UP/DOWN> to select
respectively. For privacy, you can listen via the earpiece by pressing the Speakerphone
switch between loudspeaker and earpiece.
button < > to
After a message has been played, the asterisk will disappear and will not be shown if
in front of the
Note: An asterisk is placed
Note: If there are no messages recorded, the display will briefly show " ! No Messages ".
time information of the
the handset display shows "New Call/Msg" until all new messages have been played, and the base
display flashes the number of new messages.
A
fter a new message is played it is saved as an old message automatically, unless it is deleted.
icon on the handset will flash, and <FF> will be shown on the base display.
Some answering machine functions can be operated from the base, including playing
messages, and turning the answering machine on or off. See section
Answering Machine (TAM) Control" for further details of
button operations.
The following sections give the operating instructions for the answering machine from the
handset
messages, deleting
"3.3 Base Station with Telephone
.
personalised OGM, and restoring the default OGM.
without saving the
menu.
recording. The memo will play back for you to check. Press <OK> or leave the
finish playing, to save the message.
memo to
user. When you record a memo the message counter will
increase by one and the
answering machine messages.
To allow remote access this option must be turned "On", but you can turn this option "Off" to prevent any
remote access at all.
displayed and you must enter your new remote access PIN again in step 5.
and then enter your new remote access PIN.
Chg Remote PIN
from 60 Sec, 120 Sec, 180 Sec or Unlimited.
for each incoming message to be 60, 120 or 180 seconds,
recording time remaining on the answer machine.
or unlimited up to the total
.
or Time Saver.
from 2 Rings, 3 Rings, 4 Rings, 5 Rings, 6 Rings, 7 Rings, 8 Rings,
9 Rings
If Time Saver is set the answering machine will answer after 4 rings if there are no new
rings if there is a new message, so if you call in and don't get an
and save on call charges.
messages, or after 2
answer after 2 or 3 rings, you can hang up
automatically, with any recording up to that point saved as a new message.
Any handset can listen to who is
leaving the message and decide
answer after 14 rings and play the Answer Only
OGM.
Access PIN is entered incorrectly three times consecutively, the line will be
PIN. (Default PIN is 0000)
Note: The <*> must be entered while the OGM is still playing, and the 4-digit PIN should
follow without any delays
.
When you are away from home, you can check your messages or switch the answering
by using a tone-dialling phone to call the answering machine, and
remote access PIN code is used to
prevent other people from unauthorised
access
of your answering
machine
machine on or off,
entering a 4-digit remote access PIN. The
4-digit
.
removing the batteries.
directly into the socket. If the cal l now works, the adapter may be faulty.
socket.
Answering Machine
The unit does not record
new messages.
The answering machine is
turned off.
Turn on the answering machine.
The caller cannot leave a
message.
a. The answering machine
is turned off.
b. Message memory is full.
a. Turn on the answering machine.
b. Erase unnecessary messages.
I cannot operate the
answering machine
remotely.
a. You are entering the
wrong remote access code
b. You are pressing the dial
keys too quickly.
c.
You are using a pulse
telephone.
a. If you forget the remote access
code, reset to the default settings.
b. Press each key firmly.
While recording an outgoing
message or listening to
messages, the unit rings
and recording stops.
A call is being received.
Answer the incoming call
and try again to record your
out going message later.
c. ANSWER ONLY mode is set.
c. Change to ANS & REC
c. Try again using a touch tone
phone.
telephone line
Another handset is using the base
to make a call.
cord supplied.
10n
11
The conformity to the requirements is validated by the
symbol.
NOTE: In compliance with Directive 2002/96/EC, when you purchase a product
that comes
with the symbol
shown on the right, you are required to dispose of
electrical and electronic equipment by separate waste collection
and you cannot dispose of the product as normal waste.
This equipment and all its components, subsystems and
consumable materials formed an
integral part of this product
and when you decide to dispose of them you have to
takethem to the local recycling centres for appropriate waste
disposal, in compliance with the current regulations.
Details about the location of these centres can be obtained from
your local authority.
We the manufacturer / Importer : : Binatone Telecom Plc
1 Apsley Way London
Declare under our sole responsibility that the following product
Type of equipment:
Digital cordless telephone
Model Name:
Country of Origin:
China
Brand:
complies with the essential protection requirements of R&TTE Directive 1999/5/EC on the
approximation of
the Member States relating to Radio Spectrum
the approximation of the laws of the
Member Statesrelating to electromagnetic compatibility (EMC) and the European
Community Directive 2006/95/EC relating to Electrical Safety.
Assessment of compliance of the product with the requirements relating to the
essential requirements according to Article 3 R&TTE was based on Annex III of the
Directive 1999/5/EC and the following standard:
Radio Spectrum: EN 301406: V2.1.1 :(2009-07)
;
EMC: EN 301489 - 1:V1.8.1 (2008-04)
;
EN 301489 - 6:V1.3.1 (2008-08);
Electrical Safety: EN 60950-1:2006 + A11:2009
Manufacturer / Importer
(signature of authorized person)
20
Date
Signature
NW2 7HF.
Binatone
Binatone
the laws of
Matters, the Council Directive 89/336/EEC on
Fusion 2925 Series
30 Jun 10
< *>
WER ORD
mode.
the
11
GUARANTEE
PRODUCT
This product is guaranteed against manufacturing defects
for a period of 1 Year.
This does not cover the product where the fault is due to misuse, abuse,
use in contravention of the instructions, or where the product has been
the subject of unauthorised
subject of
In the event of a problem with the product within the guarantee period please
return it to your nearest Argos store. If the item is shown to have had an
the time of sale, the store will provide you with
a replacement.
Your statutory rights remain unaffected.
Guarantor; Argos Ltd
489 - 499 Avebury Boulevard
Central Milton Keynes
MK9 2NW
commercial use.
modifications or alterations, or has been the
inherent defect present at
Argos