


PHONEBOOK
ringer
Display messages and symbols
Installation
2
3 Making and answering calls
To make a call
1
Key in the phone number
If you make a mistake, press
to clear digits from the display.
To clear all digits, press and hold
2
Press
To answer a call
When the handset and base unit ring:
◗
Press
To end a call
◗
Press
so that the
symbol disappears from the display
Last Number Redial
To make a repeat call to the last number you dialled:
1
Press
2
Press
To make a repeat call to one of the 10 last numbers you dialled:
1
Press
▲
or
▼
until the number is shown on the display
2
Press
Muting the mouthpiece
◗
Press and hold key
for 4s
to mute the mouthpiece
While the mouthpiece is muted the person on the other end of the call can’t
hear you. is shown on the display.
◗
Press
and hold key
once again to un-mute the mouthpiece
6 Tones and volumes
To adjust the earpiece volume during a call
1
Press
▲
or
▼
to change the volume
Handset ringing melodies
To change the ringing melody for incoming external calls
:
1
Press
à
2
Press
à
3
Press
à
4
Press
à
melod
y
1
to
5
Press
▲
or
▼
to hear each melody in turn.
6
Press
to confirm the melody you want
.
7
Press and hold
to go back to standby mode
.
4 Memory dialling
You can store up to 40 numbers in each handset’s memory. Each number can
have up to 2
4
digits, and you can store a name of up to 10
characters with
the number.
To store a number
The display shows:
1
Press
à
3
Press
à
add
4
Press
à
name
5
Key in the name, using the numbered keys
6
Press
7
Key in the number
Note:
if you make a mistake , press to clear digits or letters from
the display.
8
Press
You can now carry on storing numbers
To store a number from redial list
1
P
ress then select the number
2
Press
if you wish.
5
P
ress to confirm.
3
P
ress key in a name then
To make a memory call
1
Press
2
Press
▲
or
▼
until the display shows the name and
number
3
Press
to dial the number
Handset ringing volume
You have a choice of
eight
volume levels
including
ringer off.
1
Press
à
2
Press
à
3
Press
à
4
Press
à
1
to
o
rvo
l
off
5
Press
▲
or
▼
to change the volume
6
Press
to confirm
7
Press and hold
to go back to standby mode
Base unit ringing melody
1
Press
à
2
Press
à
3
Press
à
volume
4
Press
à
melody
5
Press
à
melody
an
d
1
to
6
Press
▲
or
▼
to hear each melody in turn
7
Press
to confirm the melody you want
8
Press and hold
to go back to standby mode
Base unit ringing volume
1
Press
à
2
Press
à
3
Press
à
4
Press
à
5
Press
▲
or
▼
to change the volume
6
Press
to confirm the volume level you want
7
Press and hold
to go back to standby mode
* If you’ve set the ringer volume to OFF, you won’t hear any melody at this point.
Key tone on/off
Each time you press a key, you hear a tone. You can turn this off if you prefer.
1
Press
then
à
à
handset
2
Press
à
keytone
3
Press
à
on
or
off
4
Press and hold
to go back to standby mode
7 Call barring
Using call barring, you can prevent certain types of call being made on your
handset. There are four levels of Call Barring:
■
no bar
— all calls are allowed. This is the default.
■
local
—
no international calls
■
internal
— you can’t make any outgoing calls except emergency 999 calls.
To bar calls to specified numbers
1
Press
then
press
à
base
2
Press
then press
3
Press
to select [
] or [
]
the display shows a list of registered handset numbers
4
Key in a handset number
5
key in the barred number and confirm using
6
P
ress to select [
] and confirm using
7
Using
to select tick(ON) to activate the call barring or
Cross (OFF) to de- activerte it ,
to go back.
8 Customising your phone
Your handset’s name
The default name shown on your handse
t’s display is
[
]
. You can
change this to anything with up to ten characters.
1
Press
then
à
handset
2
Press
à
hs name
3
Press
to display the current name
4
Press
repeatedly to clear the display
5
Key in your chosen name
6
Press
to confirm
7
Press and hold
to go back to standby mode
Auto-answer
Normally, you need to press
to answer an incoming call. But with
auto-answer turned on, when your handset is resting on the base unit and
it rings for an incoming call, you can answer by simply lifting the handset.
To turn auto-answer on or off:
1
Press
then
à
à
handset
2
Press
then
à
auto ans
3
Press
to select
Tick (ON)
or
Cross (OFF)
4
Press
and hold
to go back to standby mode
!
If you have turned auto-answer on, don’t press the
after
you’ve answered a call by lifting the handset;
Locking the keypad
When the keypad is locked, no numbered keys can be pressed so you can’t make
calls by mistake.
To lock the keypad:
1
P
ress and hold for 4
seconds
à
The display shows the symbol when the keypad is locked.
To unlock the keypad:
1
P
ress and hold for 4
seconds again
The symbol will disappear from display.
!
With the keypad locked, you cannot make emergency calls to 999 or 112.
Your security PIN
You will only need this feature if you plan to set up
Call Barring
.
The base unit has a default PIN (personal identity number) of 0000
. You can
change it to any number you’ll remember, with up to eight digits.
9 Resetting the system
!
If you reset the system, all features will return to their default settings.
!
While you are resetting the system, you should disconnect the telephone
line cord from the back of the base unit, so you won’t be interrupted by
incoming calls.
Reset Base
1
Press
à
base
2
Press
then
à
default
3
Press
à
4
Press
à
You hear a confirmation tone
Reset handset
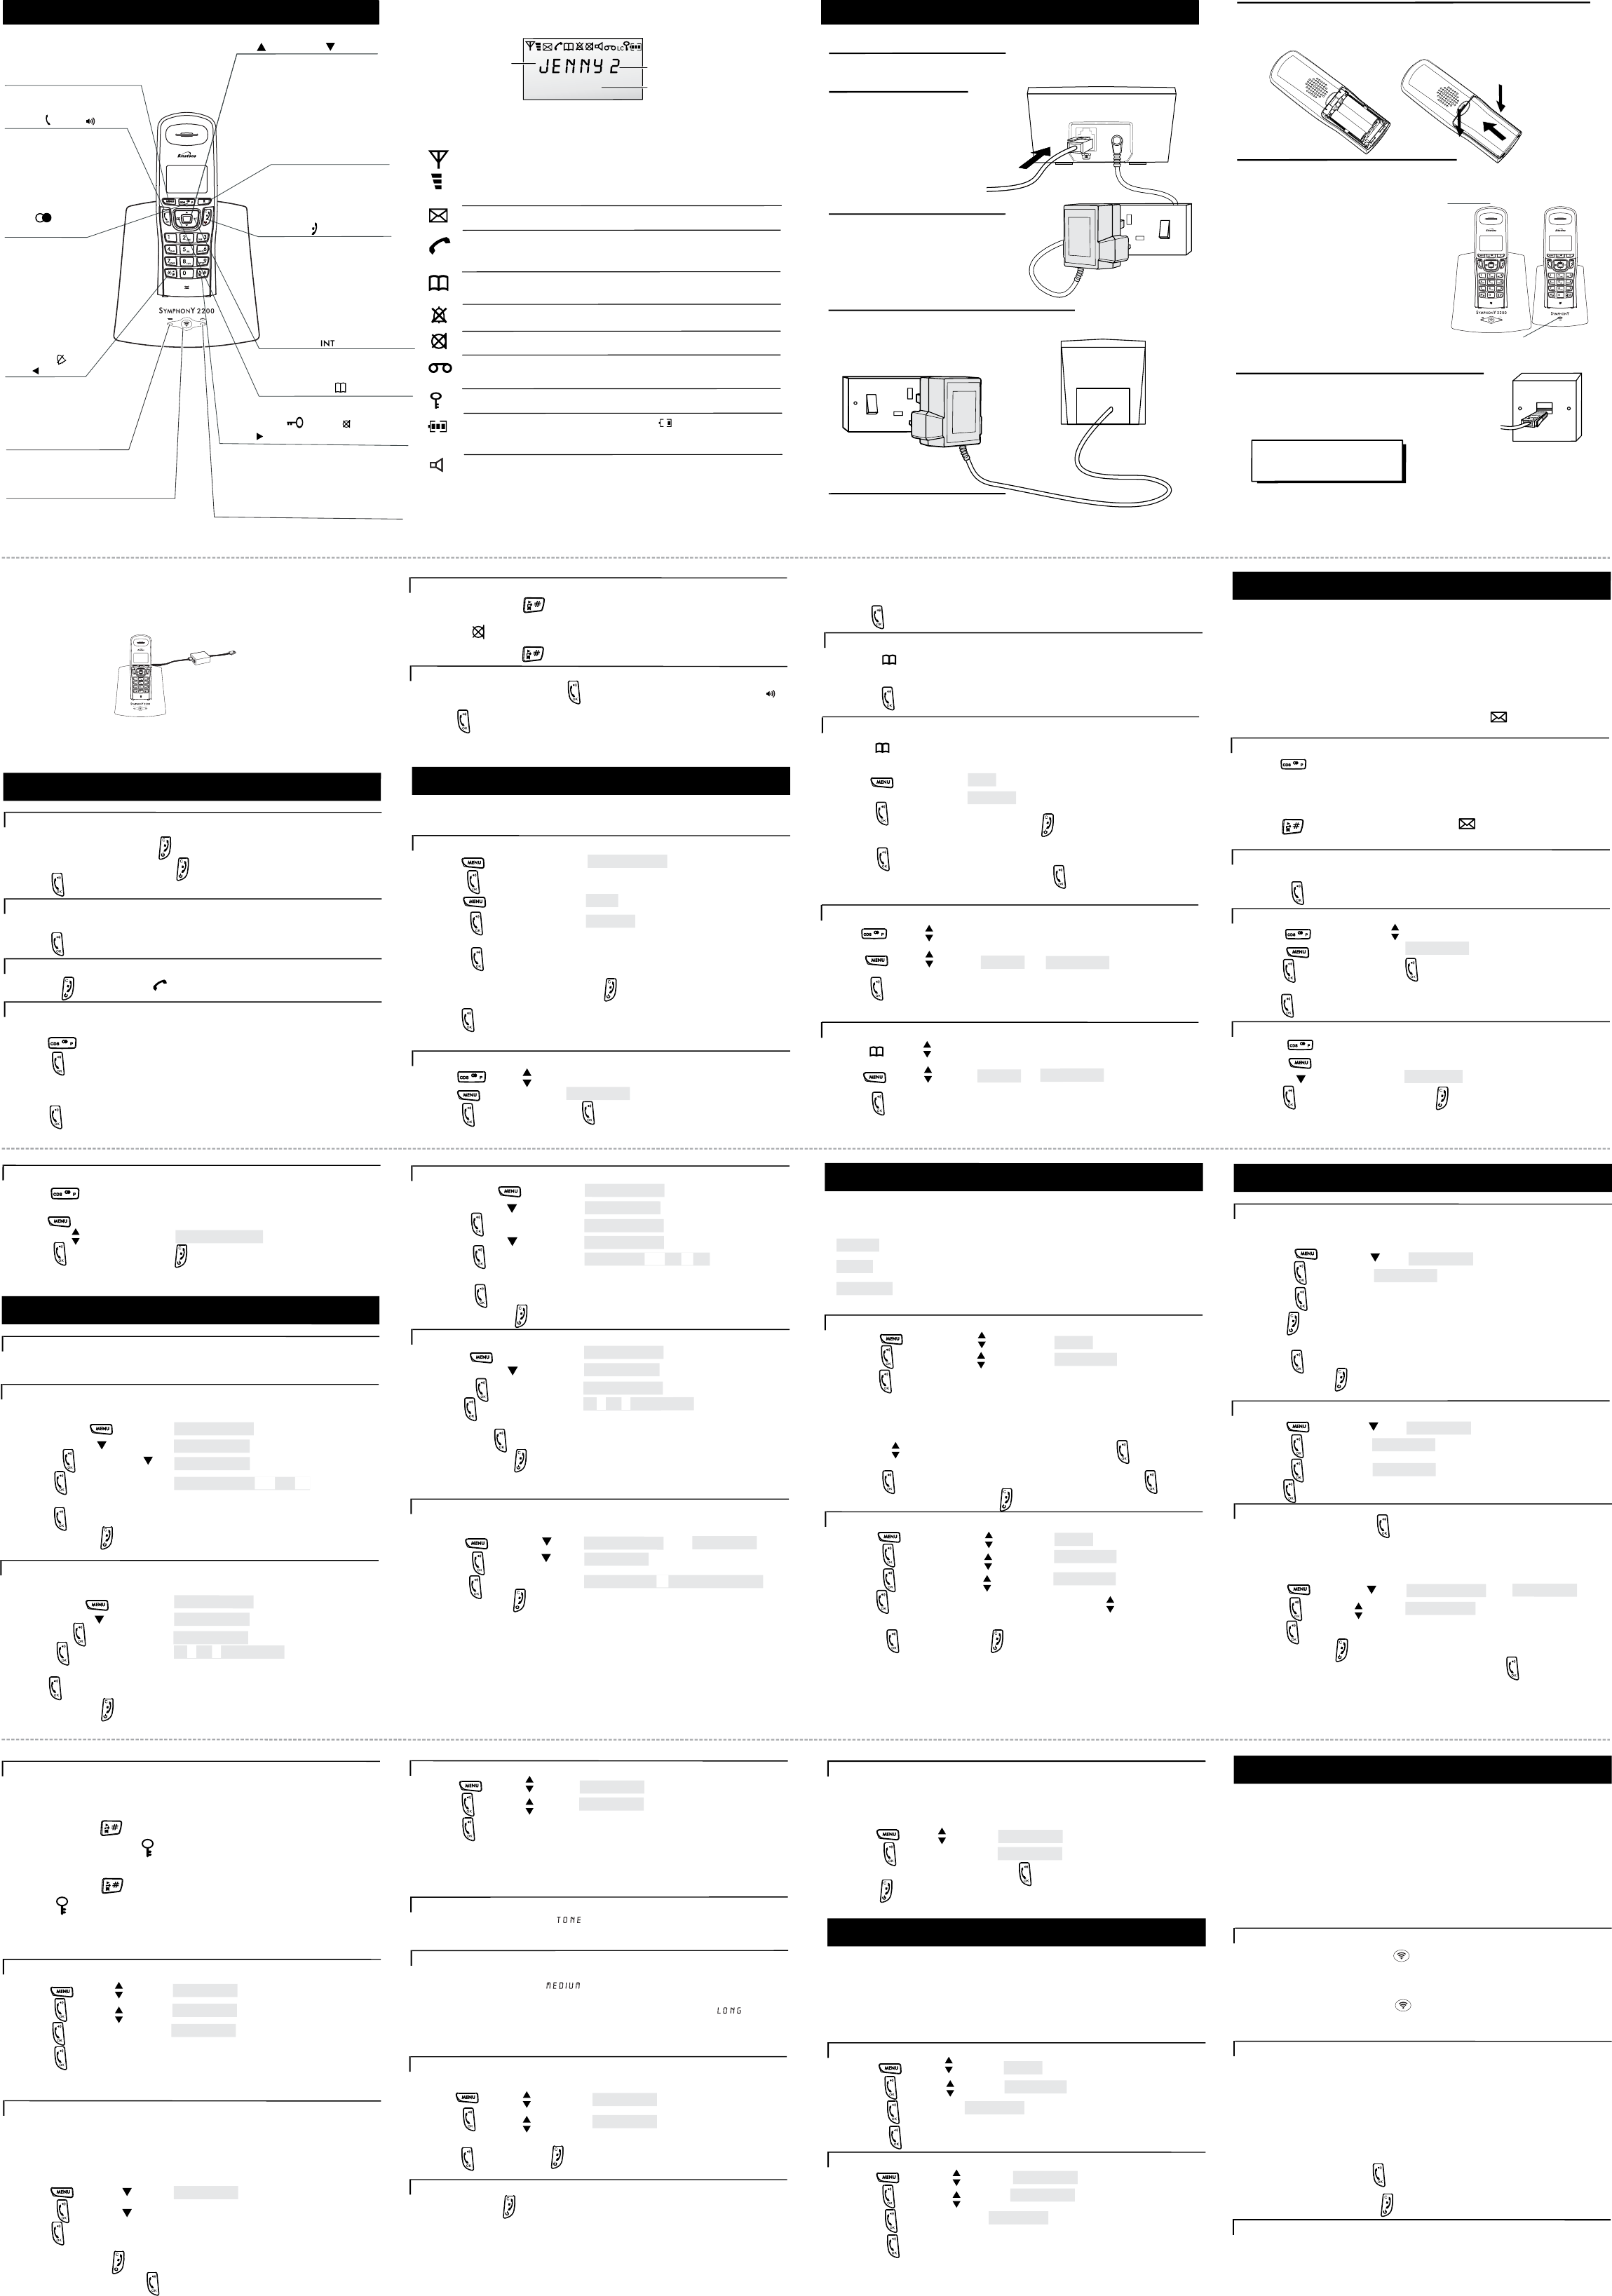
1 Where to find it
5
4
3
2
7
6
13
12
11
10
17
16
15
14
Redial / CDS/
PAUSE button
once
twice
Press to open a list
of the last 10 phone
numbers you called.
Press to open the
list of Caller Display
records.
Press while dialling a
number to insert a
pause (you might need
this on a PBX).
Ringer Off /
Scroll button
Press and hold for 4 seconds
to turn the ringer off.
When viewing a number with
more than 12 digits, press to
scroll back along the display.
R (Recall) button
You may need this if your
phone is connected to a
PBX, or if you use
network-based services.
Press to start using Menu
functions.
P
H
O
N
E
/
O
K
/
Press to begin or answer a
phone call.
When using Menu functions,
press to confirm your
selection.
UP and DOWN buttons
Press during programming to
Press to move through the Caller
Press during a call to adjust the
Keypad Lock /MUTE /
Scroll button
Press and hold for a moment to lock and
unlock the
keypad.
Press during a call to mute the mouthpiece.
When viewing a number with more than 12
digits,press to scroll
for ward along the display
.
PHONE BOOK button
Press to open the Phone Book.
INTERCOM button
Press to make an intercom call
to another handset.
H
AN
G U
P
(Cancel) button
Press to end a call.
Press and hold for 3 seconds to
switch the handset on and off.
Press
while editing
or
using
M
en
u f
u
nct
i
o
n
s
,
to
cancel
what
you’re doing and return the
display to Standby mode.
move through the menus and
options.
Display or Redial list.
volume
in
the
earpiece
or
speakerphone.
16:25
When this shows ‘nearly empty’ ( ), put the handset on the
base unit or charger pod as soon as possible, to charge the
batteries. While the batteries are being charged, this blinks.
Appears when you have a connection to the outside line.
Flashes when there’s an incoming call to be answered
(even if the ringer is turned off).
The handset’s number
The current time
The handset’s name
(t
h
e
d
e
f
au
l
t
i
s
)
Phone
Book
Ringer off
Comes on when you’re storing numbers in the Phone Book, and
when you’re making calls to stored numbers.
Comes on when the handset’s ringer is turned off.
Radio link/
signal level
Th
on steadily when there’s a radio link between
the handset and base unit. lashes while the handset is trying
to establish a link
.
.
e first symbol
It f
to the base unit
The second symbol shows the strength of the signal.
If this symbol flashes while
you’re on a call, move closer to the base unit
Battery
charge
level
Phone
New call
You have new Caller Display records.
What the symbols mean
The duration of each call is displayed, from 20 seconds after you press the
PHONE button for a line, until 5 seconds after you end the call.
Lock
Comes on when your handset’s keypad is locked.
Mute
Comes on when your handset’s microphone is muted.
If you use a network voice mail service, this symbol appears
when you have new messages in your Inbox.
Network
voice mail
3
5
4
Plug the mains adapter into a
230 V AC, 50 Hz mains socket,
with the switch on the socket
set to OFF
Plug the mains adapter into a 230 V AC,
50 Hz mains socket, with the switch on
the socket set to OFF
Switch on at the mains socket(s)
Install the charger pod(s) …
Connect the mains power
lead and the telephone
line cord into the
underside of the base unit
2
Use the telephone line
supplied with your
use any other
telephone line cord
cord
1
Choose a suitable site for the
base unit telephone
The CHARGE
light comes
on
The bars on the
battery level symbol
continuously change
as the batteries are
being charged
Make sure the mains socket is
switched on — the phone won’t
work without electrical power
Connect the base unit to the telephone line
Switch off power at the mains socket
Insert the telephone line plug into the socket
Switch mains power back on
8
NOTE: the charger pod doesn’t have
a connection to the telephone line.
Charge the batteries for 15 hours
7
Before you use the cordless
handsets for the first time,
it’s important to charge the
batteries fully.
You hear a ‘beep’ when the
handset is correctly in
position on the charging
cradle.
To keep the batteries charged,
whenever you don’t need to use the
handset (such as overnight, or when
you go out), leave it on the base unit
or charger pod.
Leave the handsets on the base unit
and charger pod(s) for 15 hours.
Fit the batteries in the cordless handsets
6
Insert the three rechargeable
batteries as shown
Drop in the battery compartment
cover, then slide it forward until it
clicks firmly into place
2
Press
show
first
memory stored
entry
.
4
You can edit the number using HANG UP/C before storing it
call bar
à
To bar certain type of call
1
Press
t
hen press
à
base
2
Press
then press
4
Press
then k
ey in a handset number, press
select [
] , [ ] o
r [
]
5
Using
to confirm or
to go back to turn call barring off
* Follow 1 to
4 above, setting the level to [
] at step
4
call bar
à
à
Clear memories on handset
1
Press
then
2
Press
then
3
Press
4
Press
to c
o
nfirm
à
handset
à
à
1
Press
then
2
Press
Key in your new PIN and Press
to confirm.
3
Press
to go back.
à
à
base
à
1
Press
then
2
Press
then
à
default
3
Press
4
Press
à
You hear a confirmation tone from the
handset.
à
handset
10 Using a muti-handset system
■
page
the handsets from the base unit (this is useful if you can t find a handset)
■
make
intercom
calls from one handset to another
■
transfer
outside calls between handsets
To page all
handsets
Press the
HANDSET LOCATOR
button on the base unit
Ú
All registered handsets ring, and their
displays show
PAGING
To stop the ringing:
Press the
HANDSET LOCATOR
button again, or press any button
on any handset
If you have an
multi-handset system, you
already have up to six
handsets registered to your base unit.
You can register additional handsets —
altogether, up
to six handsets per base
unit
. With two or more
handsets registered, you can:
■
Set up a three - way conference call
To make an intercom call
1
Press the
INTERCOM
button on the handset
2
EITHER key in a handset number (1 to 6, depending on how many
handsets are registered);
OR key in
9
to call all registered handsets;
Ú
If you called a handset, it rings and its
display shows
INT
and your handset number.
To answer the intercom call
:
3
Press the
PHONE/OK
button on the ringing handset;
To end the intercom call
4
Press the
HANG UP/C
button on the handset;
To transfer
a call
1
Make or answer an outside call using the handset
2
Briefly
press the
INTERCOM
button then key in a handset number (or
press
9
to call all handsets)
To modify (change) a number in memory
1
Press
show memory stored.
à
add
4
Press
▼
TWICE
à
modify
5
Press
2
Press
▲
or
▼
until the display shows the name
.
6
Modify the name if necessar
y, pressing to clear characters from
the display before keying in the correct ones
.
7
Press
t
he display shows the corresponding number
.
8
Modify the number if necessa
ry then press
You can now carry on modifying numbers
.
To return a call
To make a return call to someone who’s called you:
◗
Press
while either the name or number is shown on the display
To delete a Caller Display record
1
Press
twice
, then
▲
or
▼
to select the caller display record,
press
2
Press
twice
à
delete
3
Press
to delete this record
or press
if you don¡¯
't want to delete the record
When there are no more records, the display shows
handset name.
To delete all Caller Display records
1
Press
twice
The display shows the first Caller Display record
.
3
press
à
4
Press to confirm or press
if you don'¡¥t want to delete all records
When there are no more records, the display shows
handsset name.
5 Caller Display
If you subscribe to this feature from your service provider, you can see the phone
numbers of people calling you, before you answer. The Symphony2200 will store
the
numbers of the last
incoming call
s
. Each Caller Display record includes:
■
The caller’s
name
, if it’s one you’ve already stored in your phone’s memory.
■
The caller’s
number
(up to 20 digits). The number won’t be displayed if the
network they’re calling from does
n
’t support this feature
or
withheld
If the call
e
r
’
s number was
n
’
t available, the display shows
.
■
The
date and time
of the call
When there have been calls you haven’t answered, the symbol is shown on
the display.
To check Caller Display records
1
Press
twice
2
Press
▲
or
▼
to scroll through the records
You’ll see either
names or number
s
.If you see a
name
displayed
or
number
,
to check Date/Time of the call,
3
Press
to show the Date/Time,
the
symbol will
disappear
from the display, once you enter the record list.
9
8
3
Press
2
Press
then
To store a number from Caller Display
1
Press
twice
, then
select the
number.
2
Press
5
P
ress to confirm.
3
P
ress key in a name then
4
You can edit the number using HANG UP/C before storing it
if you wish.
then
by (Tick)
by(Cross)
à
à
UNKNOWN
To delete an entry (all entries) from
redial list
1
Press
2
Press
or
.
then
select the number.
3
Press to confirm delete an entry or delete all entries.
To delete an entry or all entries from Phone Book
1
Press
2
Press
then
select
or .
then
select the number.
3
Press to confirm.
hs
volume
hs
COPY tO PB
DELETE
DELETE ALL
DELETE
DELETE ALL
COPY tO PB
bs
bs
7
8
8
volume
bs
bs
1
t
o
o
r
vo
l
off
7
then key in a handset number
3
Press
then press
à
T
P
E
Y
To set the date and time
1
Press
then
à
2
Press
à
4
Press
to confirm
DATE/TIME
dd-mm-yy
key in the date
3
Press
à
key in the time
HH-MM
If you do will clear all numbers from the handset's phonebook and redial list
Dial mode
Always leave this setting at .
It
’
s ver
y unlikely that yo
u
’ll need this function, and it
’
s
usually best to leave
the setting at its default,
.
B
u
t
i
f
y
o
u
r
2
0
0
i
s
c
o
n
n
e
c
te
d
to
a
n
e
x
te
n
s
i
o
n
o
n
a
P
B
X,
y
o
u
m
a
y
need to change this setting (also
called the
recall lengt
h
) to
. If
applicable,
consult the PBX documentation for details.
Clear all memories on base
Select this to clear all numbers from caller display list
1
Press then
Ú
The display asks:
2
Press then
3
Press to confirm, to cancel
Flash
à
à
CONFIRM?
CONFIRM?
twice
Handset Switch ON/OFF
1
Press
and hold
2
The handset will switch ON or OFF
for 3 seconds
base
then
CONFIRM?
à
CONFIRM?
CLEAR MEM
PHONEBOOK
hs ringer
PHONEBOOK
hs ringer
PHONEBOOK
ringer
bs
PHONEBOOK
PHONEBOOK
PI
N
NEW
C LEAR
D
C I
PHONEBOOK
then
select
DELETE
A
LL
Provider mode
1
Press
then
2
Press
then
3
Press
to select Tick (ON) or Cross (OFF)
à
handset
à
If you have programmed a prefix code into the base unit , you need to turn provider
mode on for each handset if you want it automatically to dial the prefix whenever
you dial a number beginning with 0.
PROV MODE
Prefix number
This may be useful if you use a dialling prefix to route your long-distance calls via a
service provider other them the one which supplies your line. You can program this
prefix into the base unit. Then when you turn on Provider Mode on individual handsets
the prefix will automatically be dialled out at the beginning of any phone number
starting with 0.
t
he display shows
and any prefix
that¡¯s
4
If necessary, use
to clear digits from the
display. Then key in the
prefix and confirm using
1
Press
then
2
Press
then
3
Press
à
à
base
already been set.
V
A
N
TA
G
E
/O
N
–
O
F
F /C
CHARGE
L
i
g
h
t
handset's batteries are
beingcharged.
L
i
gh
t
IN USE
ha
v
e
a
c
o
nne
t
i
o
n
telephone line.
Symphony2200
Symphony2200 — don’t
S
y
m
p
h
o
n
y
2
MENU button
b
ut
t
o
n
Comes on when the
Comes on when you
r
e
k
a
e
pS
-
-
+
+
+
-
Switch the Speakerphone on and off
◗
During a call, you can press to switch the speakerphone on, the
symbol will appear on display.
◗
Press when speakerphone on, the speakerphone will turn off and
the symbol disappear from display.
!
The speakerphone won't work if the batteries are low.
NU MBER1
NU MBER2
ACTIVATION
NO BAR
NO BAR
LOCAL
INTERNAL
PREFI NUM
X
PREFI NUMBER
X
Press to switch speakerphone
on or off.
Press to make all registered handsets
t
o
t
he
H
AN
D
S
E
T
L
O
C
AT
O
R
(
P
A
G
E
)
b
ut
t
o
n
ring, this is usefull if you've forgotten
where you put a handset.
en
o
h
p
Your handset's loudspeaker on.
melody
9
If you have a Broadband line
e
noh
p
elet yr
e
ve ,
dnabdaorb htiw
em
o
h a nI
tsu
j
t
on
,de
t
c
enn
oc
ru
oy taht tn
iop
en
oh
pe
le
t eh
t
ta
eno
eh
t
e
ro
m
deen
u
oy
f
I
.o
t
d
e
t
cenn
oc
s
i
m
e
do
m
bro
a
d
b
a
nd
mi
cro
f
i
l
te
rs,
c
o
n
t
ac
t
you
r
b
r
oadband
supp
l
i
e
r
.
r
e
t
l
i
f
o
r
c
i
m
a
e
v
a
h
t
s
um
If you connect your telephone to a line with
you will need to
insert a microfilter(not included) between the telephone
between
which could cause problems.
a broadband connection,
and the
telephone line, otherwise you may get interference
the telephone and the broadband,
HA
N
D
S
E
T