


PV; Reviewed:
SPOC 2/1/2011
Solution & Interoperability Test Lab Application Notes
©2011 Avaya Inc. All Rights Reserved
13 of 16
11-12-R4-IPO61
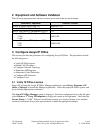
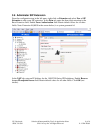
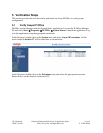
To configure the setting on the phone, press the Services or “Globe” button twice. The phone
will ask for an Admin password. Enter the proper credentials.
Select Server Settings and enter the following:
Domain Name: Enter the domain name configured in Section 3.4. For the sample
configuration, avaya.com was used.
S1: Enter the IP address configured in Section 3.2. For the sample configuration
33.1.1.104 was used.
TCP Port: Enter 5060.
S2: Enter the IP address configured in Section 3.2.
TCP Port: Enter 5060.
Retain default for all other values.
Select Apply.
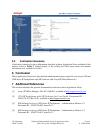
Select Device Settings and enter the following:
EAP Mode: Disable
DHCP: No
Phone IP: Enter the IP address configured in Section 3.6.
Net Mask: Enter the appropriate value. For the sample configuration
255.255.255.0 was used.
Gateway: Enter the appropriate value. For the sample configuration 33.1.1.254
was used.
DNS1 IP: Enter the appropriate value. For the sample configuration 30.1.1.7 was
used.
DNS2 IP: Enter the appropriate value. For the sample configuration 30.1.1.7 was
used.
Provisioning Server URL: Enter the IP address configured in Section 3.2. For
the sample configuration 33.1.1.104 was used.
Protocol: HTTP
Retain default for all other values.
Select Apply.
The telephone will reboot upon selecting Apply. It will automatically upgrade the
firmware version (if needed). After that, the telephone will provide the user with
a login prompt.
Enter the login and password configured in Section 3.7.