


Model C1060 Headset Intercom System Replacement Parts and Service
©3M 2005 November 11
Service Procedures (continued)
Reassembly procedure
1. Replace Mic Boom assembly as described.
(see previous section Mic Boom Assembly
:)
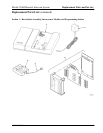
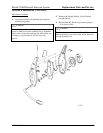
2. Install Main PWA and antenna in Outer Case.
3. Connect Mic Boom cable to bottom connector
on PWA.
4. Connect switch bezel ribbon cable by first
making sure the two locking tabs on the sides
of the ribbon connector are released
(positioned toward the edge of the PWA).
Take care to insert the ribbon cable into the
center of the connector, not underneath the
connector. Make sure the ribbon cable is
inserted straight on, not skewed. To lock,
move both tabs toward the connector with
your finger tips.
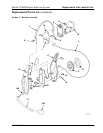
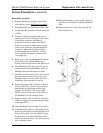
5. Insert power cable and Headband through the
top of Outer Case with Headband curve
arching away from the front of the Outer Case.
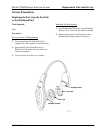
6. Grasp Headband Clip with open wire groove
up and side slot facing Headband. Insert on
Headband and rotate 90 degrees in place.
7. Carefully press the power wires, one on top of
the other, into the open wire groove of the
Headband Clip. Be sure to press the wires
completely down into the wire groove.
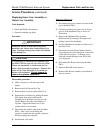
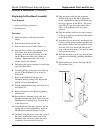
8. Plug in the power cable connector located at
the top of the PWA. Route the power cable
between the On-Off Button and the large
capacitor on the PWA. The power cable
MUST route down the center of the PWA or
the Headband will not extend properly.
9. Plug the speaker cable into the top connector
of the two connectors located near the bottom
of the Main PWA.
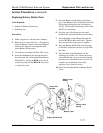
10. Align Headband Clip into Outer Case tracks.
11. Assemble the case halves by inserting the tab
at the top of the Inner Case through the slot at
the top of the Outer Case and carefully lower
the Inner Case over the On-Off Button and
snap it shut at the bottom. Care must be taken
not to pinch any wires.
12. Reinstall the battery, power up and checkout
operation of the headset, including Headband
slide.
13. Replace three case screws, Ear Cup and Ear
Pad on Inner Case.