Install Software
Install Software
Print
Print
Now you’re ready to print. For instructions, use these resources:
• Your User’s Guide
Learn about loading paper, printing, maintaining your printer,
solving problems, and contacting Epson.
• Your on-screen Reference Guide
Double-click the SPR2400 Reference Guide icon
on your desktop to view more information about
your printer.
Epson and Epson Stylus are registered trademarks and Exceed Your Vision is a trademark of Seiko Epson Corporation.
Epson PhotoCenter is a service mark of Epson America, Inc.
General Notice: Other product names are for identification purposes only and may be trademarks of their respective owners.
Epson disclaims any and all rights in those marks.
© 2007 Epson America, Inc. 4/07 CPD-19427R2
Printed in XXXXXX XX.XX-XX XXX
6
6
5
5
6 Click Photo Software.
Click nik Color Efex Pro 2.0 Sample Filters to learn
more about it. When you’re finished, close any open
windows on the screen and click Back twice to return
to the Optional Software menu.
7 Click Color Management Solutions.
Click each title to learn more about it. If you want to
install any options, follow the on-screen instructions.
8 When you’re finished installing software, close any open windows on the screen and click
Back at the Color Management Solutions menu.
9 Click Epson PhotoCenter Link.
Click Add Icon to place a link to the Epson PhotoCenter
SM
website on your desktop, then
click OK.
10 When you’re done installing software, click Exit. The registration screen appears.
11 Follow the on-screen instructions to register your printer.
NOTE: Be sure to restart your computer to enable all of your printer software features.
You’re ready to print! See section 6, “Print.”
Macintosh
®
The software works with Mac OS
®
X 10.2.8 and 10.3.9 through 10.4.x.
1 Connect your printer to your computer with either a USB cable or a FireWire cable.
USB
Connect the square end of your USB cable to the back of your printer and the flat end of
the USB cable to your computer. (You can connect to any open port.)
FireWire
Connect one end of the FireWire cable to the back of your printer and the other end to
your computer.
2 Turn on your Macintosh. Wait for it to start up,
then insert the Epson CD-ROM into your drive.
3 Double-click the CD-ROM icon, if necessary,
then double-click
EPSON.
4 Read the license agreement that appears
and click AGREE.
5 Click Printer Driver and follow the on-screen
instructions.
6 Click Photo Software.
Click nik Color Efex Pro 2.0 Sample Filters to learn
more about it
When you’re finished, close any open windows
on the screen and click Back twice to return
to the Install Menu.
7 Click Color Management Solutions.
Click each title to learn more about it. If you want to install any options, follow the
on-screen instructions.
8 When you’re finished installing software, close any open windows on the screen and
click Back at the Color Management Solutions menu.
9 Click Epson Reference Guide to install the guide.
10 Click Epson PhotoCenter Link.
Click Add Icon to place a link to the Epson PhotoCenter website on your desktop, then
click OK.
11 When you’re done installing software, click Exit. The registration screen appears.
12 Follow the on-screen instructions to register your printer.
Go to the next section to finish setting up your printer.
Finishing Printer Setup
1 Open the Applications folder, then open the Utilities folder and double-click Printer Setup
Utility (OS X 10.4 or 10.3) or Print Center (OS X 10.2).
2 Click the Add button.
3 In Mac OS X 10.4, select Stylus Photo R2400. (If it doesn’t appear, click More Printers,
select EPSON USB or EPSON FireWire, choose Stylus Photo R2400, and click Add).
In Mac OS X 10.2 and 10.3, select EPSON USB at the top and Stylus Photo R2400 below.
NOTE: If the Stylus Photo R2400 doesn’t appear, make sure it is turned on and
securely connected to your Macintosh.
4 Click Add.
5 Quit the Printer Setup Utility or Print Center.
You’re ready to print! See section 6, “Print.”
Windows
®
The software works with Windows 2000, XP, XP Professional x64 Edition, and Windows Vista.™
Make sure your printer is NOT connected to your computer, then follow the steps below.
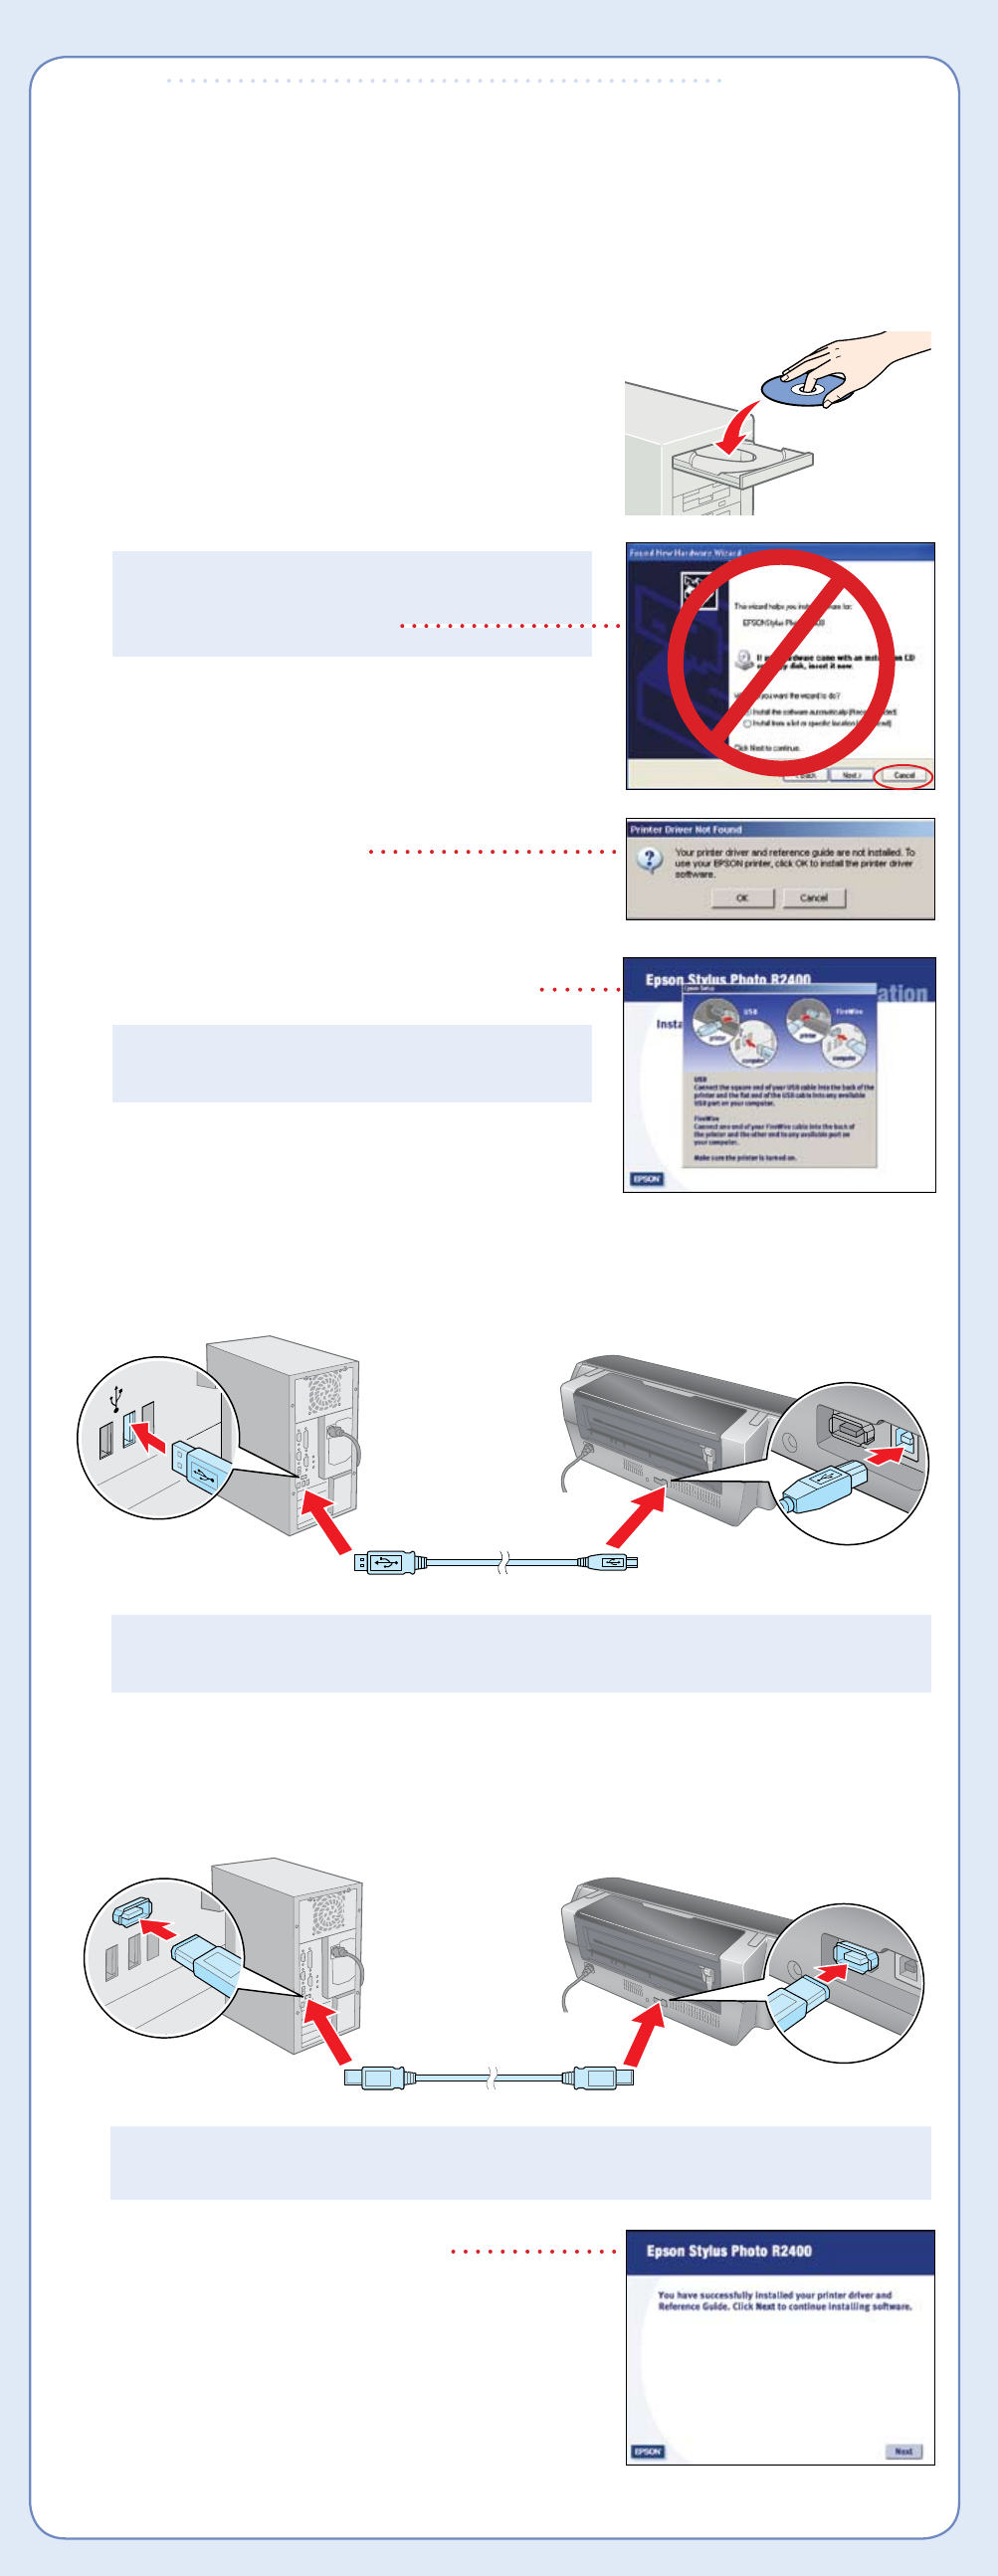
1 Turn on your computer. Wait for the system to start up,
then insert the Epson
®
CD-ROM in your drive.
With Windows Vista, if you see the AutoPlay window,
click Run Epsetup.exe. When you see the User
Account Control screen, click Continue.
NOTE: If you see a screen like this, click Cancel
and disconnect the printer from your computer.
Then follow the steps below.
2 Read the license agreement that appears and click
AGREE.
3 You see a message like this.
Click OK to begin installing your printer driver.
4 When you see this screen, follow the steps below to
connect either a USB cable or a FireWire cable.
NOTE: Windows Vista supports only a USB
connection.
USB
Connect the square end of your USB cable to the back of your printer and the flat end of
the USB cable to your computer. (You can connect to any open port.)
NOTE: For Windows XP, if you don’t have USB 2.0, you see a message. Click the
Close button to close the message.
FireWire
Connect one end of the FireWire cable to the back of your printer and the other end to
your computer.
NOTE: If your computer uses i.Link or another 4-pin FireWire connection, you will
need to connect a 6-pin to 4-pin FireWire (IEEE 1394) cable.
5 When you see this screen, click Next.
Mac OS X 10.4
Mac OS X 10.2 and 10.3


