


Macintosh OS 8.5.1 to 9.x
If you’re using Macintosh
®
OS X, see “Installing
Your Printer Software” in the Printer Basics book
for installation instructions.
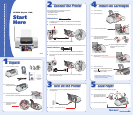
1 Turn on your Macintosh. (Make sure your
printer is still on.)
2 Put the EPSON CD-ROM in your CD-ROM
or DVD drive.
3 Select EPSON on your desktop, if necessary.
4 Select EPSON in the window that opens.
5 Read and agree to the license agreement
to continue the installation.
6 Click Install Printer Driver and follow the
on-screen instructions to install the driver and
restart your Macintosh.
7 After your Macintosh restarts, register your printer
with EPSON as instructed.
8 Open the Chooser in the Apple
®
menu.
9 Select C62 Series.
10 Select your USB port.
11 Turn on background printing.
12 Close the Chooser.
13 Select EPSON in the window on your desktop again.
You see the Main Menu.
14 Click Install EPSON Software Film Factory to
install it on your system. Follow the on-screen
instructions, then return to the Main Menu.
15 Click Install Printer Movies and Manual
to install the EPSON Printer Information Center
on your desktop. It includes helpful printer
animations and an additional manual.
16 Click Share Photos Online to add a link to the
EPSON PhotoCenter on your desktop.
17 When you’re finished, click Exit. Remove the CD-ROM
and keep it in case you need to reinstall any software later.
You’re ready to print! See the details in section 7.
Install Software
Install Software
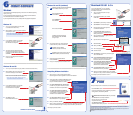
Windows
The installation works differently depending on the version of the Windows operating
system you’re using.
If you’re using Windows 2000 or Windows 95, see “Installing Your Printer Software”
in the Printer Basics book for installation instructions.
If you’re using Windows XP, Me, or 98, carefully follow the appropriate steps below.
Windows XP
1 Turn on your computer. (Make sure your printer
is connected and turned on first.)
2 Wait for Windows to detect your printer connection
and display this screen:
Note: If this screen doesn’t appear, make sure
your printer is turned on and connected.
3 Put the EPSON
®
CD-ROM in your CD-ROM
or DVD drive and wait a few seconds for
the CD-ROM to be recognized.
4 Your printer software installs automatically
and various messages appear on the screen.
At the final Found New Hardware Wizard screen,
click Finish.
5 Now go to “Completing Windows Installation”
in the next column.
Windows Me and 98
1 Turn on your computer. (Make sure your printer is connected and turned on first.)
2 Wait for Windows Me or 98 to detect your printer
connection and display a screen like this:
DON’T CLICK ANY BUTTONS ON THE SCREEN YET.
Note: If this screen doesn’t appear, make sure
your printer is turned on and connected.
3 Put the EPSON CD-ROM in your CD-ROM
or DVD drive and wait a few seconds
for the CD-ROM to be recognized.
4 Click Next on the Add
New Hardware Wizard screen.
Windows Me and 98 (continued)
5 Installation proceeds automatically. Click Finish
when installation halts, then go to step 6.
Click the Search for option,
then click Next.
Click CD-ROM drive,
then click Next.
At this screen, click Next.
Installation proceeds automatically.
When installation halts, click Finish
and go to step 6.
6 Your computer detects your printer connection
a second time and you see a screen like this:
Click Next, then click Finish.
Installation proceeds automatically.
Click Next at the next four screens, then click
Finish. Installation proceeds automatically.
7 At the final Add New Hardware Wizard
screen, click Finish.
8 Now go to “Completing Windows Installation” below.
Completing Windows Installation
1 After a moment, you see a license agreement screen.
Read and agree to the license agreement to continue the installation.
2 At the Options Menu, click Print a Test Page to check
your installation. (If the page doesn’t print correctly,
see your Printer Basics book for a solution.)
3 Click Install EPSON Software
TM
Film Factory
TM
to install it on your system. Follow the on-screen
instructions, then return to the Options Menu.
4 Click Install Printer Movies and Manual
to install the EPSON Printer Information Center
on your desktop. It includes helpful printer
animations and an additional manual.
5 Click Share Photos Online to add a link to the
EPSON PhotoCenter
SM
on your desktop.
6 When you’re finished, click Exit.
7 When you see the registration screen, register your printer with EPSON as instructed.
Remove the CD-ROM and keep it in case you need to reinstall any software later.
You’re ready to print! See section 7.
98
Me
98
Me
Print
Print
Now you’re ready to print. For instructions, use these resources:
• Your Printer Basics book
Learn about loading paper, printing, maintaining your printer,
solving problems, and contacting EPSON.
• EPSON Printer Information Center on your desktop
Click Print Show to view helpful animations
that show you how to load paper, print,
and perform other tasks.
Click Reference Guide to view
detailed information about your printer.
EPSON and EPSON Stylus are registered trademarks of SEIKO EPSON CORPORATION. EPSON Software is a trademark
and EPSON PhotoCenter is a service mark of Epson America, Inc.
General Notice: Other product names are for identification purposes only and may be trademarks of their respective owners.
EPSON disclaims any and all rights in those marks.
Printed on recycled paper. Copyright © 2002 by Epson America, Inc. 7/02
Printed in XXX
Continued in second column
7
7
6
6