


GMR3040-2CK
GMR3040-3CK
*Range may vary depending on environmental and/or
topographical conditions.
• 15GMRS/7FRSChannels
• 7WeatherChannels
• 121SubCodes
(CTCSSToneandDCS
Code)
• Upto30MileRange*
• InternalVOXCircuitry
• 10SelectableCallTone
Alerts
• BacklitLCDDisplay
• HeadsetJack
• RogerBeep
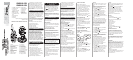
1 Antenna
2 PTT(Push-To-Talk)Button
3 Call/LockButton
4 Menu/PowerKey
5 ChannelUp/DownKey
6 Weather/MonitorKey
7 Speaker
8 HeadsetJack/DC9V
9 VolumeUp/DownKey
10 Microphone
11 BatteryLevelMeter
12 ReceiveIndicator
13 CallIndicator
14 ScanIndicator
15 ChannelIndicator
16 HiPowerIndicator
17 LowPowerIndicator
18 TransmitIndicator
19 VolumeSettingIndicator
20 KeypadLockIndicator
21 VOXIndicator
22 WeatherIndicator
23 SubCodeIndicator
24 ChargingContacts
CongratulationsonyourpurchaseofaUniden
GMRS(GeneralMobileRadioService)radio.
Theselightweight,palm-sized,radiosarestate-of-
the-artdevices.BothGMR3040-2CKand-3CK
havemanytopfeatures.Usethematsporting
events,tocontactfamilyandfriends,whilehiking,
skiing,oroutdoors,orinaneighborhoodwatchfor
vitalcommunication.
PACKAGE CONTENTS
Yourpackagecontainstworadios*,tworechargeable
NiMHbatterypacks*,oneACadapter,onecharging
cradle,twobeltclips*,andthisreferenceguide.
A
NiMHbatterypackor3optionalAAAalkaline
batteriespowerseachunit.
* GMR3040-2CK ; three
with the GMR3040-3CK.
Toorderthefollowingoptionalaccessories,visitour
websiteatwww.uniden.comorcall1-800-554-3988
duringregularbusinesshours.
•NiMHBatteryPack-#BT-1028orBP-1028
•ChargingCradle-#RC-1287
•Headset-#ZA-133and#ZA-160
•ACAdapter-#AD-1001
•DCAdapter-#DC-1002
•CarabinerClip#TSTD0720002
GMRS LICENSE
INSTALL THE BATTERY
EachradiousesasuppliedNiMHbatterypackor
3AAAalkalinebatteries(notincluded).
ToinstalltheNiMHbatterypack:
1)MakesureyourradioisOFF.
2)Pressthetabatthebottomofthebattery
compartmentdoortoremovethecover.
3)InstalltheNiMHbatterypackintothebattery
compartment.Becertaintofollowthe
instructionswrittenonthelabelonthebattery
pack.Installingthebatterypackincorrectlywill
preventtheunitfromoperating.
4)Replacethebatterycompartmentdoor.
USING THE RADIO
• BatteryCharger
• BatteryLevelMeter
• ChannelMonitor
• ChannelScan
• KeypadLock
• DC9VJack
• NOAAEmergency/
WeatherChannels
BATTERY LEVEL AND LOW
BATTERY ALERT
Thisunithasabatterylevelmeteronthedisplayto
indicatethestatusofthebatteries.Whenthe
batteryintheunitislow,thebatterylevelmeter
icon flashes.RechargetheNiMHbattery
packimmediatelyorifyouareusingalkaline
batteries,youmustreplacethealkalinebatteriesin
ordertocontinueusingtheradio.
Toavoidtheriskofpersonalinjuryor
propertydamagefromfireorelectricalshock,only
usetheUnidenaccessoriesspecificallydesignated
forthisproduct.
GMR3040-2CK AND GMR3040-3CK RADIO
CHARGING THE RADIO
IfyouusetherechargeableNiMHbatterypack,two
radioscanbechargeddirectlyorbyusingthe
suppliedchargingcradle.
1)ConnecttheoptionalDCadapter(#DC-1002)to
DC9Vjackoftheradioandtoacigarettelighter
port.
2)Chargethebatterypackfor16hoursuntilthe
batteryindicatorstopsflashing.
1)ConnecttheACadapter(#AD-0001)toDC9V
jackandtoastandard120VACwalloutlet.
2)Setthechargingcradleonthedeskortabletop,
andplacetheradiointhechargingcradlewith
thekeypadfacingforward.
3)MakesurethattheLEDilluminates.Chargethe
batterypackfor16hoursandremovetheradio
fromthechargingcradleaftercharging.
• For charging batteries directly without the cradle,
use only the #DC-1002 Cigarette Lighter Adapter
cord, available from www.Uniden.com. Other
power cords could damage your radio.
• DC 9V jack of the radio is for charging only.
Be sure to install the battery before charging.
• Use only the supplied battery and AC adapter or
approved accessories from Uniden.
• Charge time may vary depending on the battery
life remaining.
• Do not recharge alkaline batteries. Doing so can
create a safety hazard or damage the radio.
• For fastest charging, turn off the radio before
charging.
• The battery must be installed for the unit to
operate, even if the unit is also connected to
external power.
Inordertogetthemostoutofyournewradio,read
thisreferenceguidecompletelybeforeattemptingto
operatetheunit.
1)PressandholdMENU/
toturntheradioON,
andincreasethespeakervolumebypressing
VOL▲ .Todecreasethevolume,press
VOL ▼.
2)PressandholdMENU/
againtoturntheradio
OFF.
Yourradioemitsabeepeachtimeoneofthekeys
(exceptforthePTTandCALL/LOCK)ispressed.
ToturnthissoundOFF,pressandholdCALL/
LOCKwhileturningONtheradio.Repeatthisstep
toturnthesoundON.
Yourradiohas22channelsand121Subcodesyou
canusetotalktoothers.Inordertospeakto
someone,eachofyoumustbesettothesame
channelandSubcode.
Tochooseachannel:
Withtheradioin"Normal"operatingmode,pressthe
CH▲/CH ▼keytoincreaseordecreasethe
channelnumberdisplayed.
Channels 1-7 have a typical range of up to 30
miles. Channels 8-14 have a typical range of up to
5 miles. Channels 15-22 have a typical range of up
to 30 miles. You can see which GMRS or FRS
channel is active by the icon. The icon is
displayed while scanning GMRS channels, and the
icon is displayed while scanning FRS channels.
Totalktoothersusingtheradio:
1)PressandholdthePTTbuttonandspeakin
aclear,normalvoiceabout2-3inchesaway
fromthemicrophone.Whileyouare
transmitting,the
iconappearsonthe
display.Toavoidcuttingoffthefirstpartof
yourtransmission,pauseslightlyafter
pressingthePTTbuttonbeforeyoustart
talking.
2)Whenyouhavefinishedspeaking,release
thePTTbutton.Youcannowreceive
incomingcalls.Whilereceiving,
displays.
Yourradioallowsyoutolistenforweaksignals
onthecurrentchannelatthepressofakey.
ToturnONMonitormode:
• PressandholdWX/MONfor2secondsuntil
twobeepssound.Thereceivercircuitstays
open,andbothnoiseandweaksignalscan
beheard.
ToturnOFFMonitormode:
• PressandholdWX/MONfor2secondsto
returnto"Normal"mode;the
iconstops
blinkinganddisappears.
UseMENU/
toaccessyourradio'sadvanced
functions.
Normal
Normal
VOX Level
Call Tone
1-10
OFF, 1-5
Sub Code
Scan
OFF, 1-121
ON/OFF
1)PressMENU/ toenterthemenus.
2)AdditionalpressesofMENU/
advanceyou
throughthemenusuntilexitingto"Normal"
operatingmode.
3)OthermethodsofexitingtheMenufunction
are:
a.PressandholdMENU/
again.
b.PressanykeyexceptCH▲/CH▼orVOL
▲/VOL▼andwait10secondsuntilthe
unitreturnsto“Normal”mode.
Call Tone
Yourradioisequippedwith10selectablecalltones
thataretransmittedwhenCALL/LOCKispressed.
Toselectacalltone:
1)PressMENU/
repeatedlyuntilthe
CALL
icon
and
Call Tone
starttoblinkonthedisplay
.
2)PressCH▲/CH▼tomovethroughthe
availablecalltones.Eachtonewillbeheard
throughthespeakerbutwillnotbetransmitted.
Cyclethroughthesetonesandstayonthetone
youwanttoselect.
3)ExitCallTonetosettheselectedtone.
Tolockthekeypad:
1)PressandholdCALL/LOCK;
displays.
ThesefunctionsarenotaffectedbyKeyLock:
• Volumeadjust
• Calltonetransmission
• Entermonitormode
• PTTtransmission
• Poweroff
Tounlockthekeypad:
1)PressandholdCALL/LOCKagain;
disappears.
Yourradiohasacircuitdesignedtodramatically
extendthelifeofthebatteries.Ifthereis
no
transmissionoranincomingcallwithin3seconds,
yourradioswitchestoPowerSavemode.Theradio
isstillabletoreceivetransmissionsinthismode.
TheLCDBacklightautomaticallyturnsONwhenany
key(exceptthePTTbutton)ispressed.TheLCD
displayilluminatesfor10secondsbeforeturning
OFF.
RogerBeepisaBEEPthatissenttonotifytheendof
transmission(bothPTTandVOXtransmission).
RogerBeepcanbeheardthroughthespeakerwhen
bothRogerBeepandKeyBeeparesettoON.When
RogerBeepissettoONandKeyBeepissettoOFF,
RogerBeepwillnotbeheardfromthespeakerbutit
willbetransmittedtoyourparty.WhenRogerBeepis
settoOFF,RogerBeepwillneitherbeheardnor
transmitted.
TochangeRogerBeepsetting:
PressandholdVOL▲whileturningtheradioonand
off.IfRogerBeepisON,itwillbeturnedoff;ifitis
OFF,itwillbeturnedon.
• If battery power is low, you cannot operate the
radio even using external power. Allow the
batteries to charge before using. If you try to
transmit while power is low, the radio will
automatically turn off.
Sub Code
Eachofthechannels1-22mayhaveanyoneof
thecodes,OFF,or1-121selected.Code
(OFF)
indicatesnoSubcodeselectedandyourradio
canreceiveasignalregardlessofthecode
settingsofthetransmittingradio.
1)PressMENU/
toenterMenumode.The
subcodeindicatorflashes.
2)PressCH▲/CH▼keytoincreaseor
decreasethecodenumberdisplayed.You
canalsoselect(OFF)atthisstage.
3)PressMENU/
toexitMenumode.
4)PressanykeyotherthanCH▲/CH▼or
VOL▲/VOL▼andtheradioreturnstoIdle
modein10seconds.
Scan
Yourradiohasachannelscanfeaturethat
allowsyoutoeasilyscanall22channels.When
anactivechannelisdetected,theradiopauses
onthatchanneluntilthechannelisclear.Then,
aftera2seconddelay,theradiocontinues
scanning.PressingthePTTbuttonwhilethe
scanispausedonachannelallowsyouto
transmitonthatchannel.
ToturnONchannelscan:
1)PressMENU/
repeatedlyuntilthe
iconandblink.
2. PressCH▲/CH▼ toselectScanmode
andpressMENU/
tostartit.
ToturnOFFchannelscan:
1)PressMENU/
whenthescansettingis.
2)PressanykeyotherthanCH▲/CH▼or
VOL▲/VOL▼toturnchannelscanoffin
10seconds.
Voice Operated Transmission
Yourradioisequippedwithauserselectable
VoiceOperatedTransmitter(VOX)thatcanbe
usedforautomaticvoicetransmissions.The
VOXfeatureisdesignedtobeusedwithor
withoutaheadsetwithamicrophone.
Transmissionisinitiatedbyspeakingintothe
microphoneinsteadofpressingPTT.
ToselectVOXlevel:
1)PressMENU/
repeatedlyuntiltheicon
andtheVOXsensitivitylevel
(
OFF
,
1-5
)blink
.
2)PressCH▲/CH▼tochangetheVOX
sensitivitylevels.Uselevel1forincreased
sensitivitytovoiceinnormallyquiet
environments
,anduseahigherlevelto
reduceundesiredactivationinverynoisy
environments.
USING A HEADSET
Youcanuseaheadset(#ZA-133or#ZA-160)for
moreprivatecommunications.Touseaheadset,
lifttherubbercoverfromovertheheadsetjack,
thenplugintheheadset.
Your radio is not weather resistant
when using a headset jack. When you remove the
headset, be sure to fully press the jack cover into
place to restore its weather resistant capability.
U01UT063HZA(0)
English
CHARGE