


Please read this user’s guide before
installing, setting up and using your new product
www.radioshack.com
Thank you for purchasing your 20-Number Memory
Speakerphone from RadioShack. It combines a
speakerphone and a Caller ID unit in one system. It
shows the caller’s telephone number (and name, if
available in your area), and the date and time of each
call, as provided by your local telephone company to
Caller ID service subscribers.
20-Number Memory Speakerphone Stand
Long Modular Cord Short Modular Cord
Coiled Handset Cord Mounting Bracket
3 Index Cards User’s Guide
what’s included
43-3911
20-Number Memory
Speakerphone
After you install your batteries, system information
appears in the display, followed by E for English, F for
French and S for Spanish.
1. Repeatedly press REVIEW or to select the
desired display language and press DELETE to
store it. If you do not select a language within a few
seconds, the system defaults to English.
2. When LCD CONTRAST appears in the display, repeat
step 1 to select one of the six settings.
3. When 000 SET AREA CODE displays and the 0
ashes, repeatedly press REVIEW or until the
rst digit of your area code appears. Press DELETE
to store it. Repeat for each digit of your area code.
NOTE: If you do not press a button, the system automatically
sets the area code to 000.
4. Press REVIEW or to set the hour, and press
DELETE to store it.
NOTE: If you do not press a key, the system automatically
sets the time to 12:00 PM 1/01.
5. Repeat Step 4 to store the minute, month and date.
To reset the language, contrast, area code and
time/date settings:
1. Hold down DELETE and press . LCD CONTRAST
displays.
2. Repeat Step 1 above to reset each setting.
choosing your settings
Your phone’s display is protected by a plastic label
during shipping. Peel off the label before using your
phone.
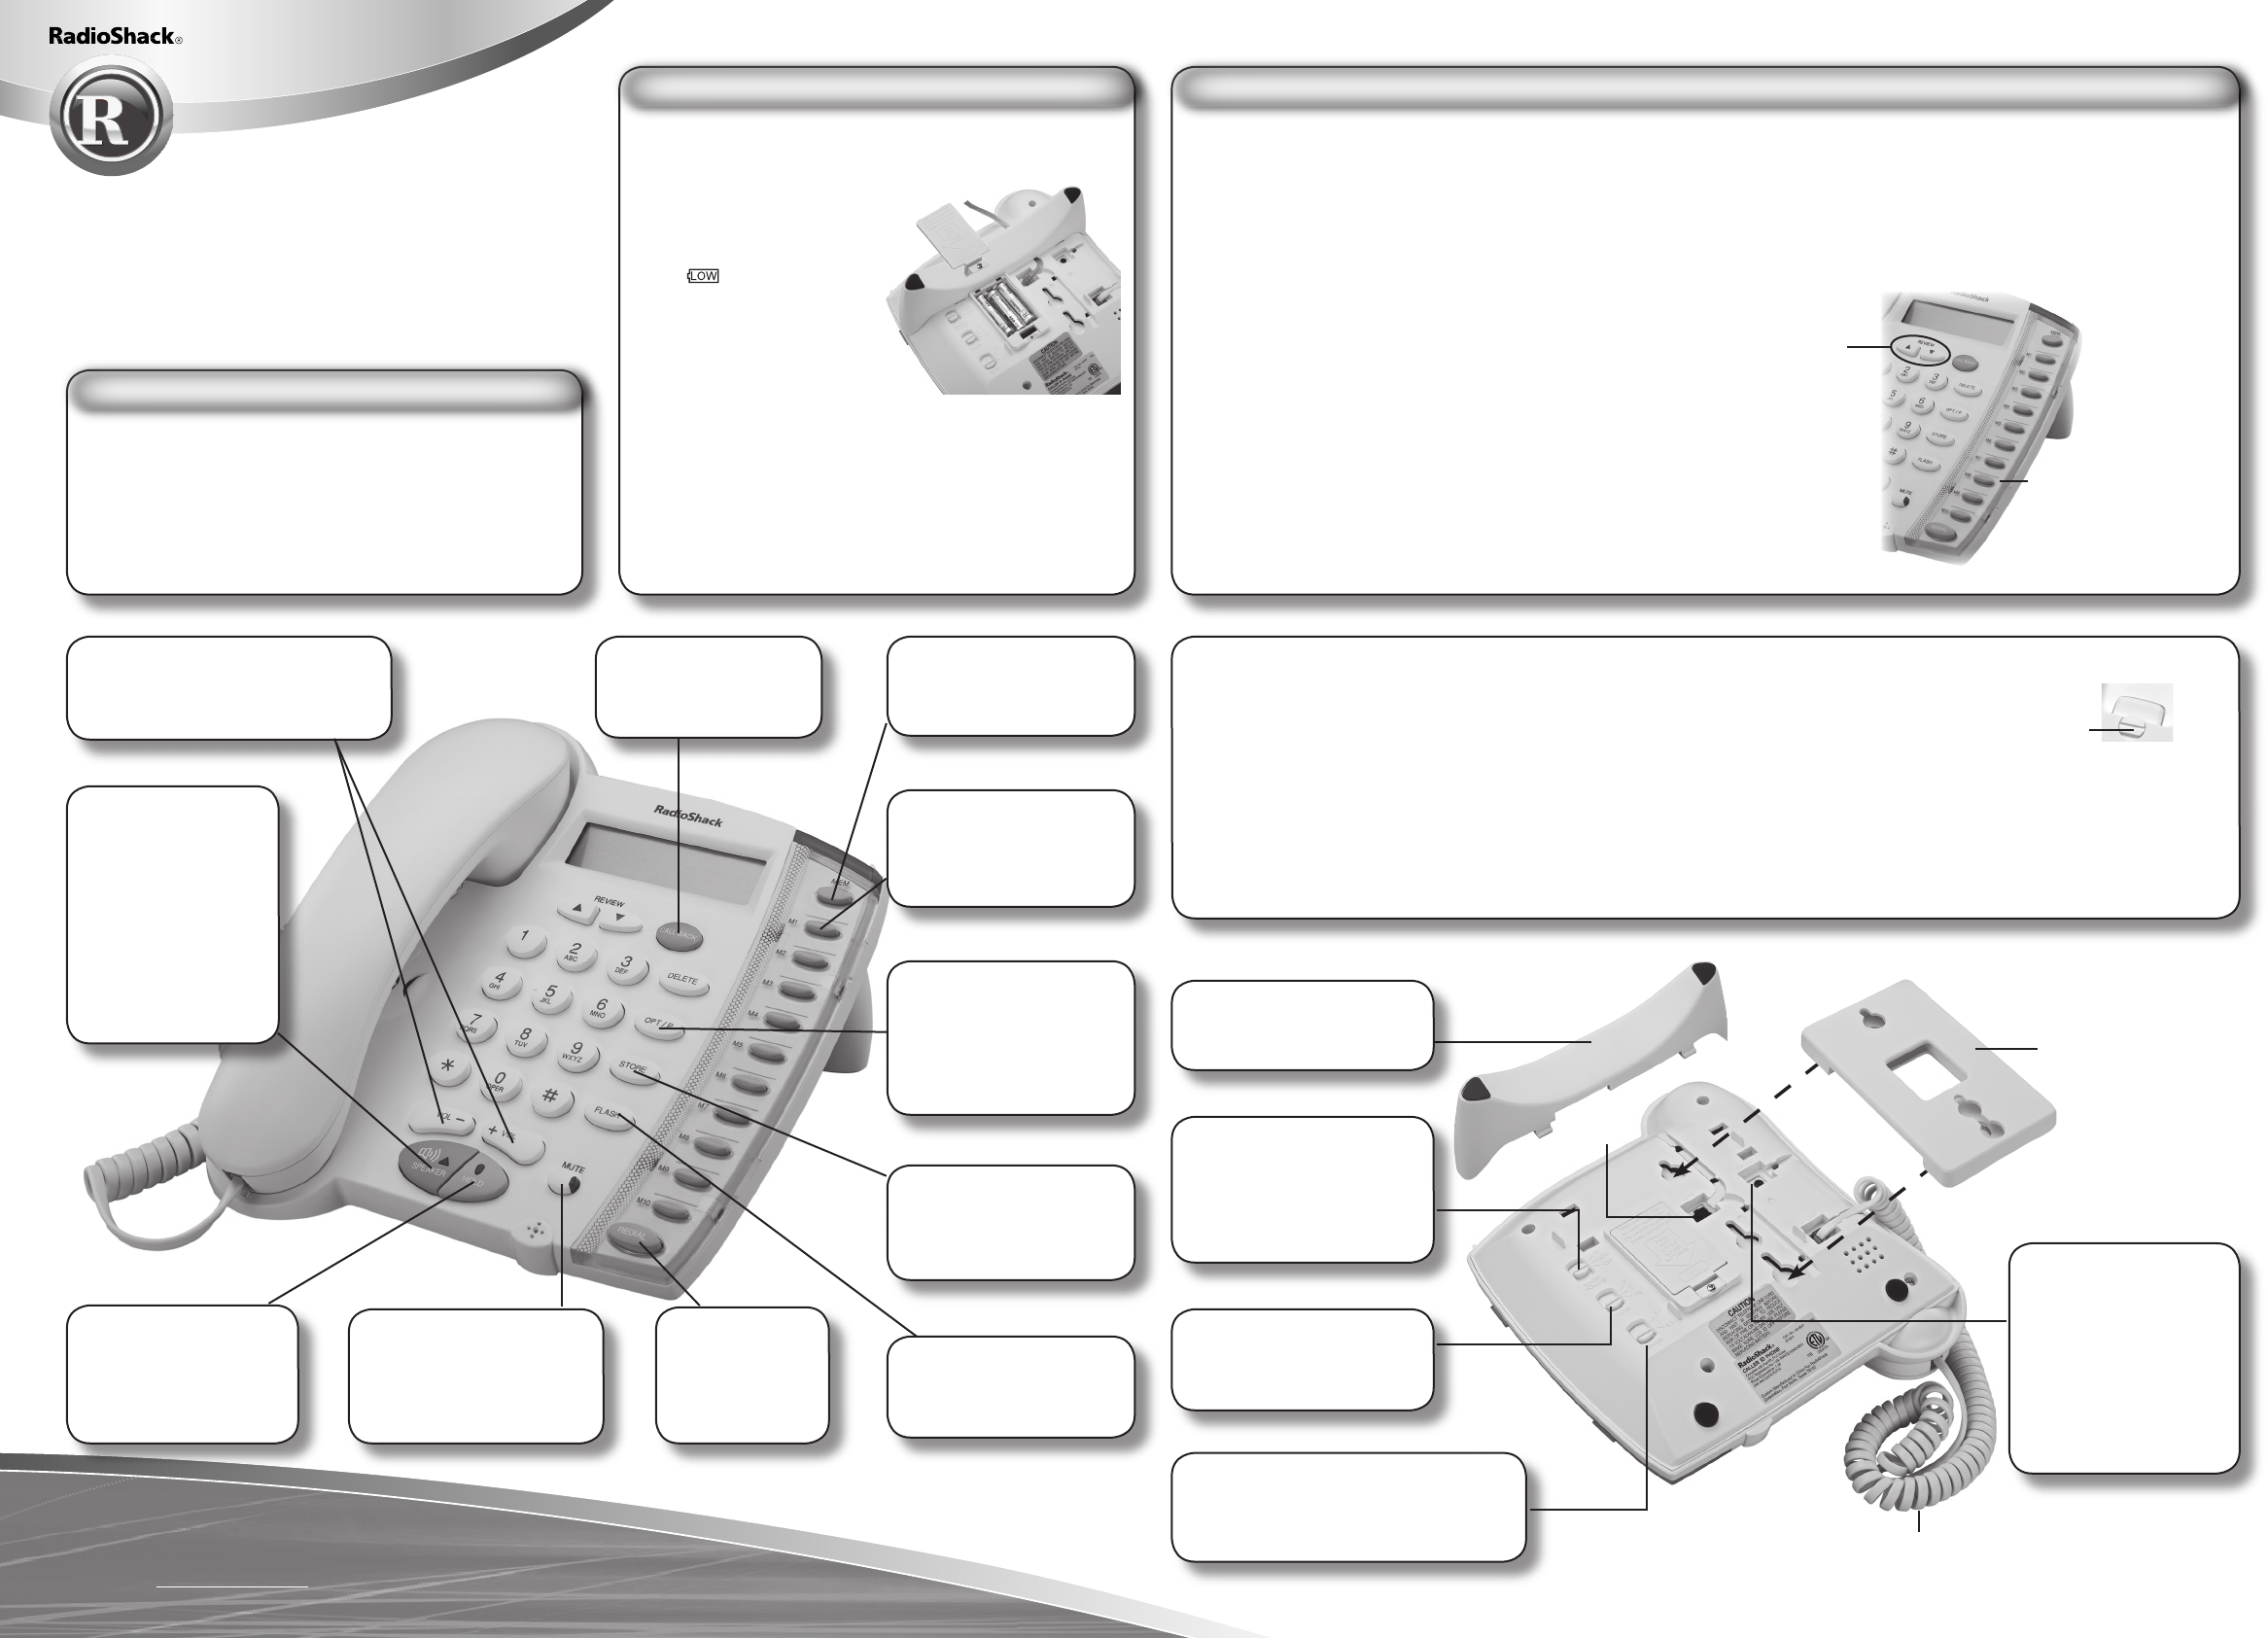
installing batteries
Insert three AAA alkaline
batteries (not supplied).
When appears or the
display becomes dim,
replace the batteries.
battery notes:
• When replacing batteries, be
sure to put in new batteries
within one minute of removing the old ones. If not, your
time and date will be lost.
• Use only fresh batteries of the required size and
recommended type.
• Do not mix batteries of different sizes or chemistries.
• Always remove old or weak batteries. Batteries can leak
chemicals that can damage electronic parts.
preparing your phone
Mounting Bracket
MEM – stores a
number in an indirect
memory location (0-9).
M1-M10 – store 10
numbers and dial them
with the touch of a
button.
CALL BACK – dial
a phone number in
the Caller ID record.
OPT/P (Option/
Pause) – press to
select different dialing
options based on
the number you are
calling.
FLASH – press to
answer another call if
you have Call Waiting.
MUTE – press to keep
the other party from
hearing you. To resume
the conversation,
release MUTE.
STORE – press to
store numbers in
memory locations. See
“Memory Dialing”.
REDIAL
– press to
redial the last
number you
dialed.
HOLD – press to
put a call on hold.
To resume the call,
press the switchhook
or lift the handset.
SPEAKER – press
to switch between
the handset and
speakerphone
for convenient
hands-free use.
When a headset
is conneted, press
SPEAKER to make
or answer calls. To
end a call, press
SPEAKER again.
VOL-/VOL+ – controls the
volume of the sound through
your handset and speakerphone.
mounting and connecting the phone
1. Press and pull out the stand from the base.
2. Connect the handset to your phone using the coiled
handset cord, and then t the cable in the groove as
shown below.
3. Align the mounting bracket’s round tabs with the holes
on the base, then slide the mounting bracket upward to
snap it into place.
4. Connect one end of the short modular cord into LINE,
and the other end to the wall plate jack.
5. Fit the keyhole slots over the wall plate studs. Slide the
phone downward to secure it.
6. Use a coin to turn the handset hook 180°.
• Your telephone connects directly to a modular phone
line jack. If your phone line jack is not a modular jack,
you can update the wiring yourself using adapters and
jacks from your local RadioShack store. Or, call your
telephone company to update the wiring for you.
• The USOC number of the jack to be installed is RJ11C.
RINGER VOLUME HI/
LOW/OFF
Set ringer’s volume to
HI or LOW as desired.
Set to OFF for no sound.
RINGER R1/R2
Set to R1 for a high number of rings
or R2 for a lower number of rings.
MODE T/P/TB
See “setting the dialing
mode”.
HEADSET
For hands-free
conversation when
the phone is placed
on the desk, connect
an optional headset
with a
3
/
32
-inch
(2.5mm) plug into
the HEADSET jack.
Use the stand to place
your phone on a desk.
REVIEW /
Scroll up or down
to set the desired
language, LCD
contrast, area code,
and time/date.
Also lets you scroll
through all numbers
in your Caller ID
memory.
Index Card
Flip open the clear cover
and use the supplied index
card inside to record the
stored numbers.
Handset Hook
Coiled Handset Cord
LINE
43-3911 rscn.indd 1 10/12/2006 11:30:00