


Charge and Fit Headset
Three ways to charge your headset
Your new headset has enough power to pair and make a few calls before
charging is needed, though you may charge at any time.
1 Align snap-fit magnetic areas of headset and charging deivce.
2 Attach charging device to USB wall charger or laptop for 90 minutes. LEDs
turn off once fully charged.
USB cable to PC or USB wall charger
Charge case to PC or USB wall charger
NOTE Your charge case has an internal battery and can fully recharge your headset
twice while on the go before needing connection to a charge cable.
Charge stand to PC or USB wall charger
Fit your headset
Replace the eartip for a better fit.
1 Push in eartip and rotate to the left to unlock it.
2 Align new eartip into slot.
3 Push in eartip and rotate to the right to lock it into place.
To wear the headset on your other ear, rotate the boom upwards then
twist it around so eartip is on other side before lowering boom.
2
1
3
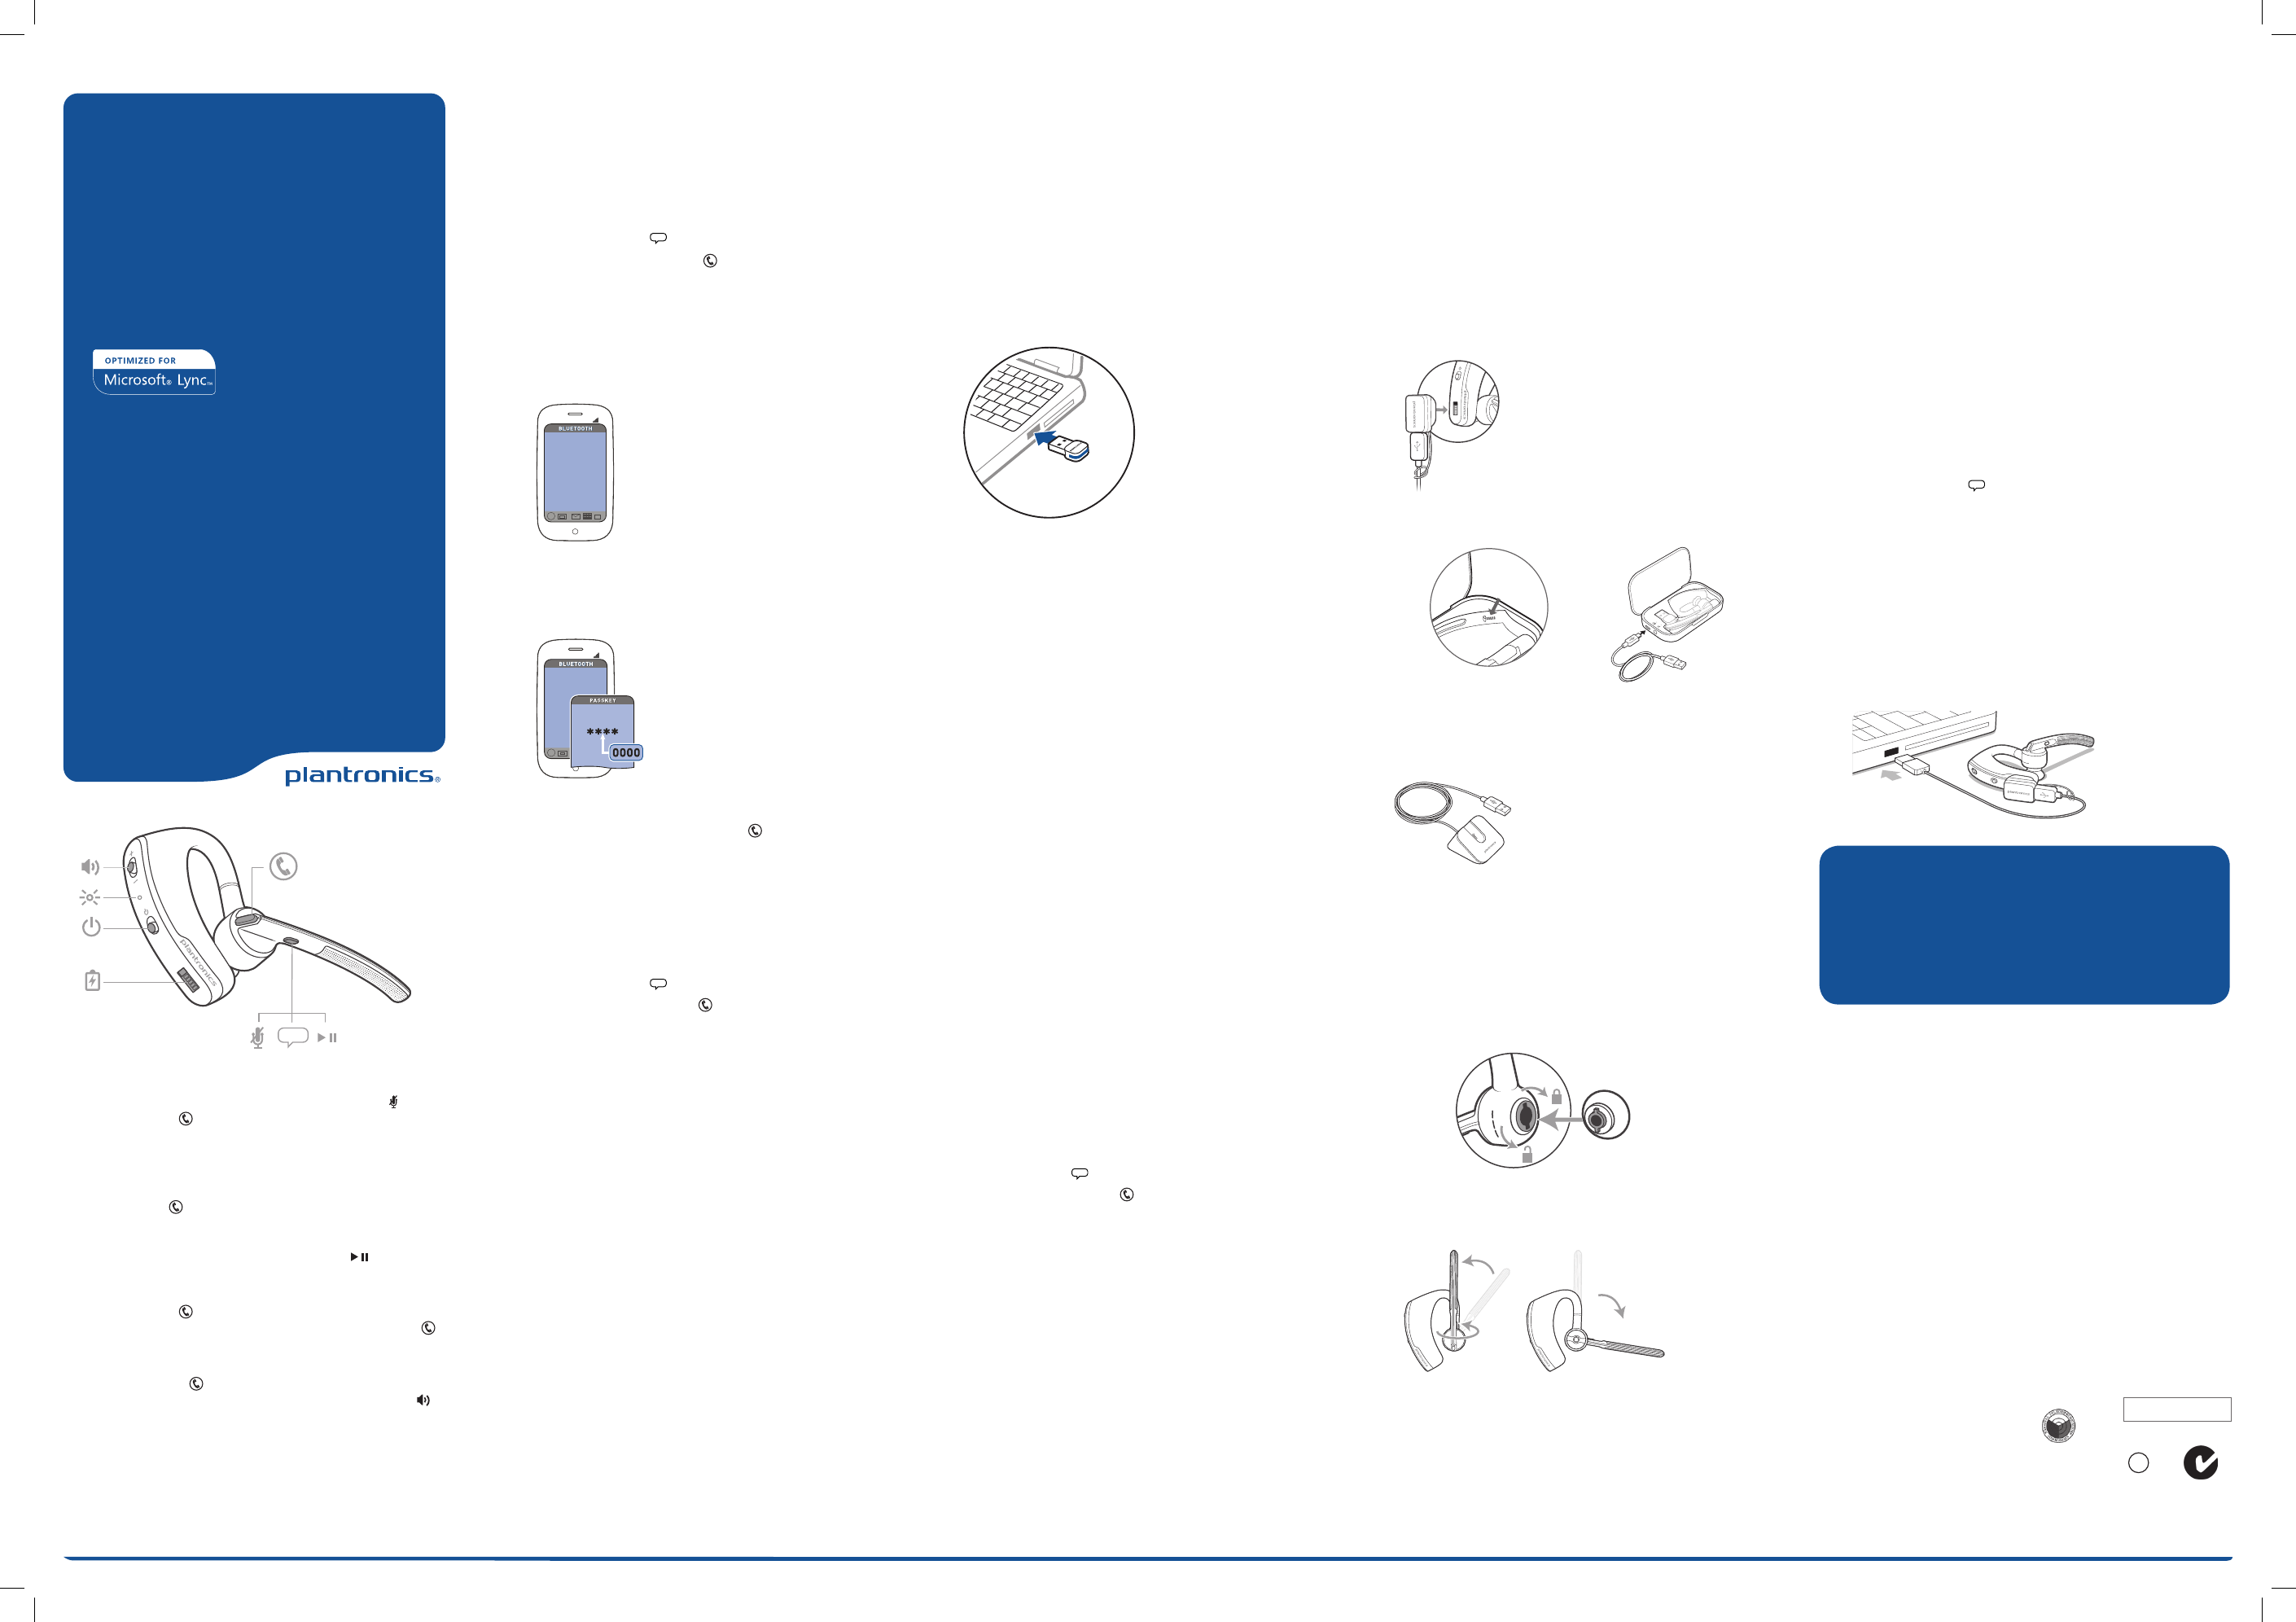
Connect PC and Call
Connect
1 Power headset on.
2 Insert Bluetooth USB adapter directly into your PC USB port. The LED
will flash and then turn solid blue to indicate the headset is connected
to the USB adapter. You will also hear “PC connected”. The LED remains
solid blue when not on an active call.
NOTE Your Bluetooth USB adapter comes pre-paired to your headset.
3 Load Plantronics Spokes software by visiting plantronics.com/software
and click on the download button.
NOTE Spokes software allows you to customize your headset’s behavior
through advanced settings and options.
4 Check your audio settings
Confirm the speaker and microphone settings for your PC softphone are
set to Plantronics BT300.
Windows 7
Go to Control Panel -> Sound-> Playback tab, and set the Plantronics
BT300 device as the Default Communications Device. If you plan to listen
to streaming audio set the Plantronics BT300 device as the Default Audio
Device as well. In the Playback tab, this is indicated by the green check
mark.
Go to Control Panel -> Sound-> Recording tab, and set the Plantronics
BT300 device as the Default Communications Device.
Windows XP
Go to Control Panel -> Sounds and Audio Devices, and in the Audio tab
set the Plantronics BT300 as the default device for Sound Playback and
Sound Recording.
5 Place a call using Microsoft Lync or Microsoft Office Communicator.
During an active call, the Bluetooth USB adapter will flash blue.
To Re-pair your Bluetooth USB adapter
In the event that your headset and Bluetooth USB adapter become
unpaired do the following:
1 Power headset on.
2 Remove the USB adapter.
3 Power on your headset then choose:
• Tap the Voice button and say “Pair mode,” or
• Press and hold the Call button
until you hear “Pairing”.
4 Insert Bluetooth USB adapter directly into your PC USB port. Once
successfully paired, LEDs stop flashing red and blue and you hear “PC
connected”.
Plantronics, Inc.
345 Encinal Street
Santa Cruz, CA 95060
United States
© 2012 Plantronics, Inc. All rights reserved. Plantronics, the logo design, Plantronics Voyager Legend,
QuickPair, are trademarks or registered trademarks of Plantronics, Inc. The Bluetooth® word mark and logos
are owned by the Bluetooth SIG, Inc. and any use of such marks by Plantronics, Inc. is under license. All other
trademarks are the property of their respective owners.
Patents Pending
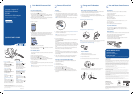
Pair Mobile Phone and Call
Pair your mobile phone
1 Power on your headset then choose:
• Tap the Voice button and say “Pair mode,” or
• Press and hold the Call button
until you hear “Pairing”. While the
headset LEDs are flashing red and blue, activate Bluetooth® on your
phone and set it to search for new devices.
2 While the headset LEDs are flashing red and blue, activate Bluetooth®
on your phone and set it to search for new devices.
3 Select “PLT_Legend”.
PLT_Legend
4 If prompted by your mobile phone for a passcode enter 0000. Once
successfully paired, LEDs stop flashing red and blue and you hear
“pairing successful”. Some phones may prompt you to allow access to
contacts to enable caller name announcement.
PLT_Legend
5 Make a test call from your mobile phone.
6 End the call by pressing the call button . The call does not end when
you remove your headset.
Pair another phone
After pairing your headset to your phone you may want to pair another
or new phone.
1 Power on your headset then choose:
• Tap the Voice button and say “Pair mode,” or
• Press and hold the Call button
until you hear “Pairing”
2 While the headset LEDs are flashing red and blue, activate Bluetooth®
on your phone and set it to search for new devices.
3 Select “PLT_Legend.”
4 Once successfully paired, LEDs stop flashing red and blue and you hear
“pairing successful.”
NOTE Some phones may prompt you to allow access to contacts to enable
caller name announcement.
QUICK START GUIDE
Voyager Legend UC
Bluetooth Headset
BT300
Bluetooth USB Adapter
Designed in Santa Cruz, California
Use and Reset Smart Sensors
™
Use sensors
Smart Sensors react when you put on or take off your headset.
Putting on your headset will:
• Answer an incoming call
• Transfer an active call from your phone (Available only with
your mobile phone)
• Resume streaming audio
Taking off your headset will:
• Transfer an active call to your phone handset (Available only with
your mobile phone)
• Pause streaming audio
• Lock the Call button to prevent accidental calls
Try voice commands
Tap the Voice button wait for command request, then say a
command. For example, “What can I say?” tells you the full list of
available commands.
Reset sensors
You may need to reset the sensors if they are not working as expected.
Wearing the headset, tap the Call button to test sensors:
• Talk time voice alert means sensors are working
• A tone means sensors need to be reset
To reset the sensors, charge your headset and place on a flat non-
metallic surface for more than 10 seconds.
3
Please refer to the separate safety instructions for important product safety
information prior to installation or use.
The B235 Wireless Headset System consists of a BT300 USB Adapter and a Voyager
Legend Bluetooth headset.
87752-01 (11.12)
voice
21
Answer a call, choose:
• Put on the headset to answer
call, or
• Tap the Call button or
• Say “answer” after call is
announced. (Available only with
your mobile phone)
Reject a call, choose:
• Press Call button for
2 seconds, or
• Say “ignore” after call is
announced. (Available only with
your mobile phone)
End a call
Tap the Call button to end
current call.
Voice dial (mobile phone fea-
ture)
Press the Call button for 2
seconds, wait for phone prompt
and then tell the phone to dial
the name of a stored contact.
Mute the microphone
during a call
Tap the Mute button . You will
hear “mute on” confirmation.
An alert repeats every 15 min-
utes as a reminder. Tap
the Mute button again to
open the microphone and hear
“mute off” confirmation.
Play or pause streaming audio
A 2-second press of the Play/
pause button
will either
pause or resume playback of
streaming audio.
Call back last call
Double-tap the Call button .
(Available only with your mobile
phone)
Adjust the volume
Toggle the Volume button up
(+) or down (–) during a call or
while streaming audio.
4
FCC Regulatory Information
Declaration of Conformity
We Plantronics, 345 Encinal Street, Santa Cruz, California, 95060 USA (800) 544-4660, declare under our sole responsibility
that the product BT300 complies with Part 15 of the FCC Rules. Operation is subject to the following two conditions: (1) this
device may not cause harmful interference, and (2) this device must accept any interference received, including interference
that may cause undesired operation.
Note: This equipment has been tested and found to comply with the limits for a Class B digital device, pursuant to part 15
of the FCC Rules. These limits are designed to provide reasonable protection against harmful interference in a residential
installation. This equipment generates, uses and can radiate radio frequency energy and, if not installed and used in
accordance with the instructions, may cause harmful interference to radio communications. However, there is no guarantee
that interference will not occur in a particular installation. If this equipment does cause harmful interference to radio or
television reception, which can be determined by turning the equipment off and on, the user is encouraged to try to correct
the interference by one or more of the following measures:
—Reorient or relocate the receiving antenna.
—Increase the separation between the equipment and receiver.
—Connect the equipment into an outlet on a circuit different from that to which the receiver is connected.
—Consult the dealer or an experienced radio/TV technician for help.
NOTE: Modifications not expressly approved by Plantronics, Inc. could void the user’s authority to operate the equipment.
Industry Canada Regulatory Information
This Class B digital apparatus complies with Canadian ICES-003. Cet appareil numérique de la classe B est conforme à la
norme NMB-003 du Canada.
This device complies with Industry Canada licence-exempt RSS standard(s). Operation is subject to the following two
conditions: (1) this device may not cause interference, and (2) this device must accept any interference, including interference
that may cause undesired operation of the device. Le présent appareil est conforme aux CNR d'Industrie Canada applicables
aux appareils radio exempts de licence. L'exploitation est autorisée aux deux conditions suivantes : (1) l'appareil ne doit pas
produire de brouillage, et (2) l'utilisateur de l'appareil doit accepter tout brouillage radioélectrique subi, même si le brouillage
est susceptible d'en compromettre le fonctionnement.
Exposure to RF Radiation
The internal wireless radio operates within the guidelines found in radio frequency safety standards and recommendations,
which reflect the consensus of the scientific community. Independent studies have shown that the internal wireless radio is
safe for use by consumers. Visit plantronics.com for more information.
This equipment complies with FCC radiation exposure limits set forth for an uncontrolled environment.
This equipment complies with IC radiation exposure limits set forth for an uncontrolled environment. Cet équipement est
conforme aux limites d'exposition de radiation IC énoncés pour un environnement non contrôlé.
Australia
Z302 N10687
Singapore Complies with
IDA Standards DA101760
Philippines
Voyager Legend
ESD - 1206509C
BT300
ESD - 1004955C
BC
NEED MORE HELP?
Technical support
plantronics.com/support
Online user guide
http://docs.plantronics.com/VoyagerLegendUC