


15
GETTING
STARTED
Antenna &
Battery
Installation
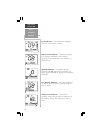
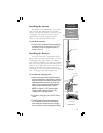
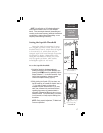
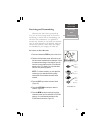
Installing the Antenna
The antenna is an essential part of your VHF
725e and the unit should never be operated
without the antenna installed, as this may result
in damage to the unit. The antenna receives
signals best when held upright and is less
effective when positioned horizontally.
To install the antenna:
1. Carefully align the bottom of the antenna with the
threaded connector on the top of the VHF 725e,
and screw it on until snug against the seating
surface. (Figure 1)
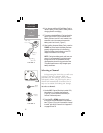
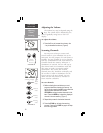
Installing the Batteries
The VHF 725e uses a rechargeable NiCad
Battery Pack to provide approximately 10 hours
of operating time under normal use. Alkaline
“AA” batteries installed in the optional GARMIN
Battery tray may also be used. The battery level
indicator at the lower left corner of the unit LCD
display gives indication of battery capacity in
increments of 25%. The Battery Pack is provided
with a Charging Stand and Charging Unit.
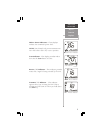
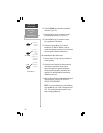
To assemble the Charging Unit:
1. Insert the Charging Unit cord plug with the contact
pins into the base of the Charging Stand. Position the
flange on the plug over the slots in the bottom of the
stand base and then press down until it clicks into
place. Pull the cord away from the stand slightly to
allow the plug to move down freely. (Figure 2)
NOTE: If using the 12 VDC Cigarette Lighter
Charging Cable, install the cord plug in the
charging stand in the same manner.
2. Connect the Charging Unit to a 240 VAC Power
Outlet.
3. The NiCad Battery Pack should be installed in the
VHF 752e when you remove it from the shipping
carton. Place the unit base-down into the Charging
Stand and allow 12 hours for charging to full capacity.
Antenna
FIGURE 1
FIGURE 2
Charging
Stand
Detail of Charging
Stand Base
Bend
Cord
Charging
Unit
Plug
.